Welcome To Housebrands!
Housebrands is a powerful multivendor web platform designed for designers and manufacturers to showcase, customize, and sell their products directly to customers. It creates a seamless ecosystem where customers can sign up under a registered designer, explore customized offerings, and place orders with confidence.
Designers and manufacturers can join Housebrands by purchasing a subscription plan to unlock its full range of advanced features. Housebrands also offers a free trial mode with limited access, allowing new users to explore the platform before committing. Each designer can build and manage their own custom shop aligned with their brand identity and business needs.
Housebrands unifies essential business tools into a single platform, helping vendors manage products, orders, projects, marketing, customers, and finances efficiently—so they can grow faster and operate smarter.
Core Features of Housebrands
- Product Management – Own products, white-label products, bulk import/export, and more
- Order Management – Manage customer orders and track your own orders
- Project Management – Tasks, time & billing tracking, ideaboards, proposals, services, invoices, and documents
- Marketing Tools – Email campaign creation and management
- Notice Management – Publish and manage important announcements
- Expense Tracker – Monitor and control business expenses
- Document Management – Securely organize and store business documents
- Customer Leads – Capture, track, and manage potential customers
- Live Chat – Real-time communication with customers
- Role & Permission Management – User-wise access and control
- Custom Theme Setup – Fully personalize shop design and appearance
- Event Management – Create, manage, and promote events
A detailed, module-wise description of each feature will be provided below to clearly demonstrate how Housebrands empowers designers and manufacturers to scale their businesses efficiently.
Product Management
Users can create and manage their own products, listing them on their website with complete details. The Add Product section requires comprehensive information to ensure clarity and accuracy.
Product Listing
This comprehensive product listing requires you to define Title & Description and showcase visuals using a Thumbnail Image & Video Link. For sales, you must set the Base Price, Discounts, & Taxes, and manage complexity by adding Product Variants & Variant-Based Pricing. Essential organizational details include specifying the Brand, Category & Unit Prices, while promotional materials can be added via Banner Images & Specifications. Finally, shipping logistics depend on accurate Weight & Dimensions. The process concludes with setting crucial policies like Terms & Policies, Shipping Policy, Return Policy, and any necessary Disclaimer to ensure a transparent user experience.
White Label Product Section
This section allows users to view a list of manufacturer products they want to showcase on their website. Users can access detailed information about each shared product, including its status. Additionally, they can track whether their share request has been approved or is still pending.
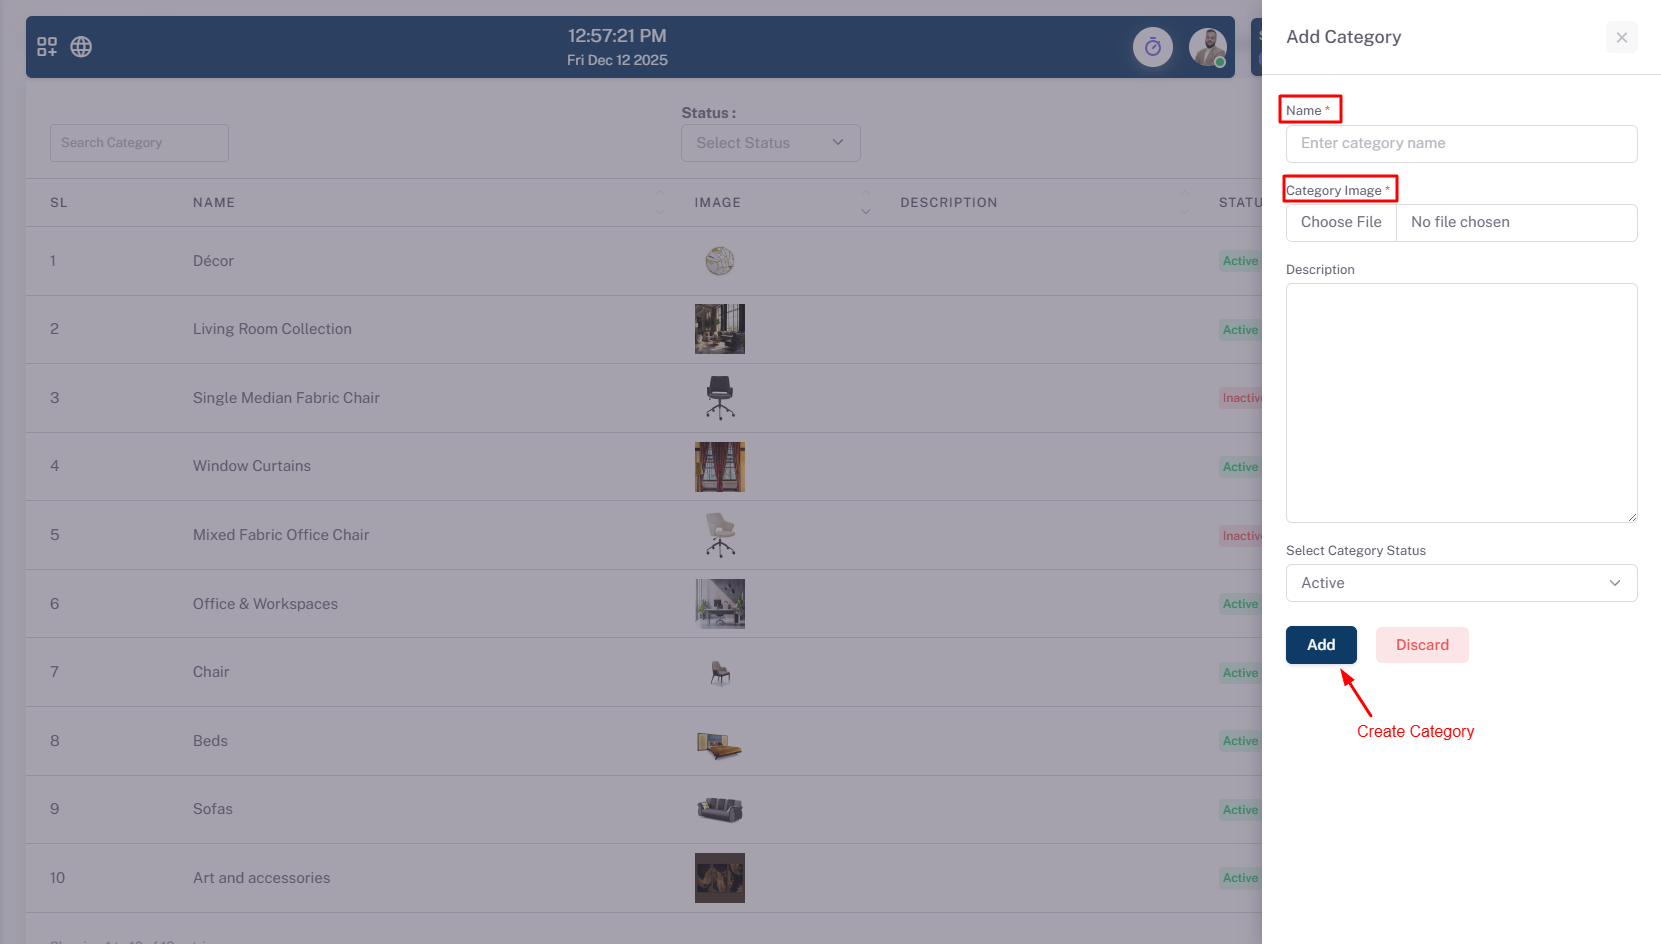
Categories
In this section, users can create categories for their products and can also see the total categories here.
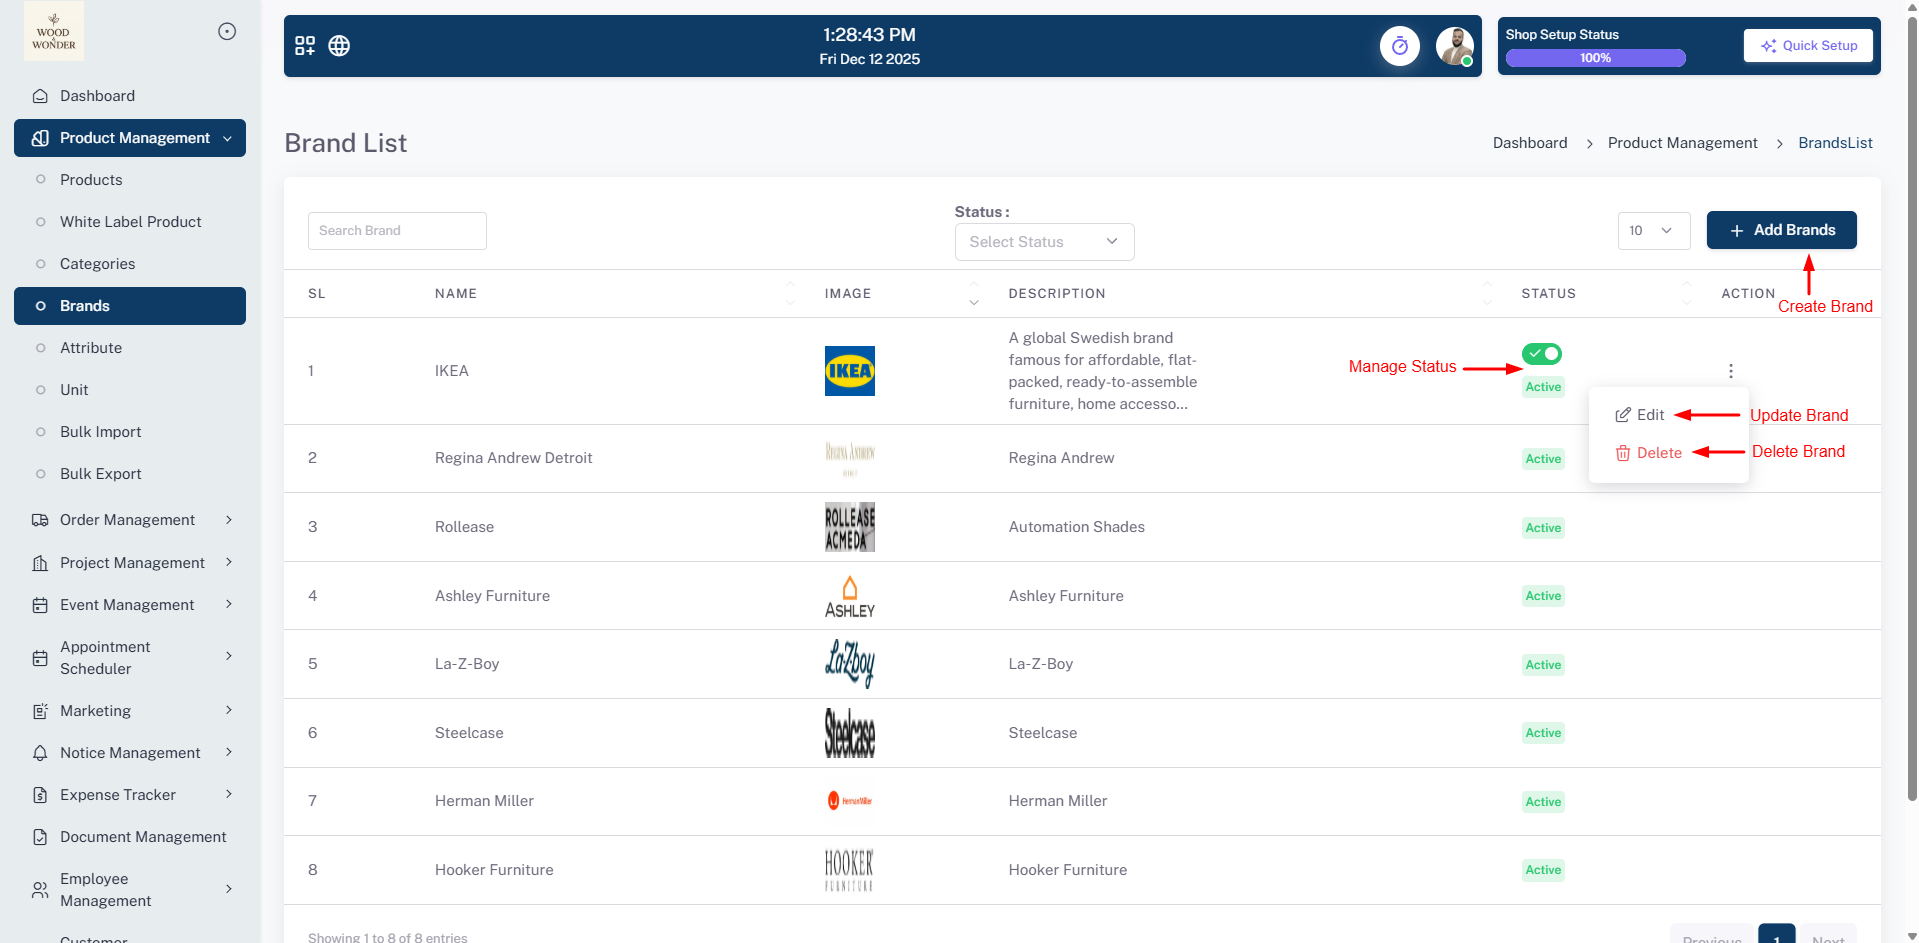
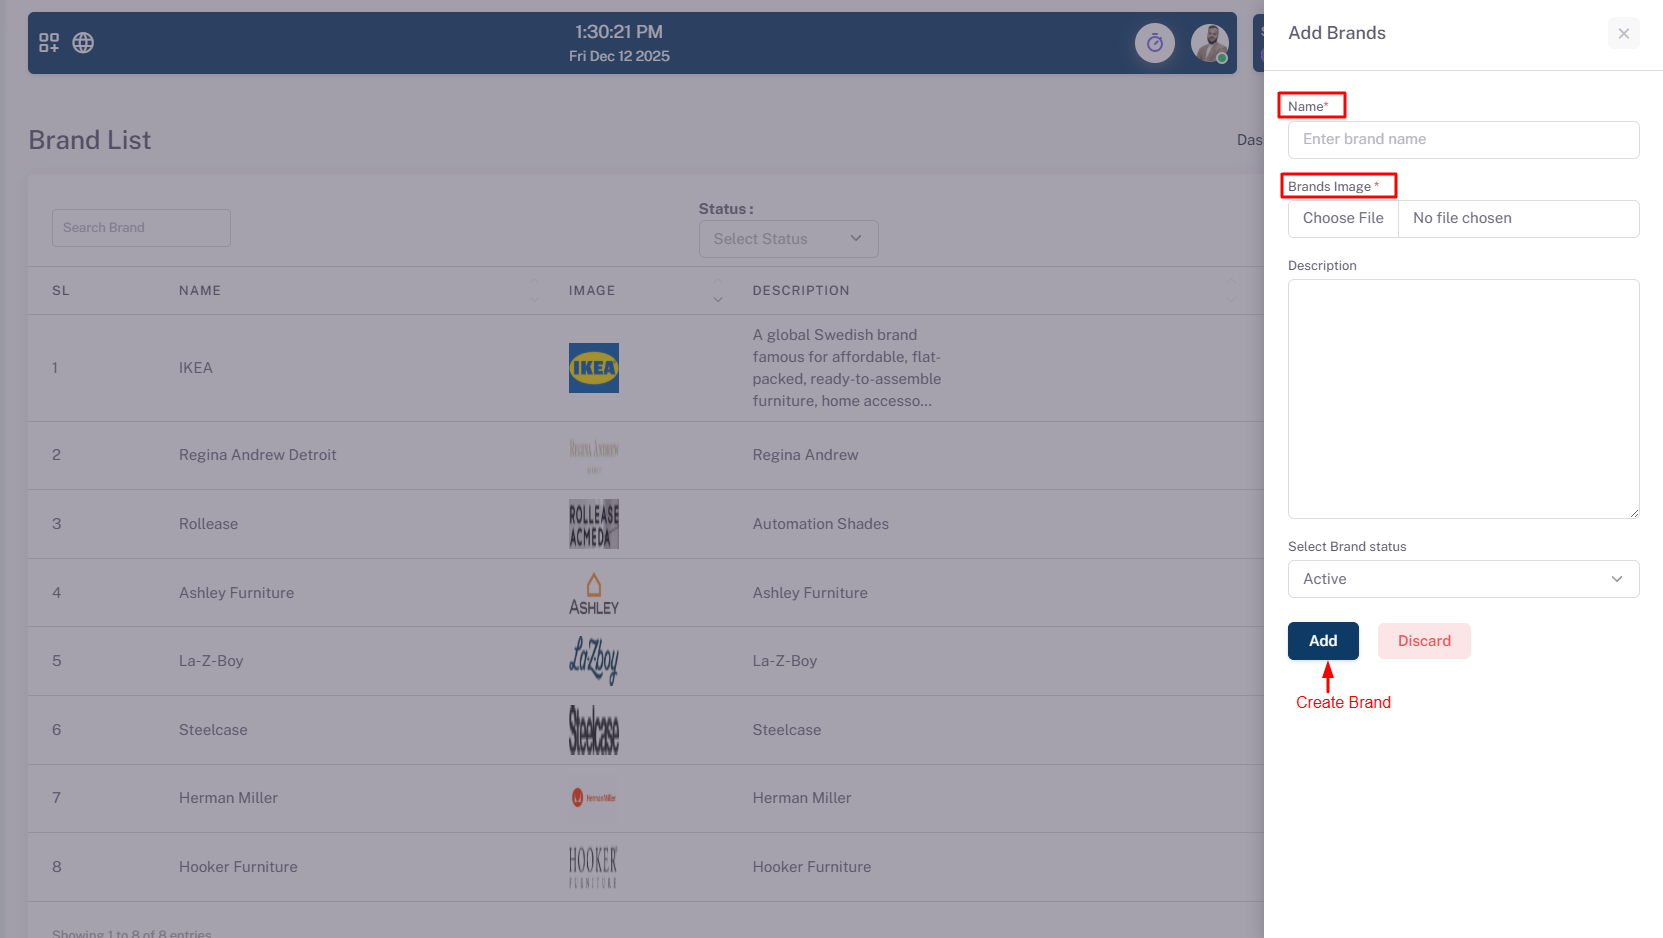
Brands
In this section, users can create brands for their products and also can see the total Brands here.
Attribute
Here, users can add attributes to their products to create variations, such as different sizes, colors or other customisable options.
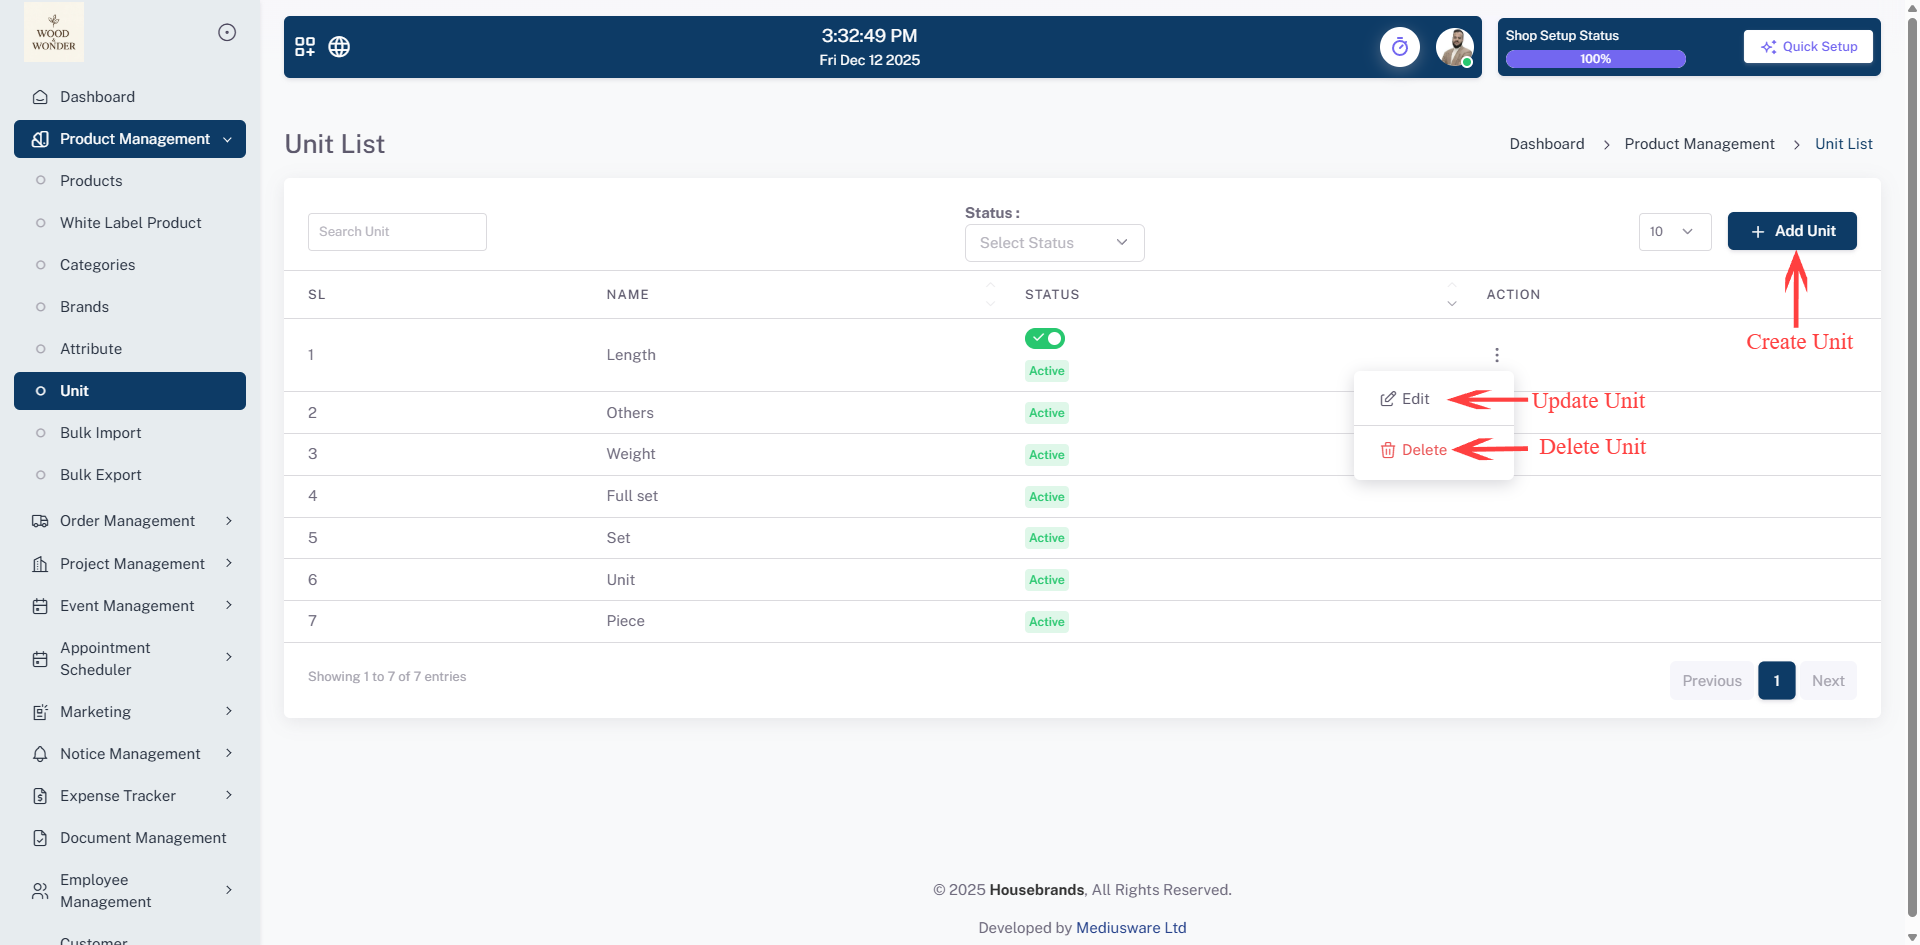
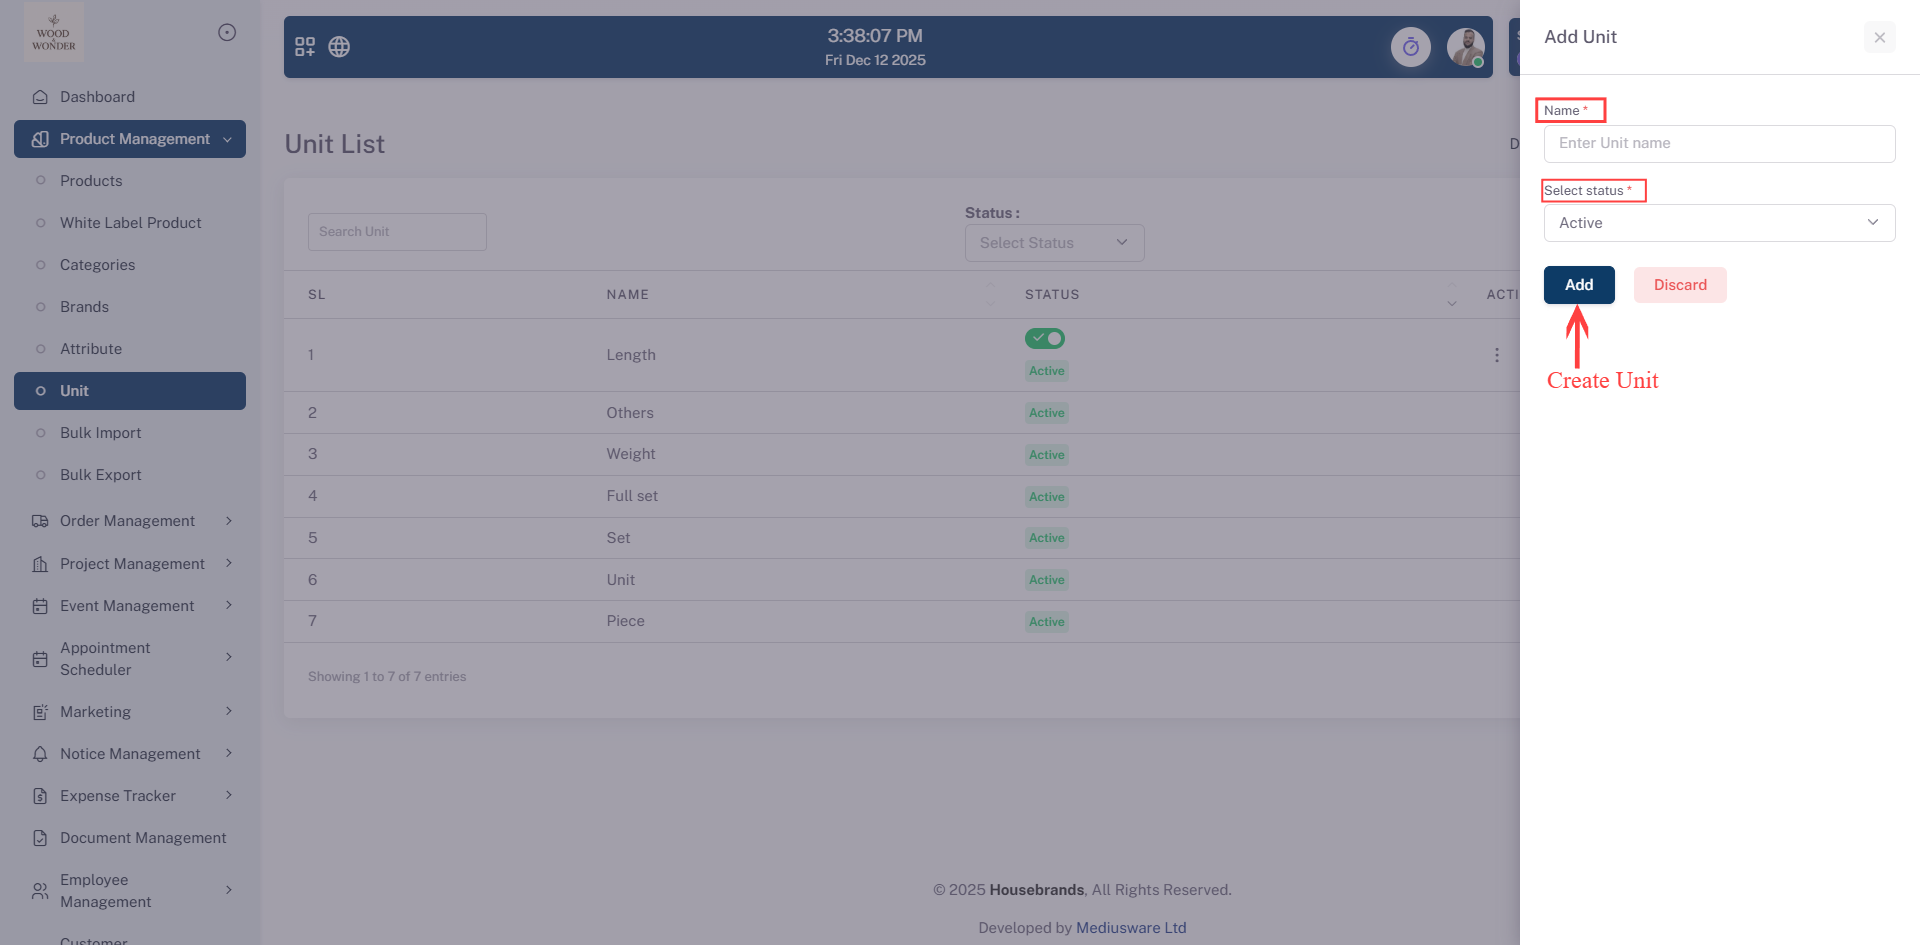
Unit
Units used to measure the quantity of a product for pricing purposes.
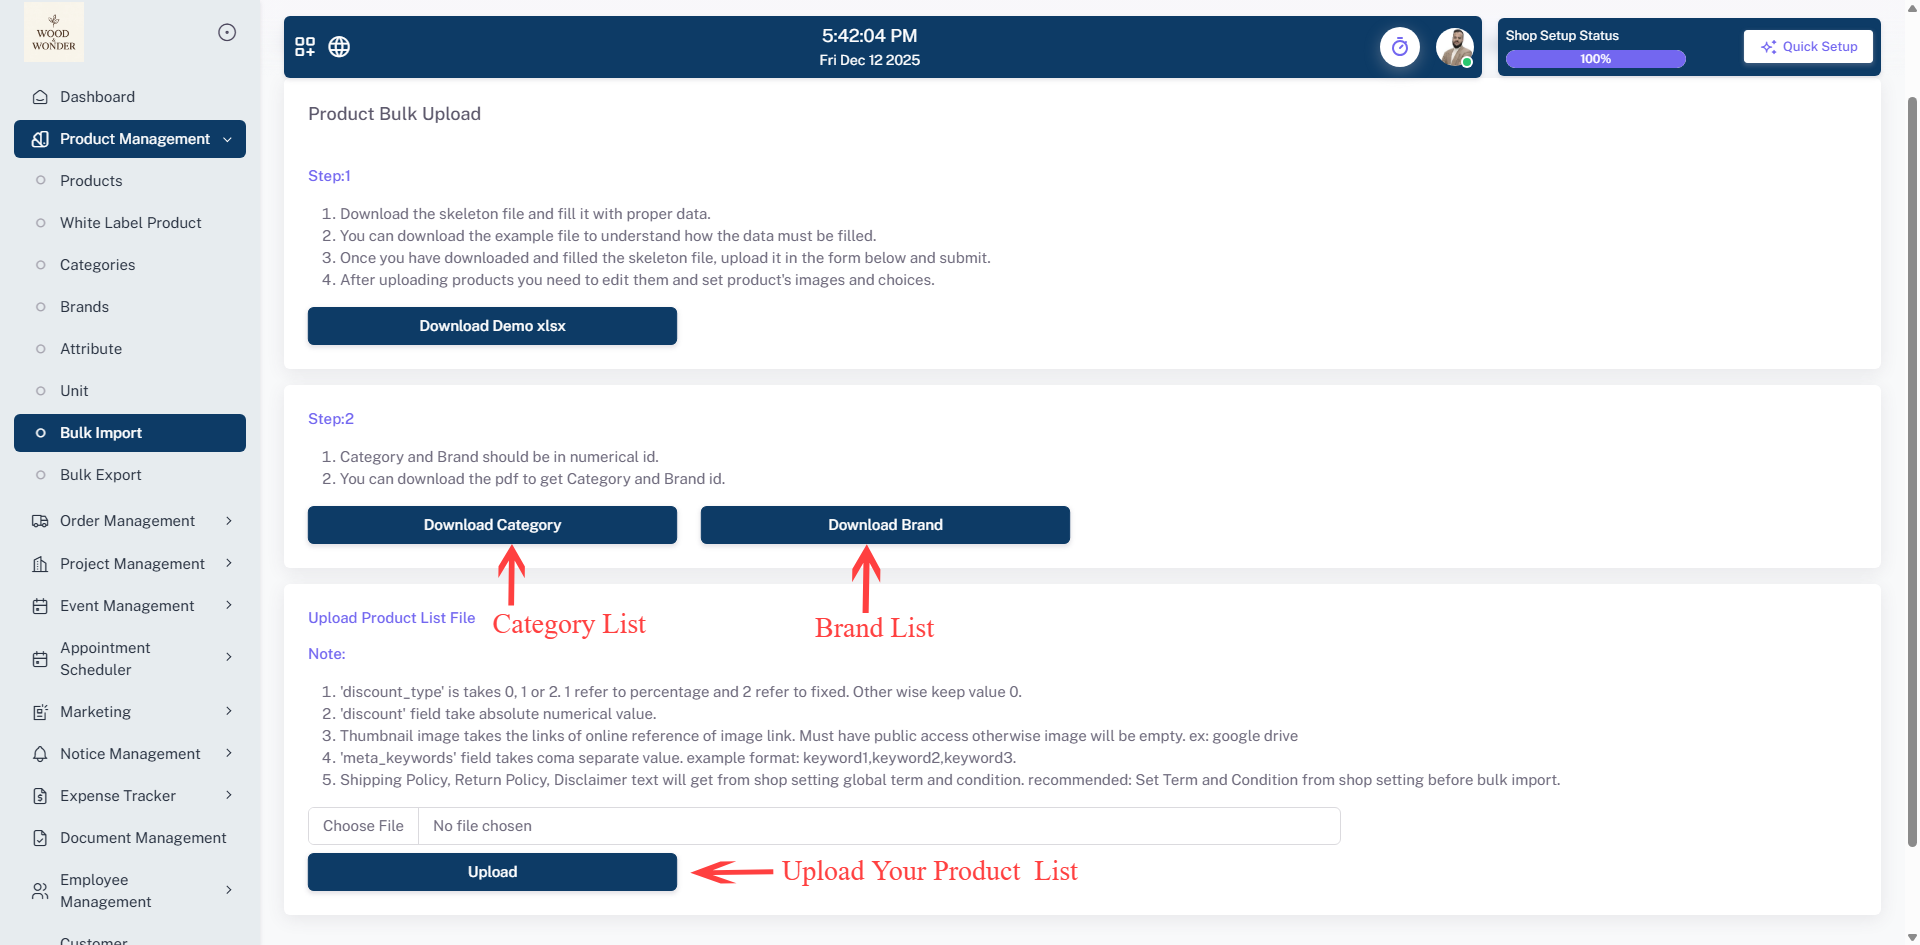
Bulk Import
This page allows users to efficiently upload multiple products at once using a predefined Excel template. A downloadable demo file is provided to help structure product data correctly, along with reference lists for category IDs and brand IDs to ensure accurate mapping. The interface also highlights essential fields—including discount type, image URLs, meta keywords, and policy descriptions—to maintain consistent and complete product information. Once the Excel sheet is prepared with all required details, users can upload it directly through this page. This feature streamlines bulk product entry, reduces manual work, and improves overall data accuracy.
Bulk Export
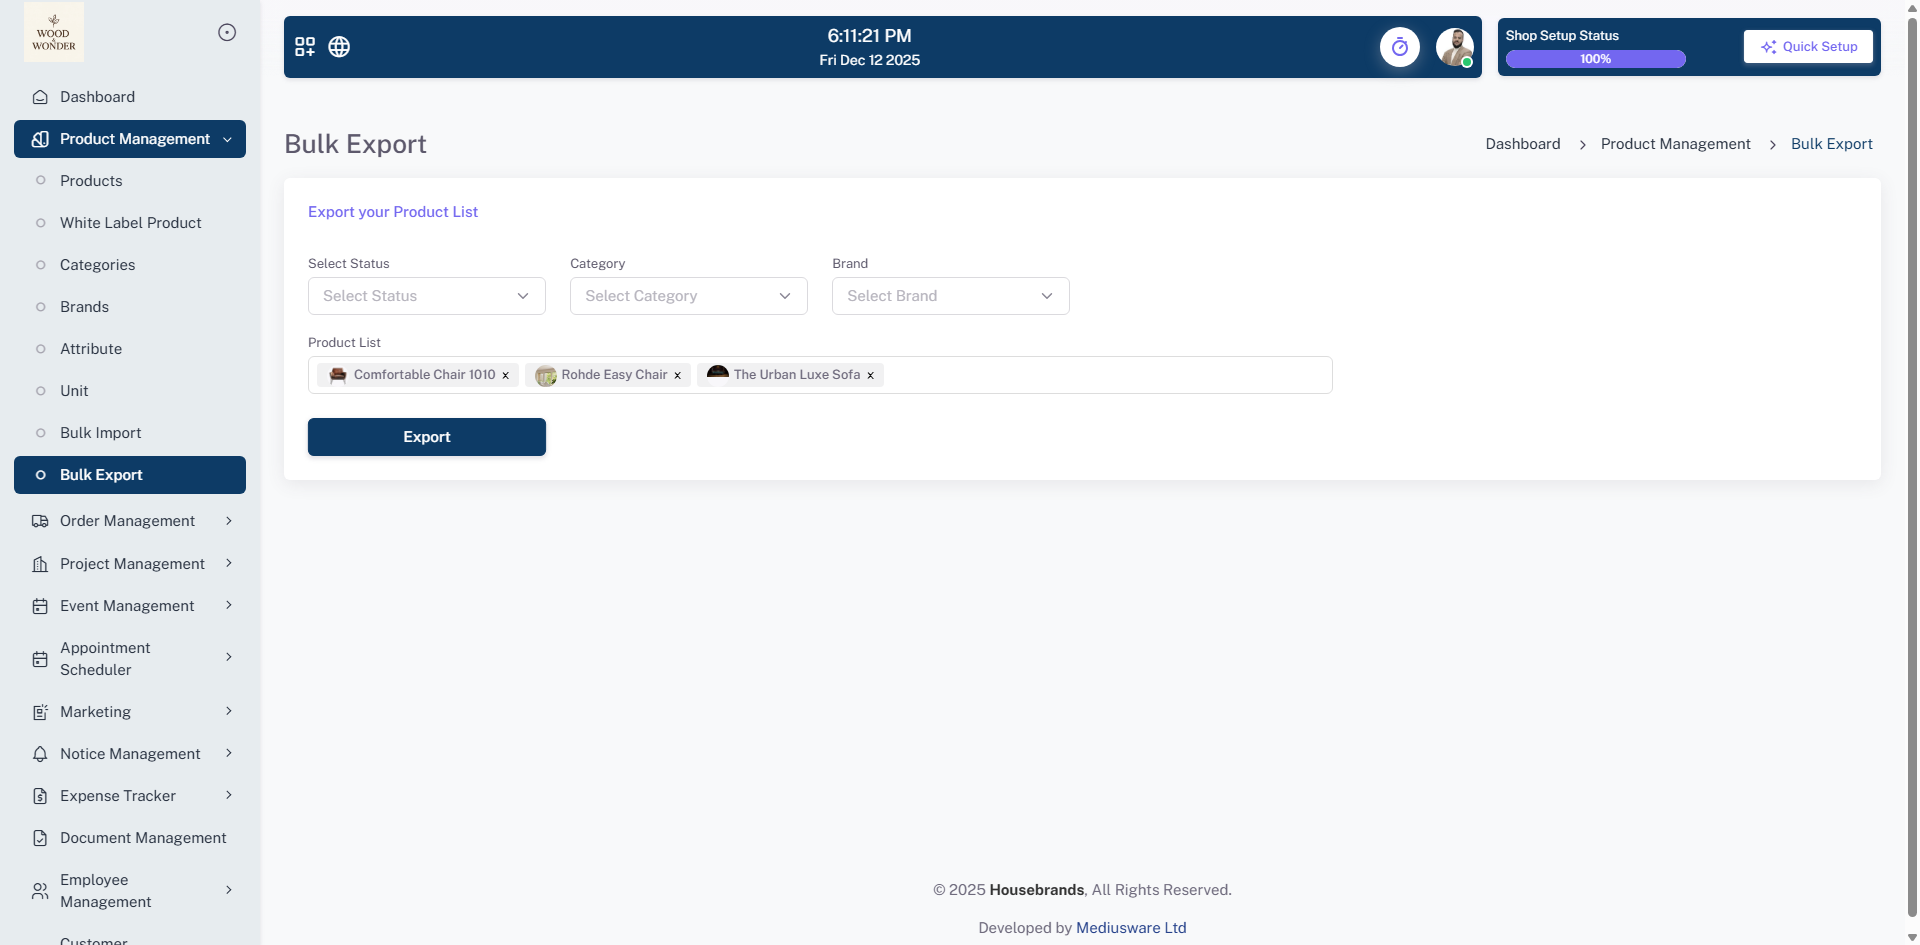
The Bulk Export page allows users to easily export product lists based on specific filters such as Status, Category, Brand, and Product Name. This feature enables users to generate customized product data files for review, editing, or record-keeping. The intuitive dropdown menus help in selecting the desired criteria, and with a single click on the Export button, users can download the filtered product list in a convenient format. This functionality streamlines product data management and simplifies bulk editing or migration tasks.
Order Management
The Order Management section provides a comprehensive toolkit for overseeing the entire lifecycle of a purchase. Users can effortlessly manage customer orders, create new orders, and monitor the customer cart list to keep track of pending items. A unique feature of this section is the ability to manage your own orders by coordinating directly with another designer or manufacturer, streamlining the production process from start to finish.
Staying updated on progress is simple with integrated order tracking and the ability to manage order status in real-time. Additionally, the system handles the order payment phase, ensuring all financial transactions are accurately recorded. Whether you are fulfilling a direct request or outsourcing to a partner, these tools provide clear visibility and complete control over every stage of the workflow.
Customer Order
The Customer Order section provides a comprehensive overview of all customer-initiated purchases, from initial cart creation to final order placement. This module allows for detailed tracking and management of each stage, ensuring a smooth and efficient fulfillment process.
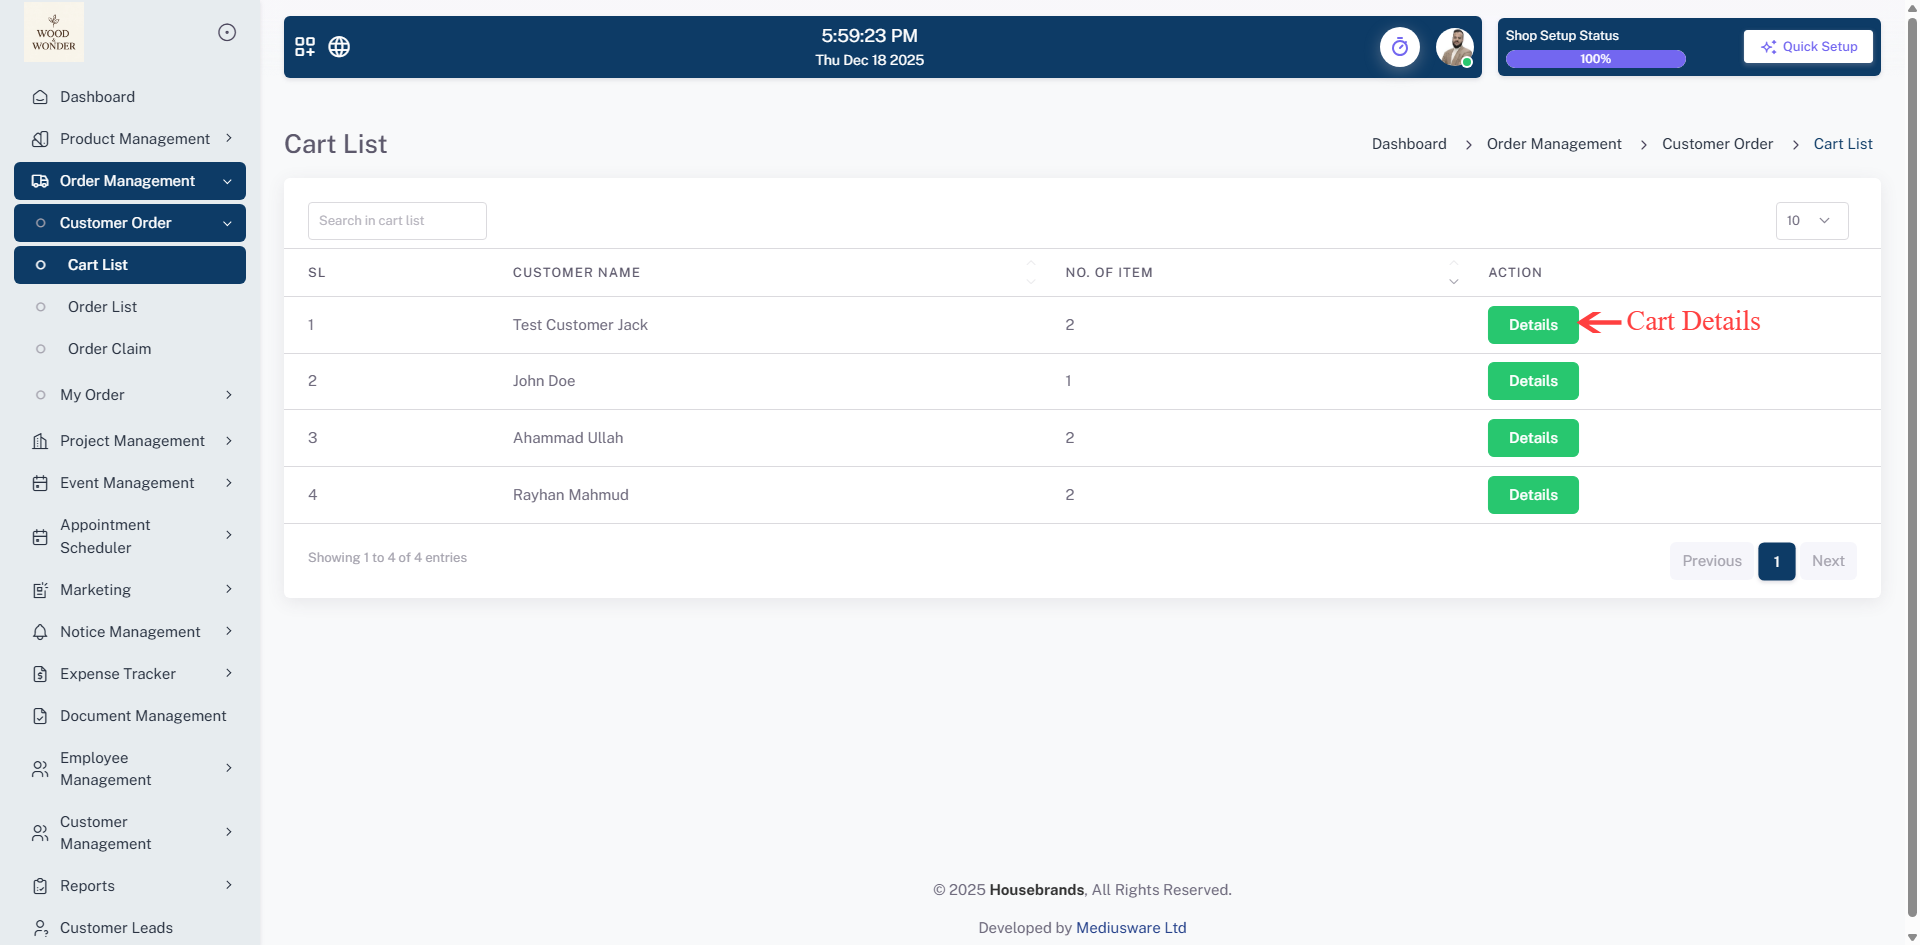
Cart List
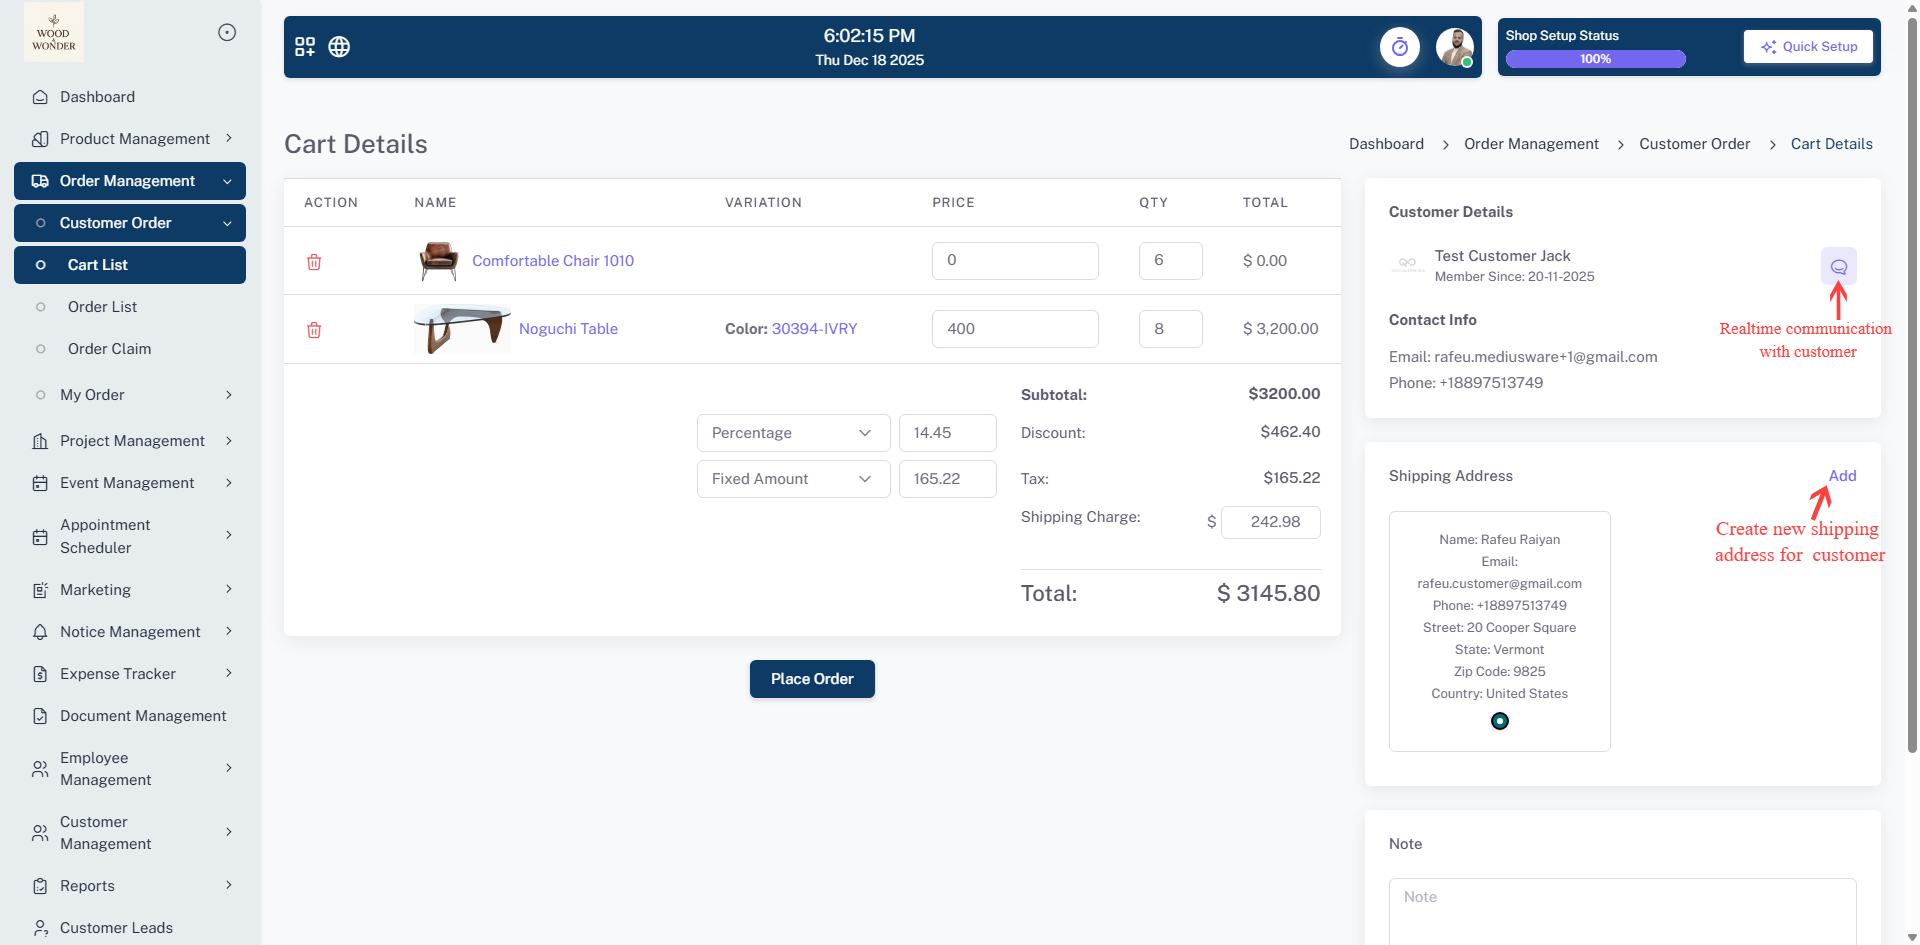
This section provides an overview of all customer carts in the system. You can view the customer name, number of items in their cart, and access detailed cart information. Actions such as reviewing or managing individual carts are available directly from this list.
Cart Details displays the full details of a selected customer’s cart. You can see each product with its image, variation, price, quantity, and total. It also allows you to apply discounts, taxes, and shipping charges. On the right, customer information, contact details, shipping address, and live chat access are available. From here, you can finalize and place the order.
Order List
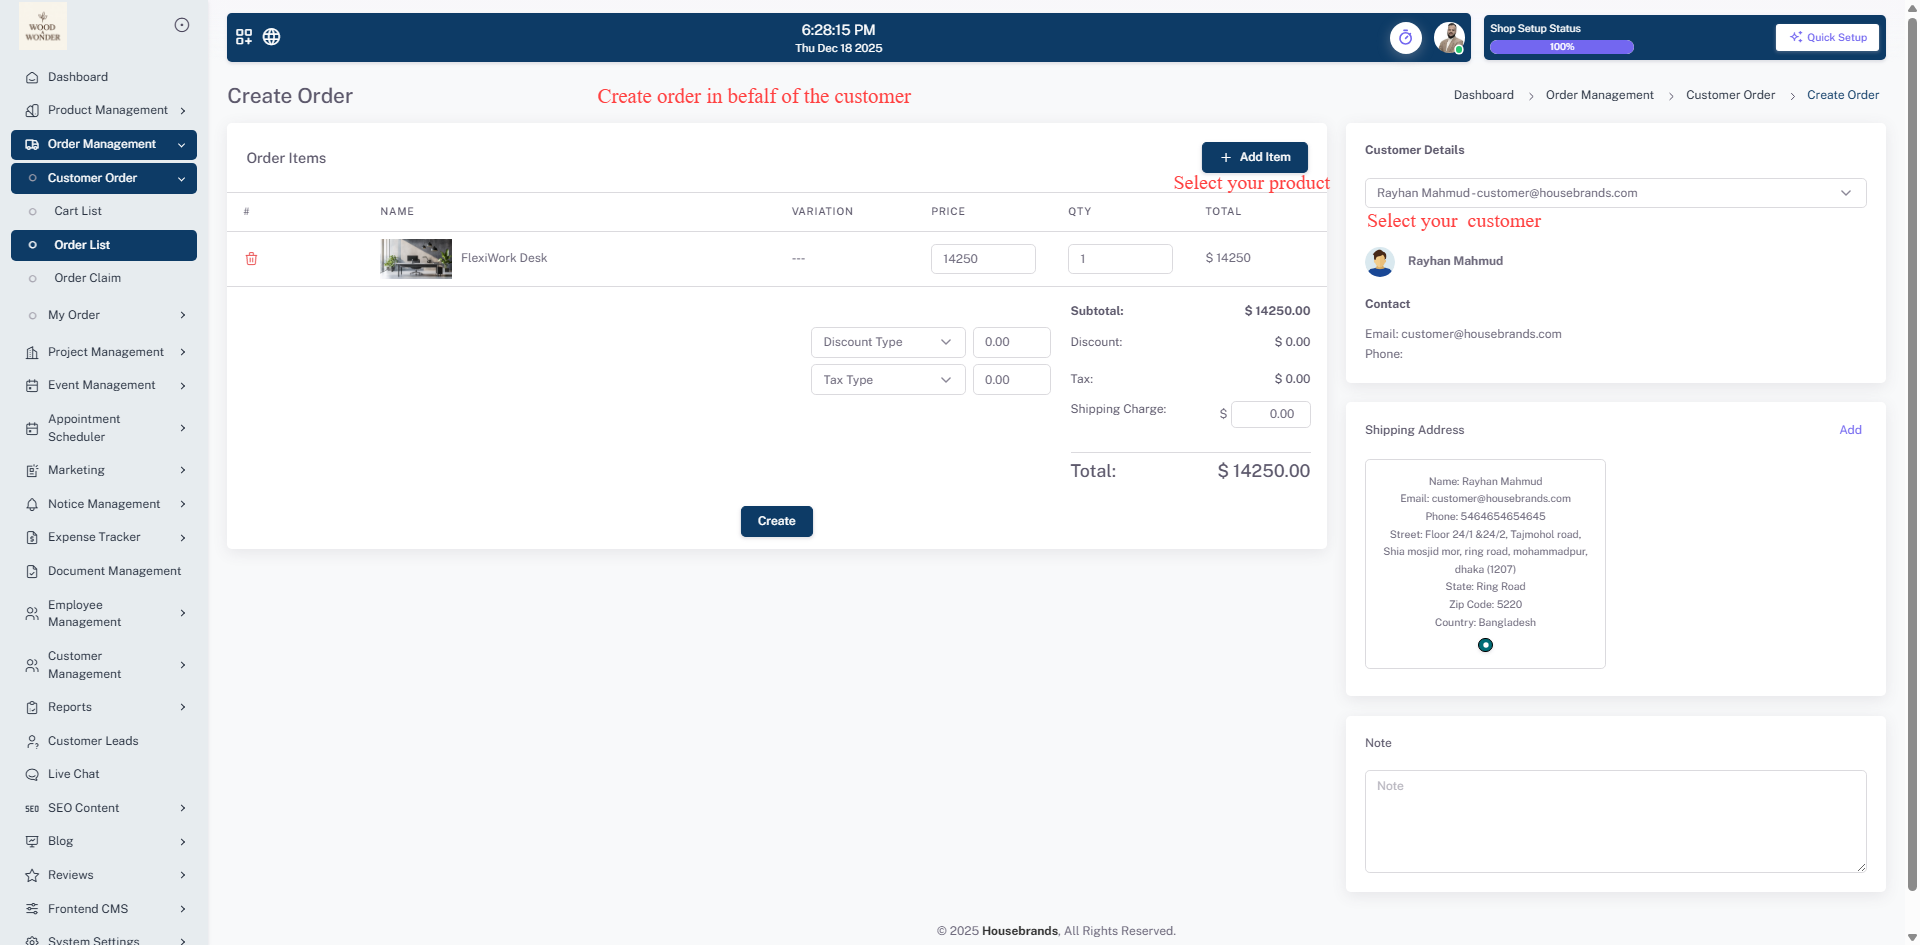
The order list provides a high-level overview of all transactions with quick info at a glance, including the order ID, payment status, and current order status. From this dashboard, you can visit order details for a deeper look, preview the invoice, or create an order on behalf of a customer to provide direct assistance. To ensure flexibility, the system allows you to edit order details as needed until the order is confirmed or the payment is complete.

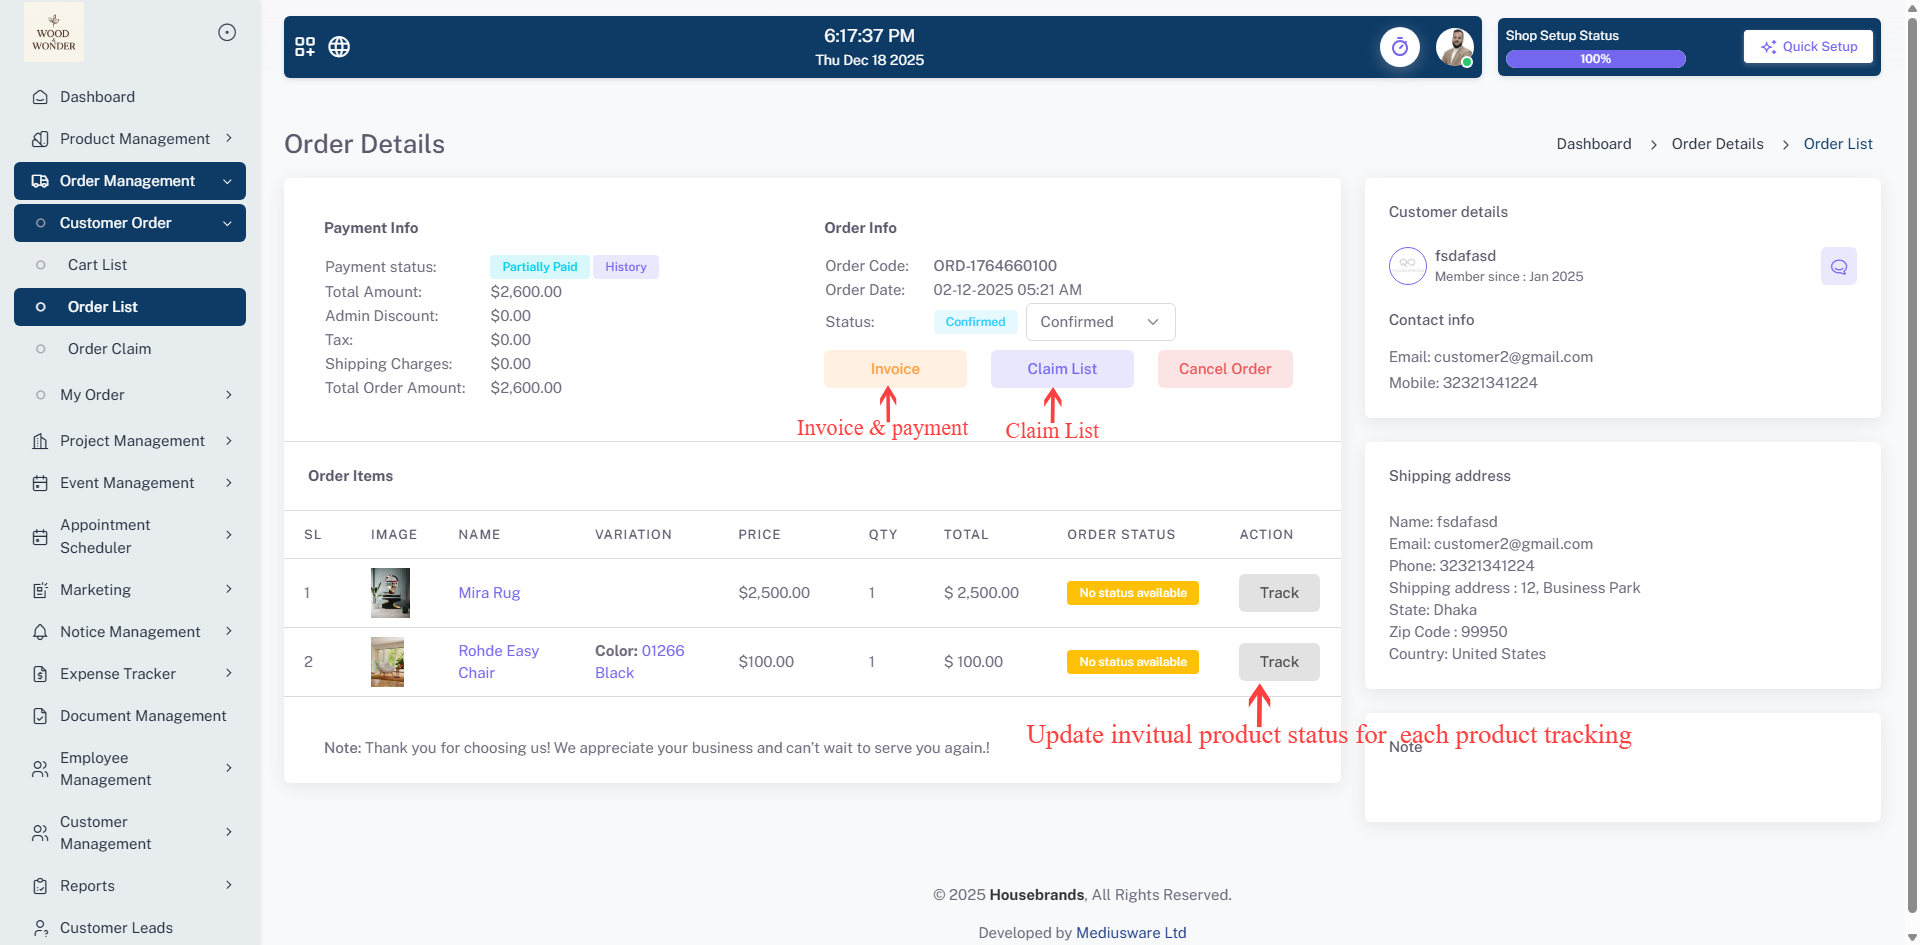
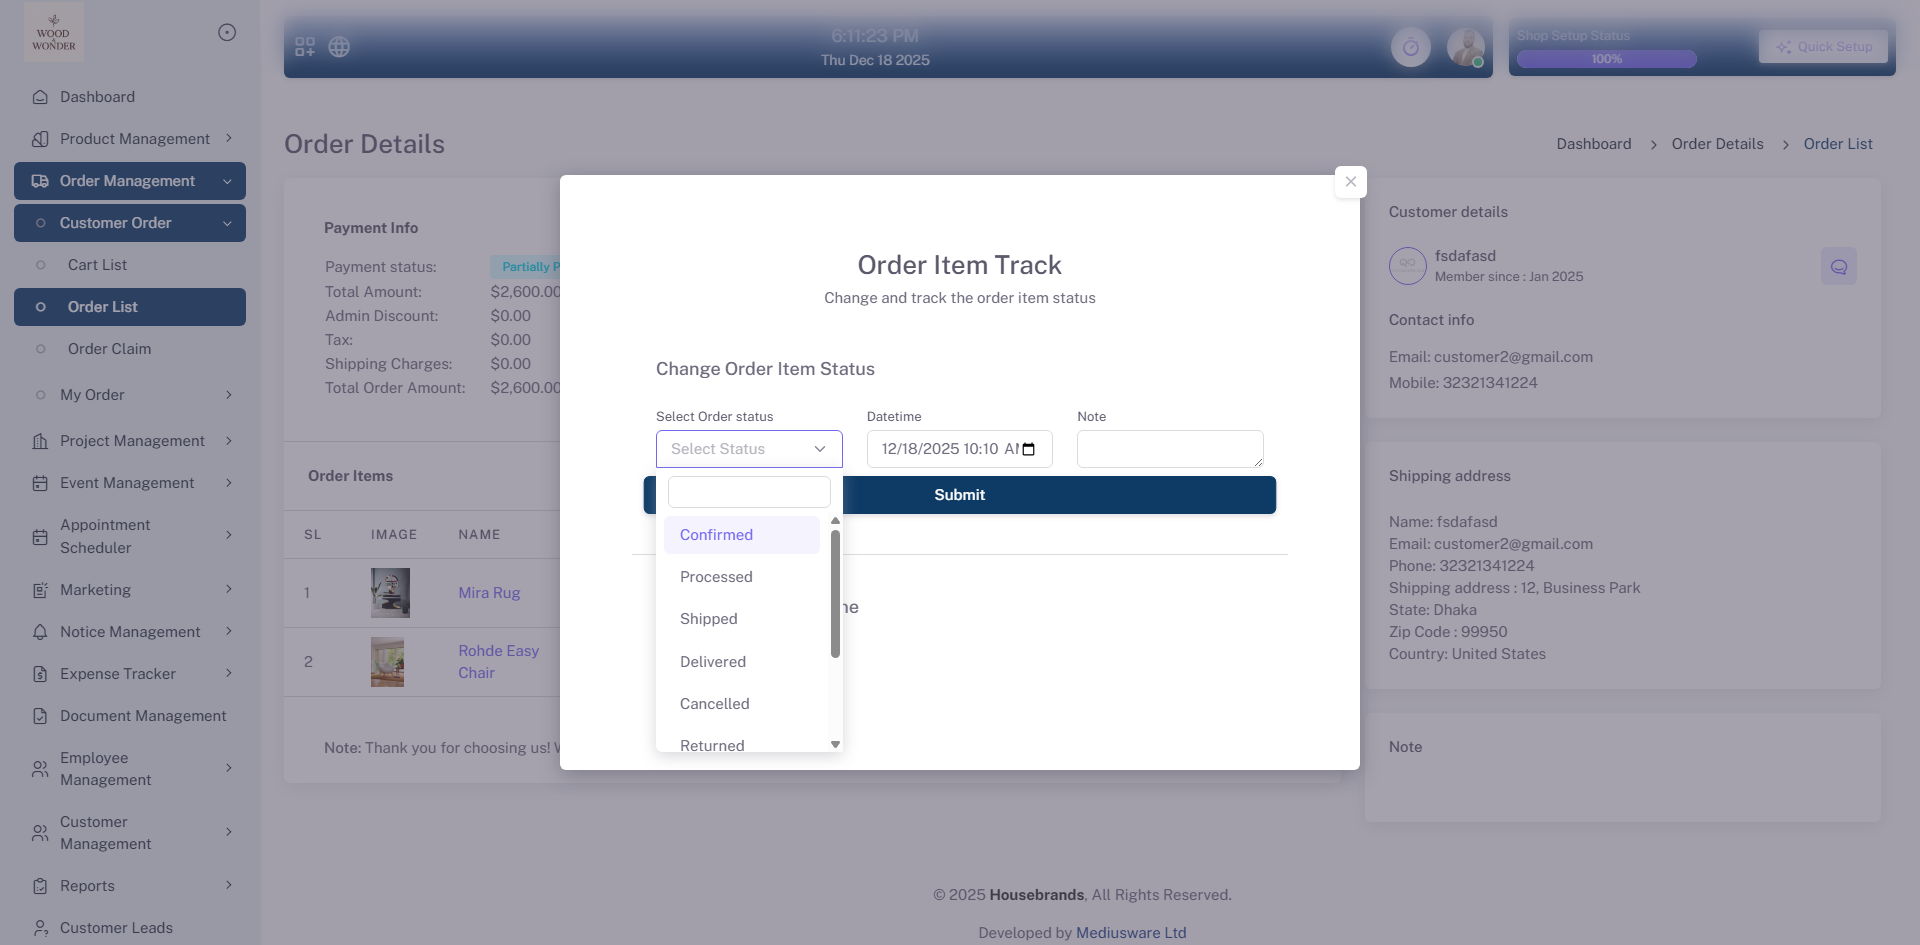
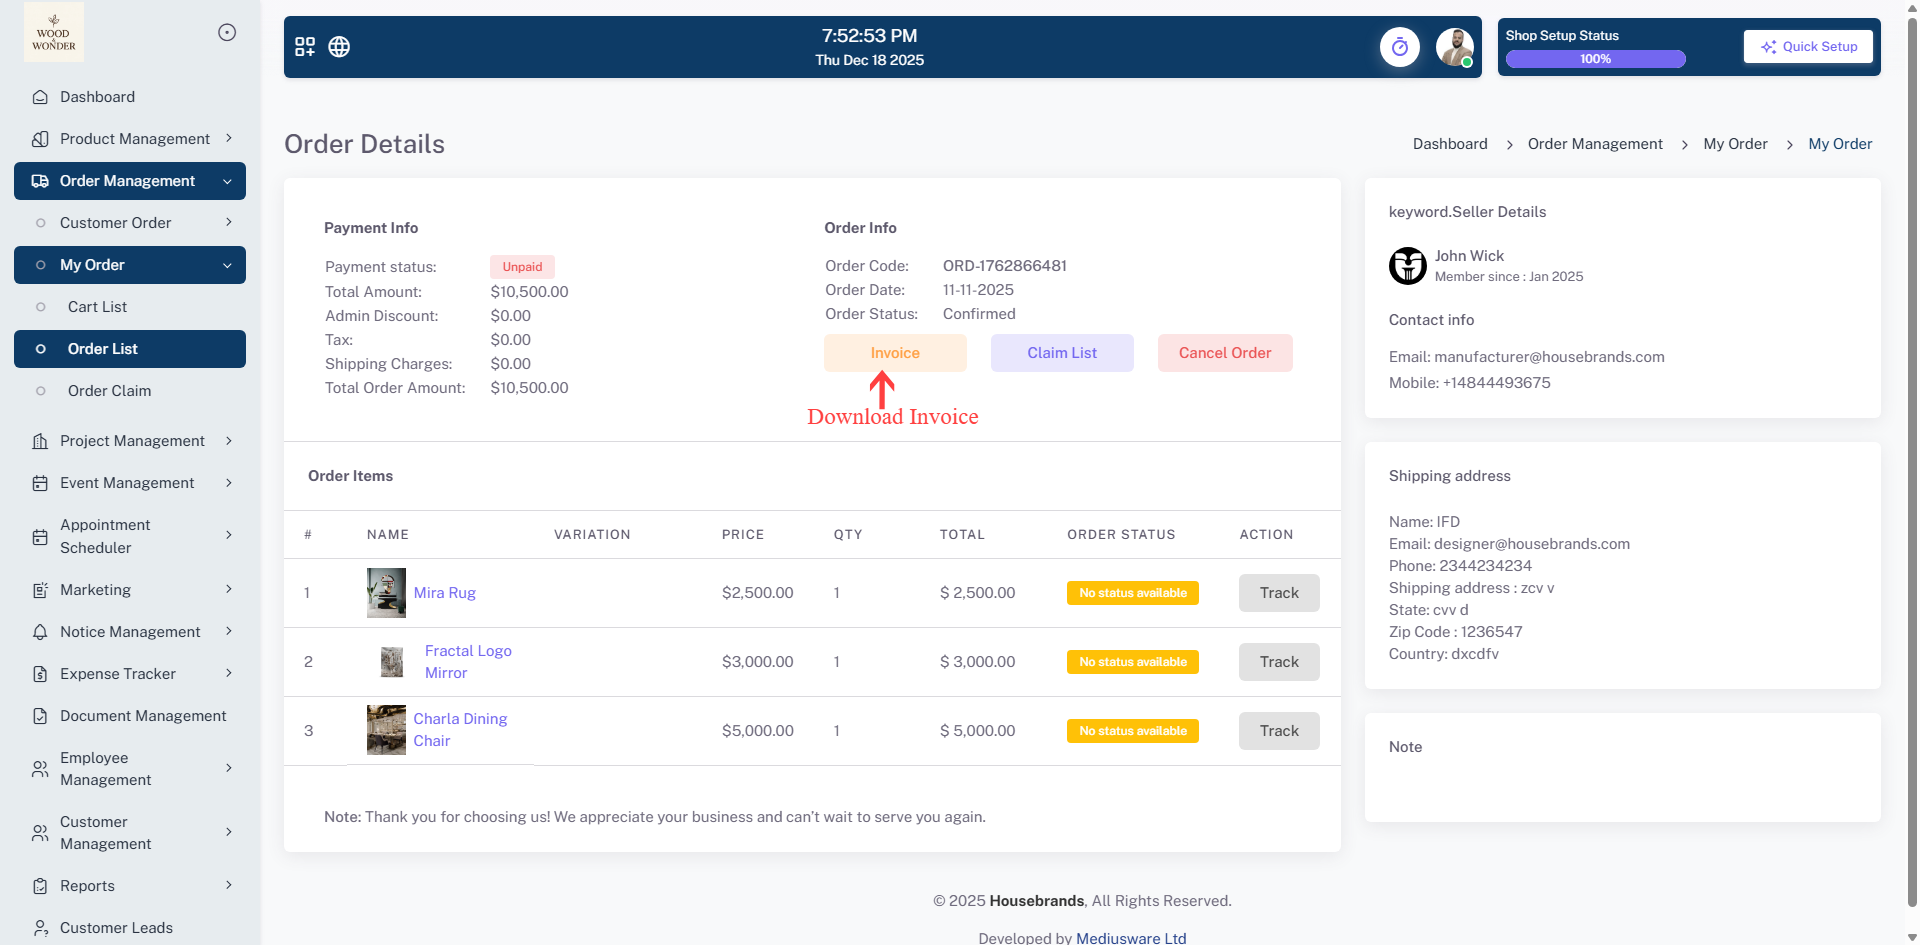
The Order Details page provides a comprehensive view of every element within a single transaction. From this central hub, you can oversee the entire fulfillment process by changing the current status of the overall order. To keep your clients informed, the system allows you to update the status of individual products, providing customers with real-time tracking and transparency for every item they purchased. On the right-hand side of the interface, you have immediate access to essential user info, the shipping address, and any specific customer notes to ensure accurate delivery.
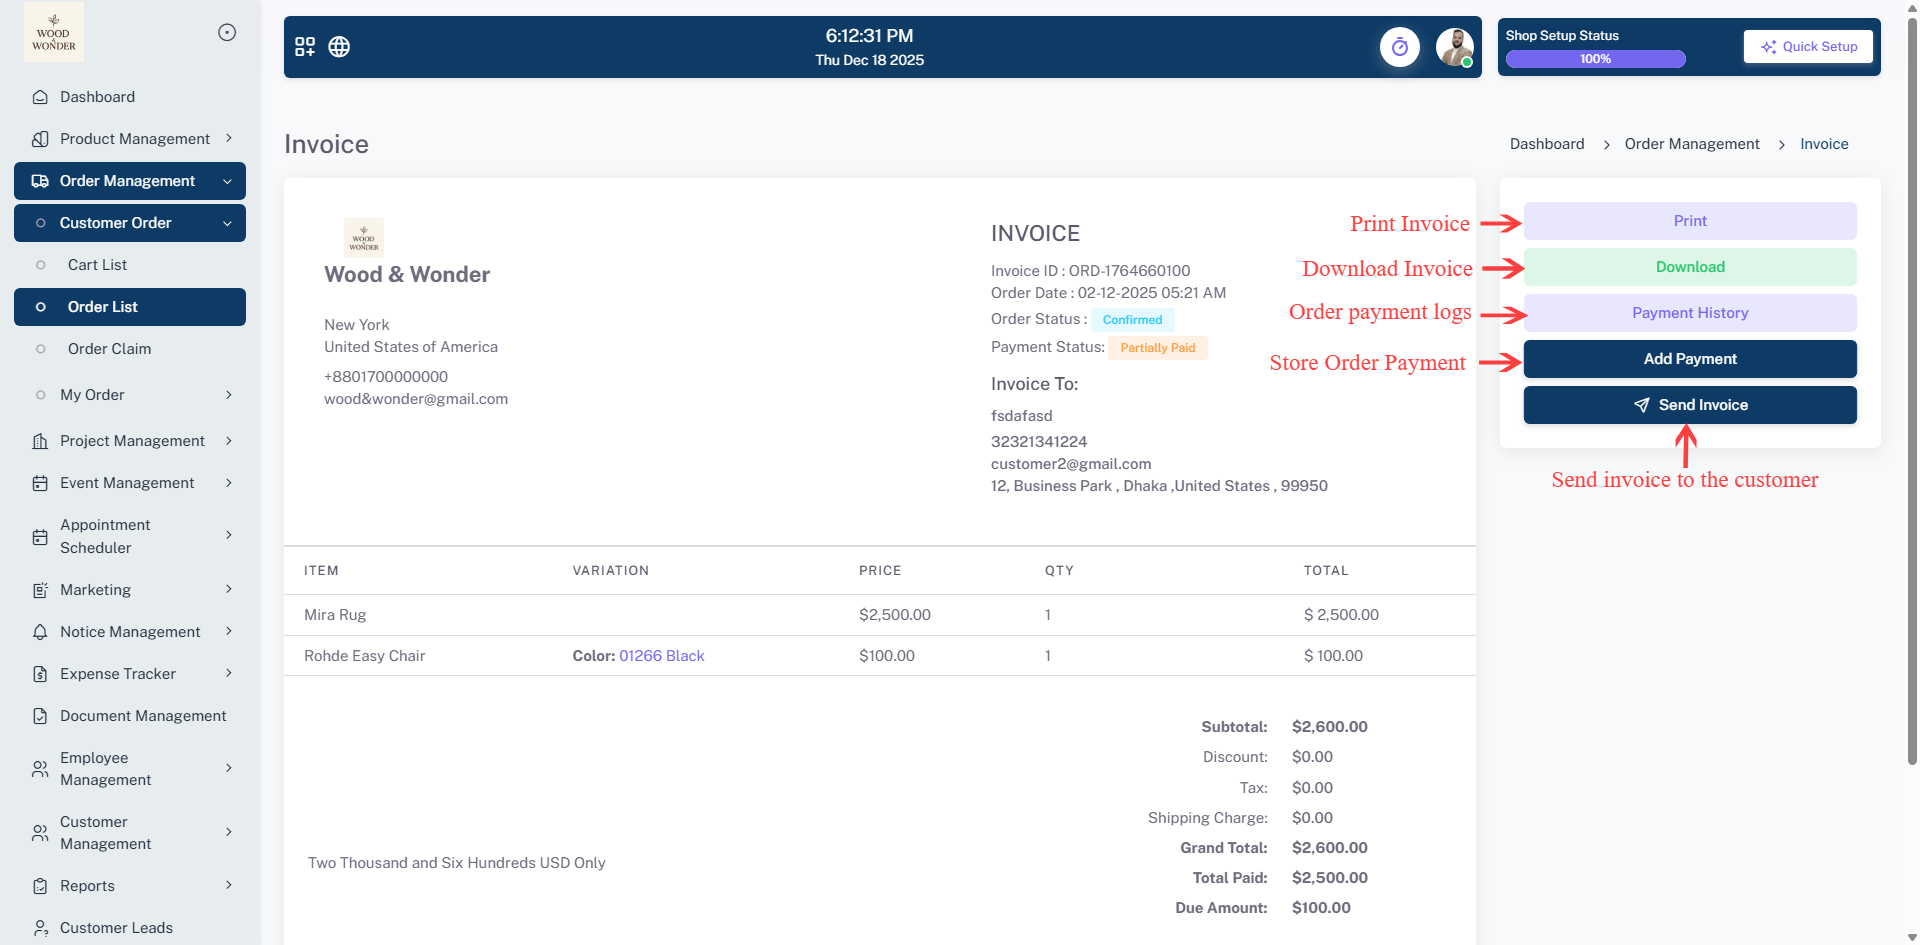
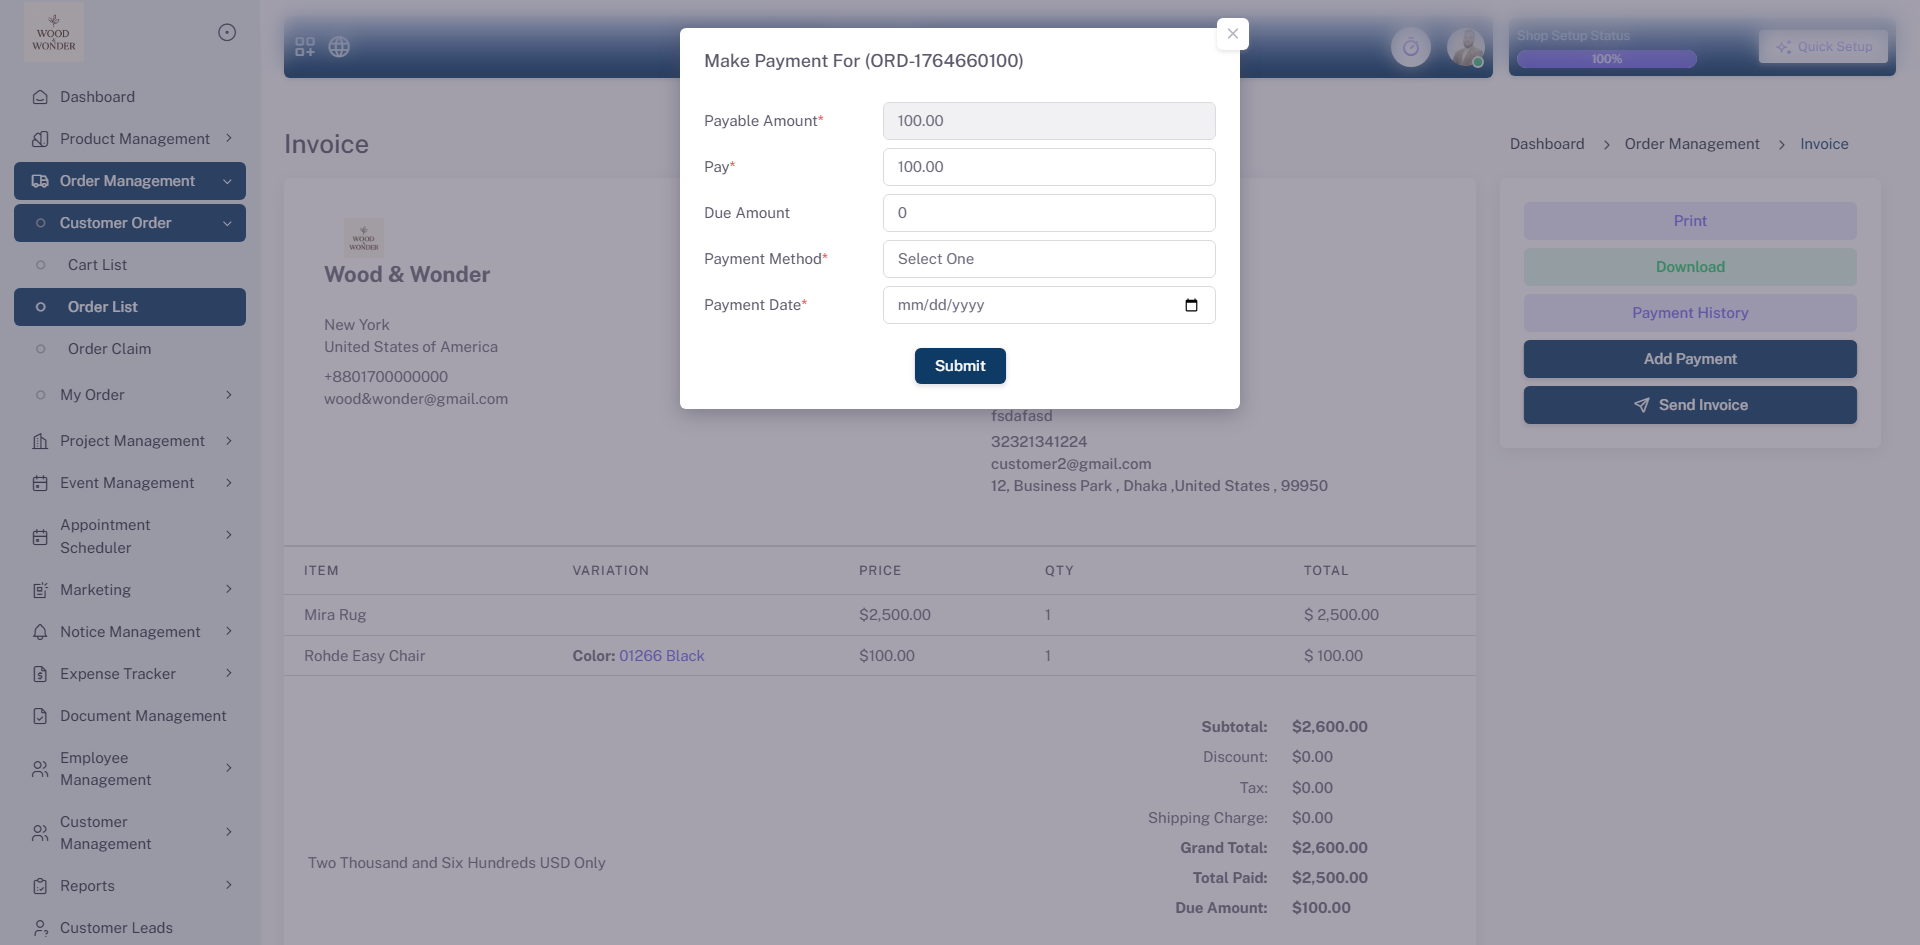
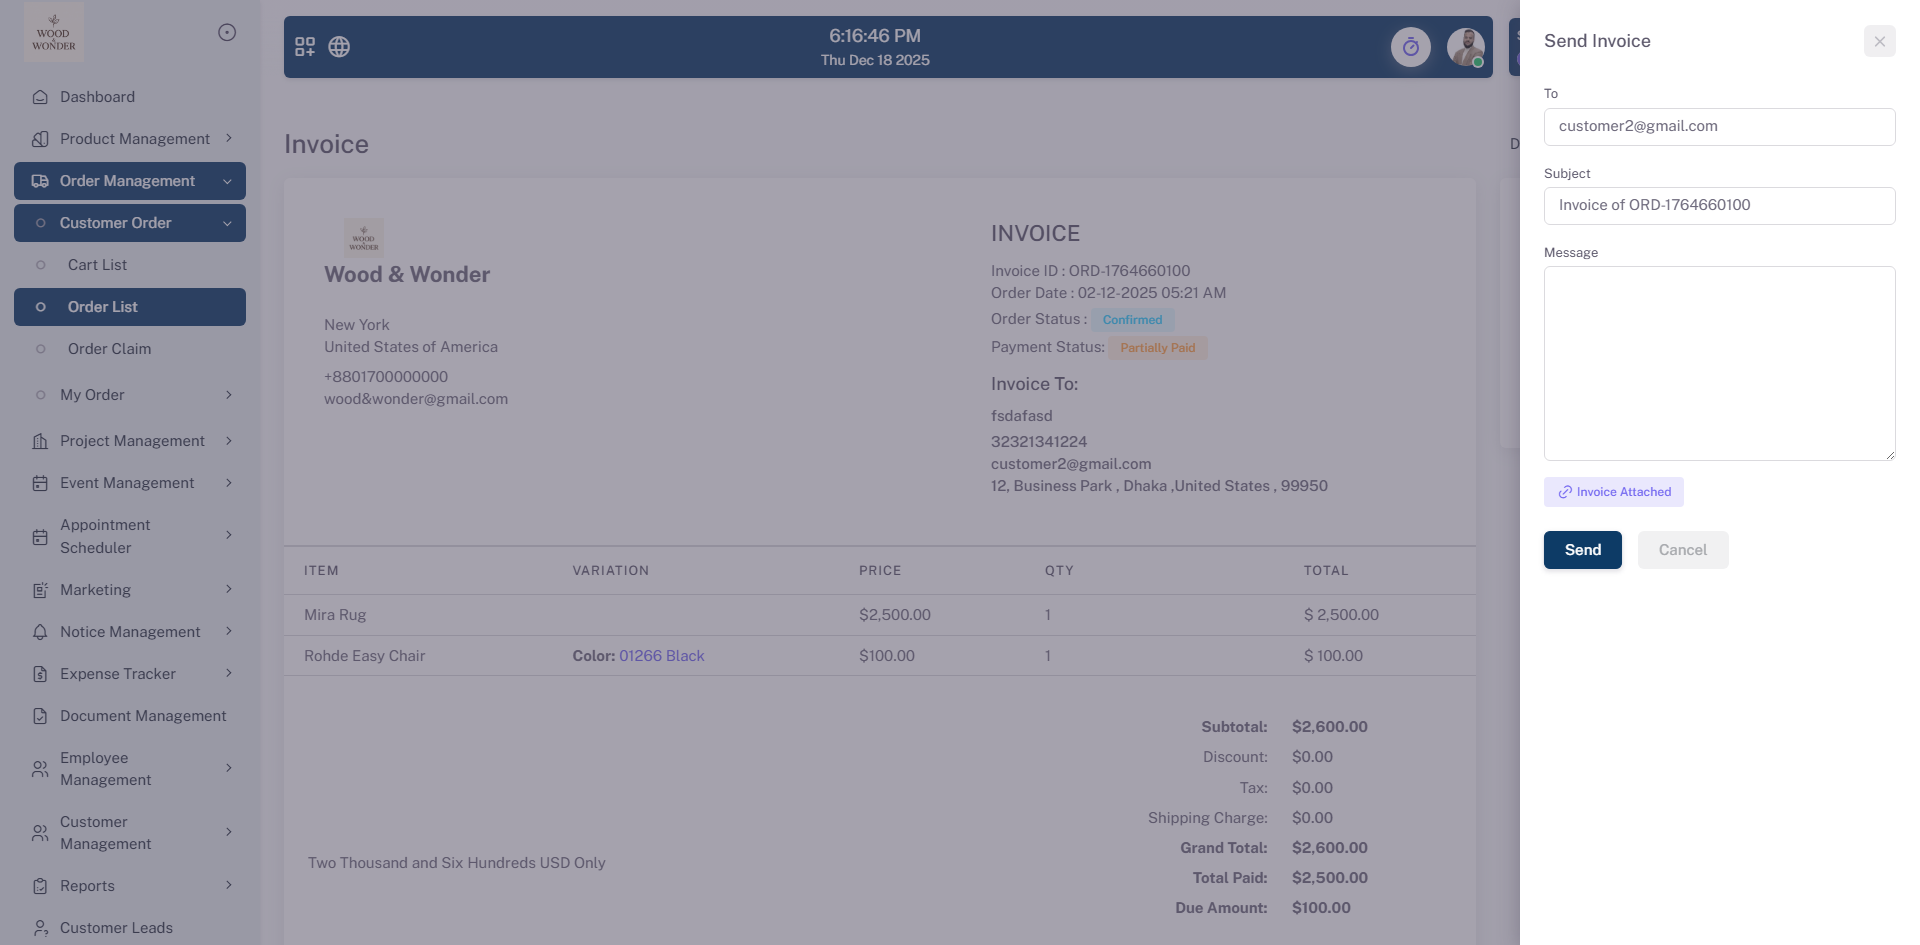
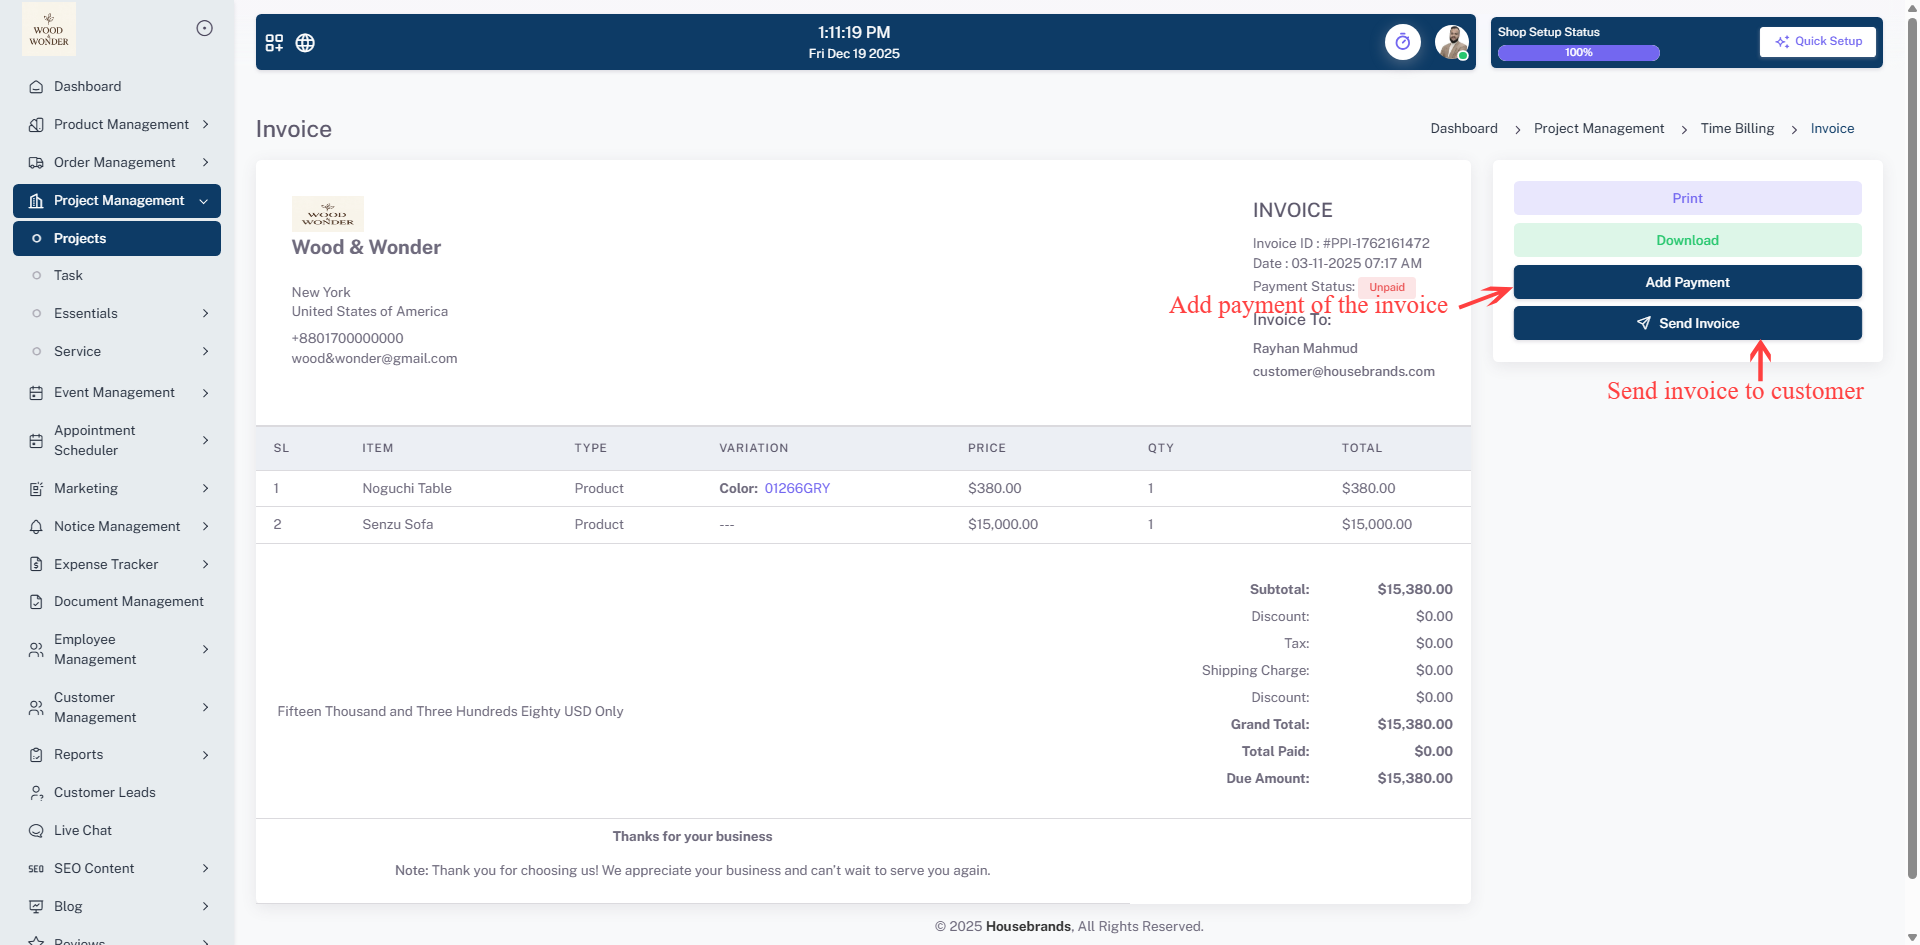
This section also serves as your financial management tool through the Invoice feature. You have the flexibility to print or download the document for your records, send the invoice directly to the customer via email, and register payments manually from your side. As you record these transactions, the payment status will change automatically to reflect the new balance. For managing issues, the Claim List allows you to view all customer complaints or requests related to the order, enabling you to send replies and take the necessary actions to resolve them. If a transaction cannot proceed, the Cancel Order button allows you to terminate the process safely.
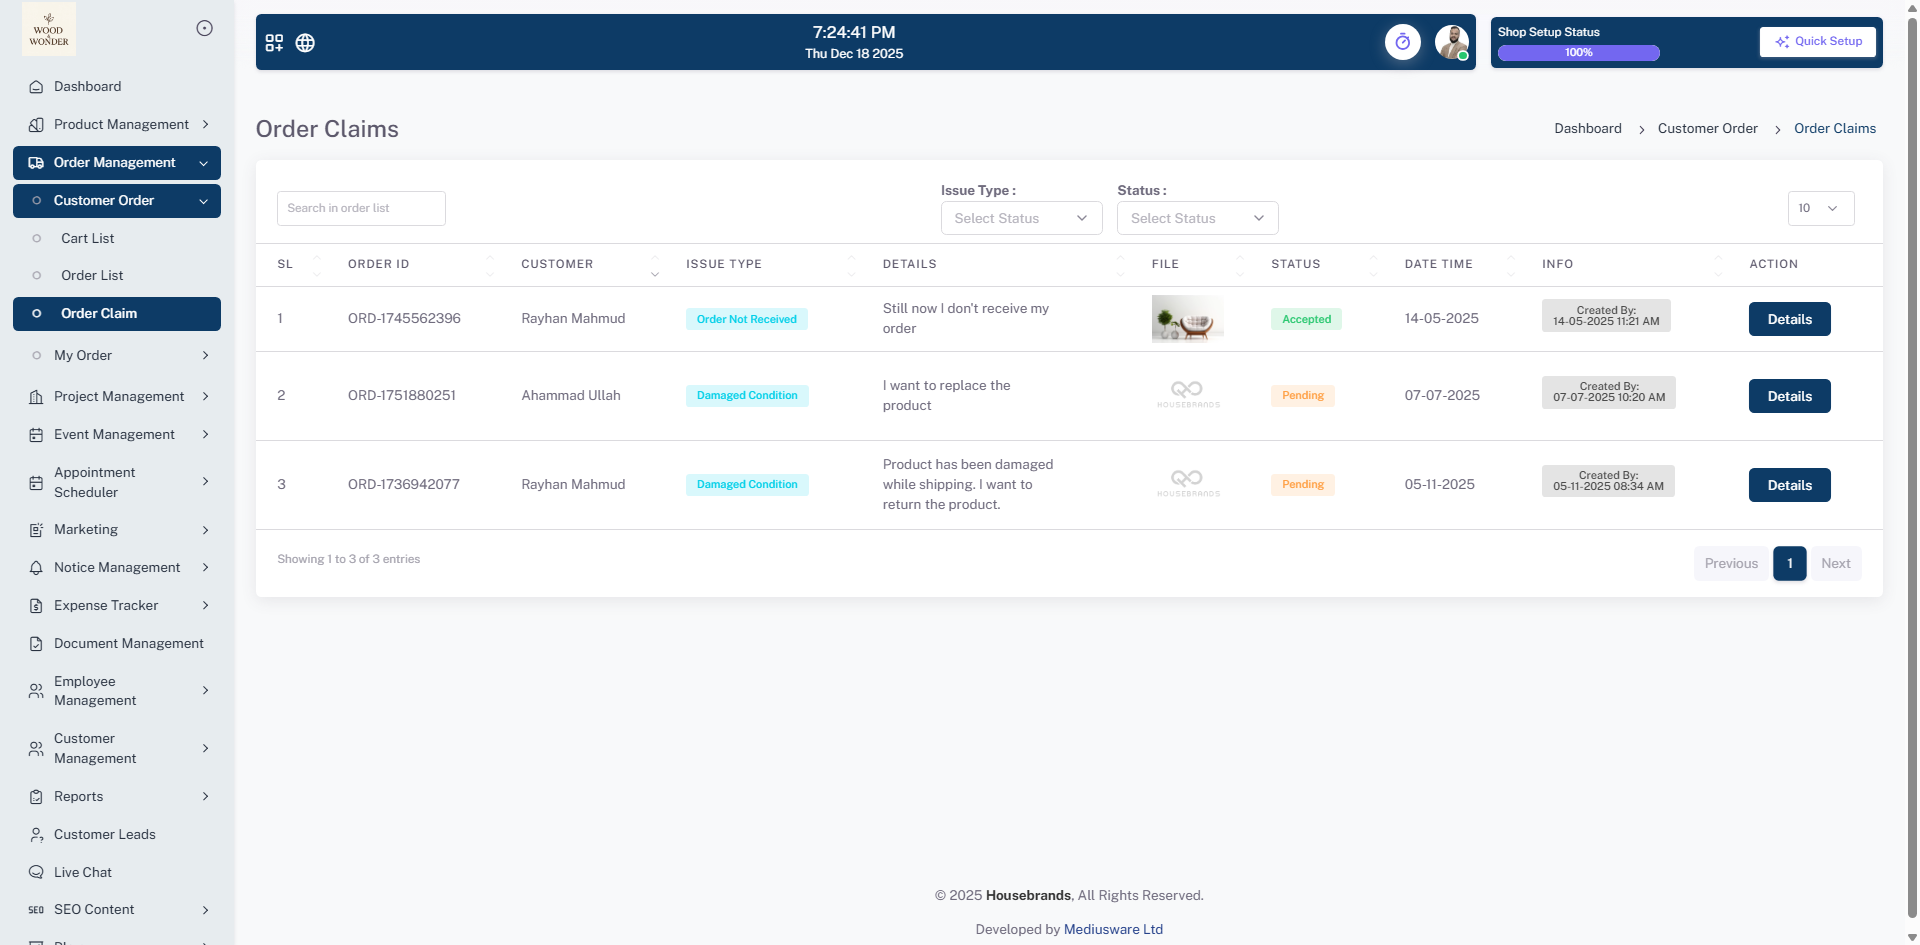
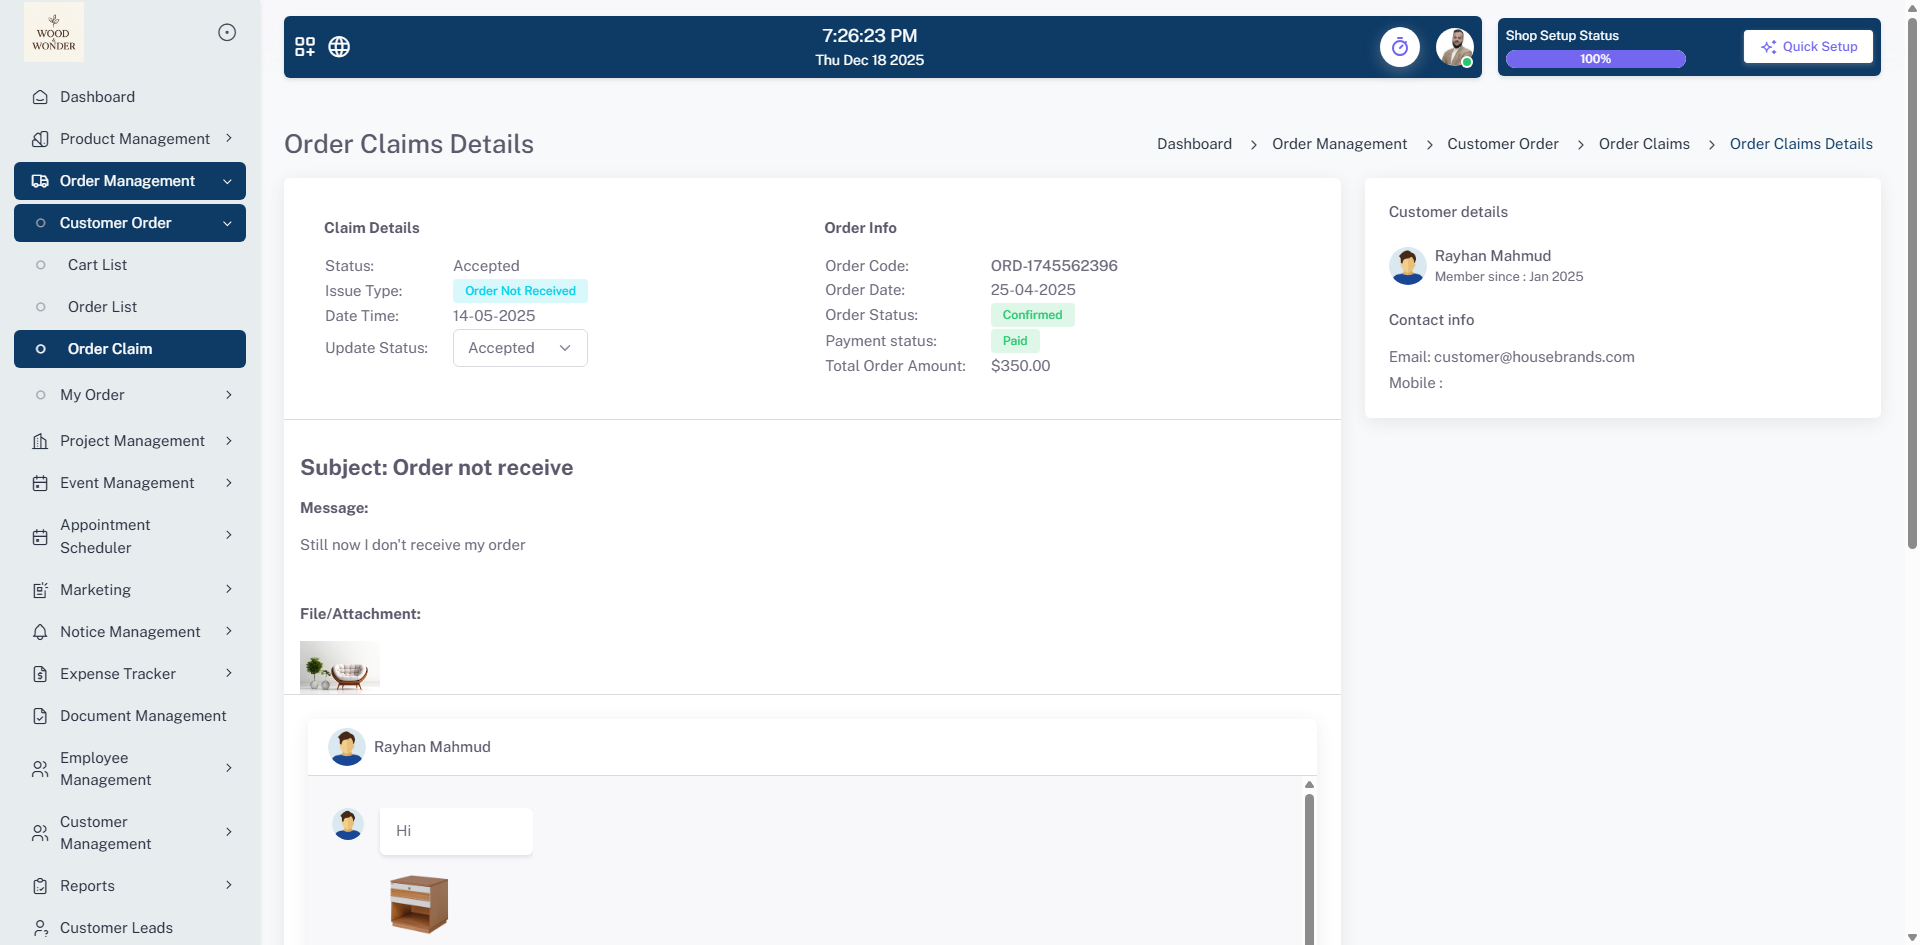
Order Claim
The Claim Management section provides a dedicated space to view and manage the list of all claims submitted by customers. For every entry, you can dive into the order claim details to understand the specific issue and initiate a direct conversation with the customer. Each conversation is unique to that specific claim, ensuring that all communication, media, and updates remain organized and easy to track.
To keep the resolution process moving forward, you have the authority to change the status of the claim as it progresses. Whether a request is pending, under review, or resolved, updating the status ensures both you and the customer stay informed. This structured communication tool allows you to take necessary actions quickly and maintain a high standard of customer service by resolving disputes in one central location.
My Order
The My Order section serves as a personal management dashboard where you can handle all your external sourcing and purchasing tasks without visiting the frontend. In this area, you can view your cart list and update the cart items directly to prepare for a new purchase. It also provides a centralized view of the order list for all transactions you have placed with other sources, such as designers or manufacturers.
In addition to tracking purchases, you can view all claims you have submitted regarding your orders. This allows you to monitor the progress of your requests and manage ongoing disputes or resolutions from a single administrative interface. By consolidating these tools, the system ensures you can manage your procurement and track order history efficiently and professionally.
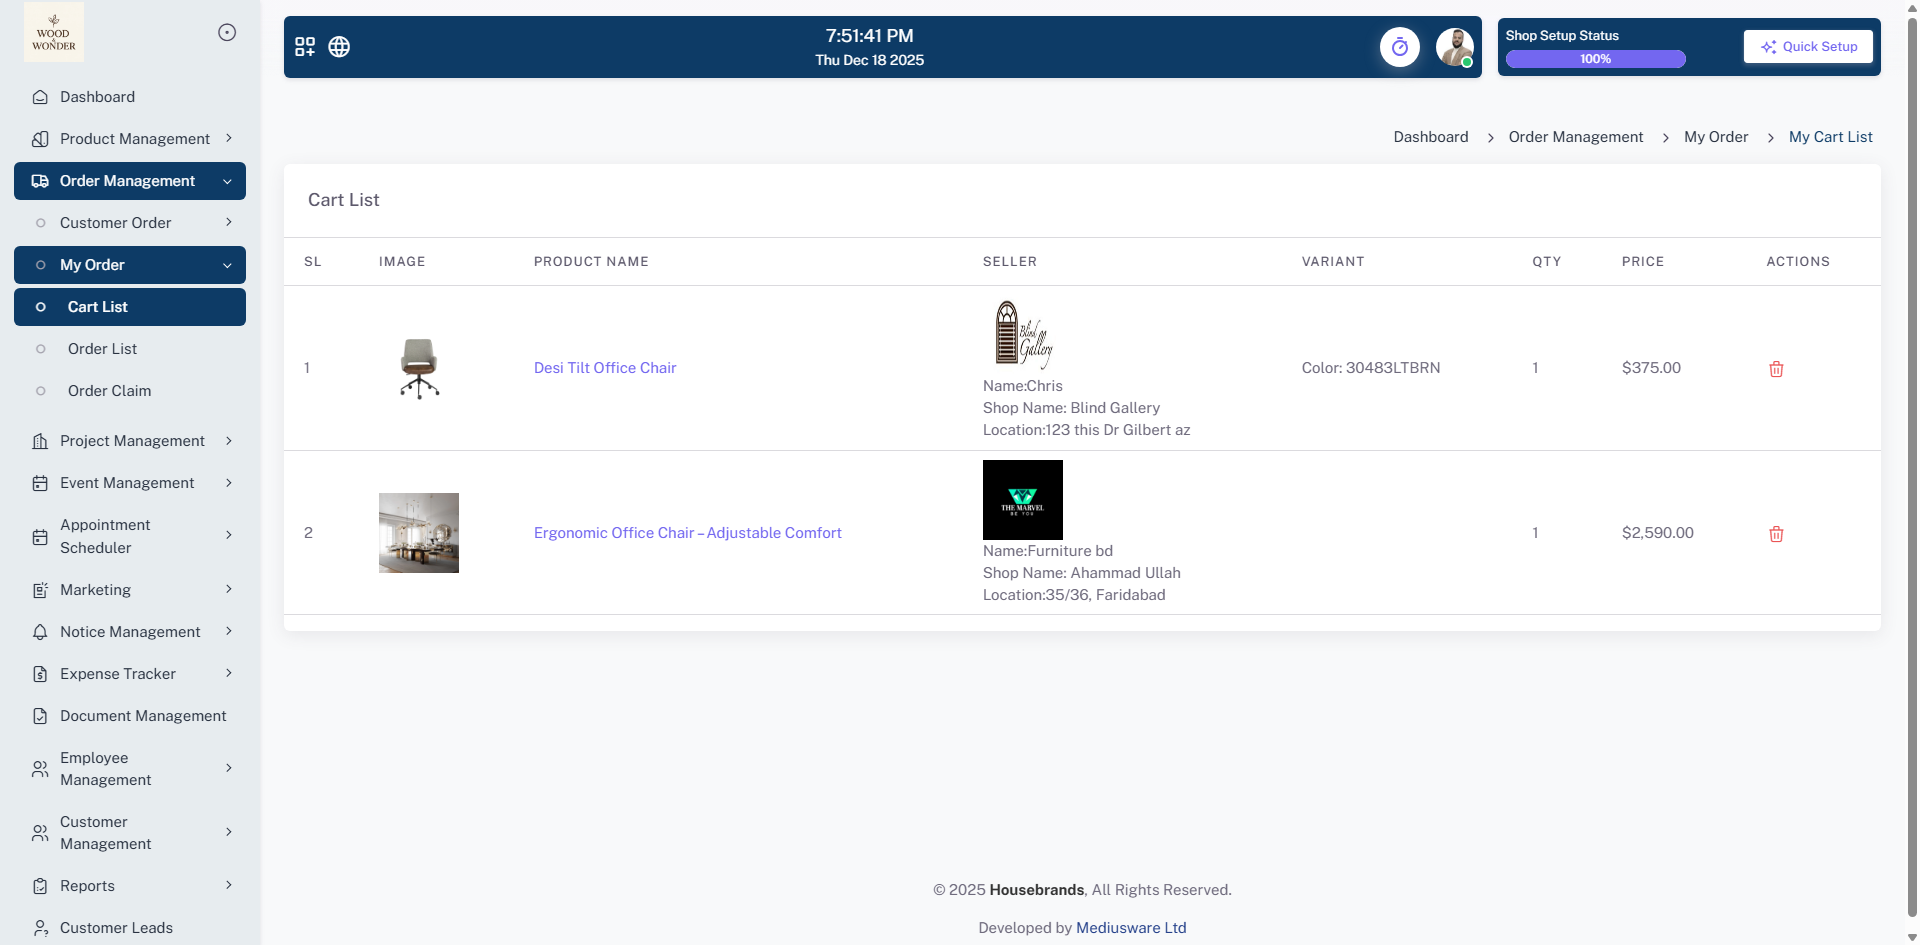
Cart List
The Cart List provides a clear overview of all the products you have selected for purchase. From this section, you can easily review your choices and remove items from the list if you no longer wish to include them, ensuring your order is exactly as intended before you proceed to checkout.
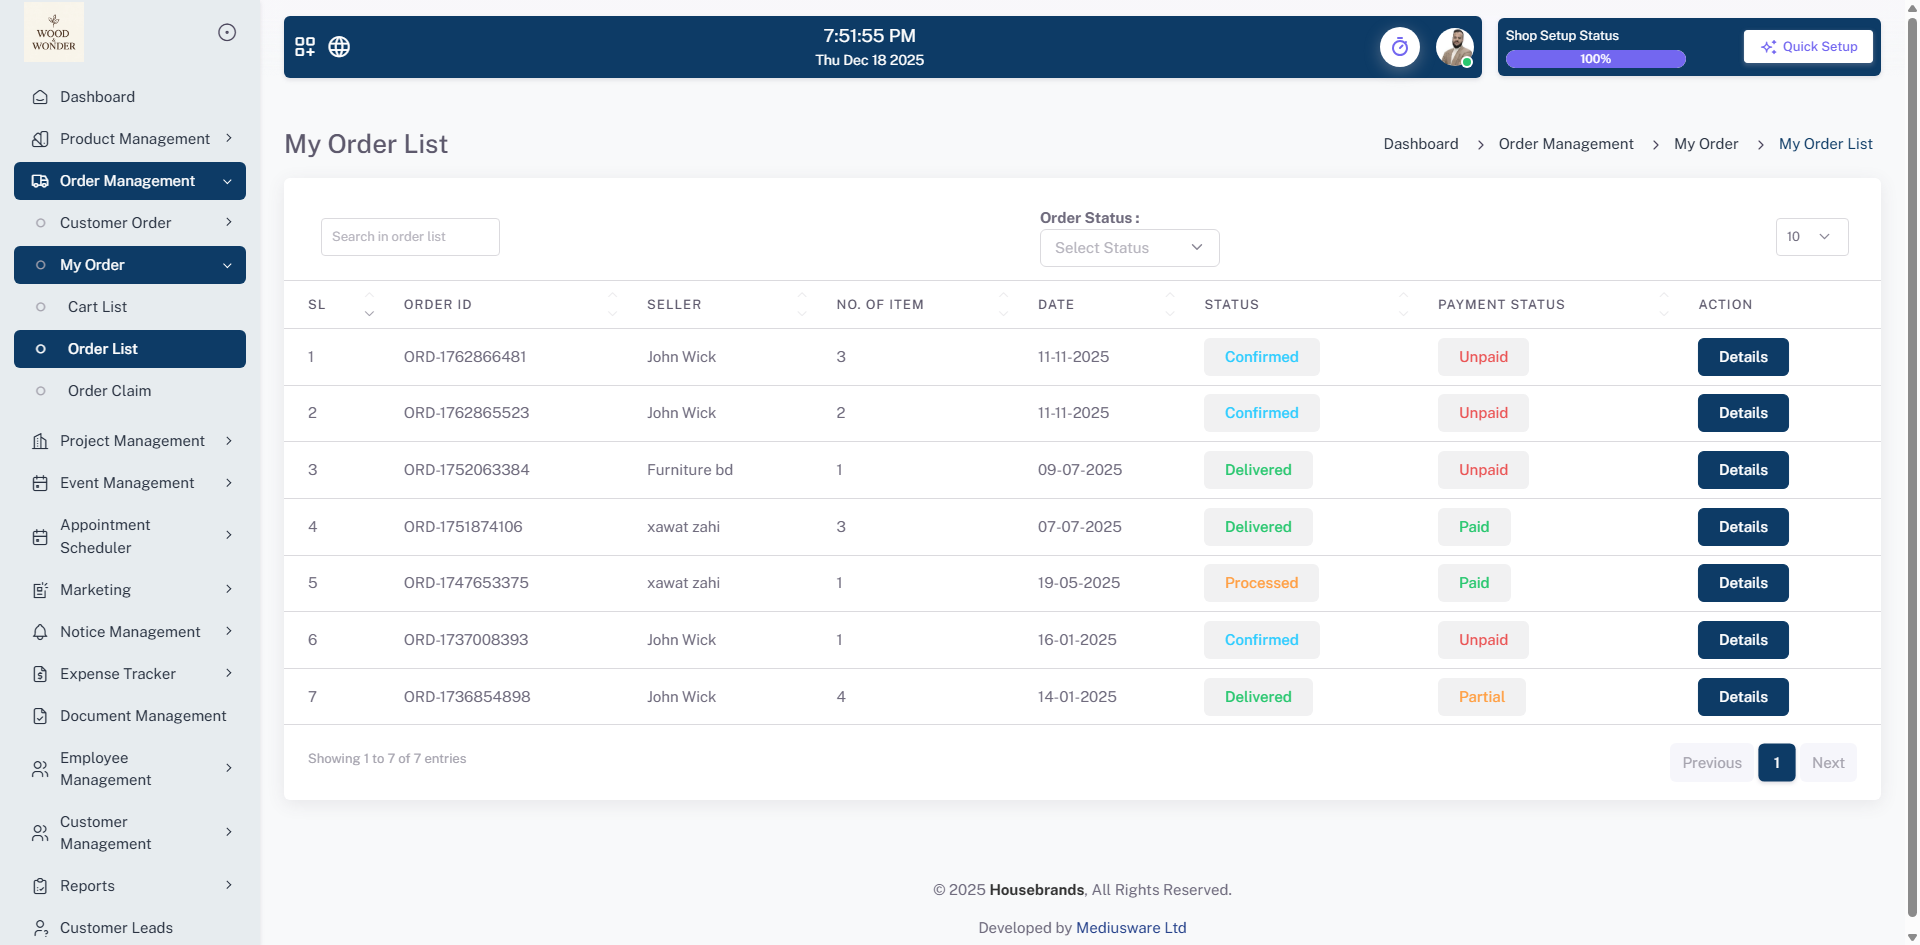
Order List
The Order List provides a complete history of all your transactions in one convenient view. From this dashboard, you can view all your orders and track complete payments to ensure your accounts are up to date. To give you full control, the system allows you to cancel an order at any time, provided the order is not yet confirmed or the payment has not been made.
For your professional records, you can download your order invoice directly from the list with a single click. Additionally, you can monitor real-time product status for every item you have purchased, ensuring you stay informed about exactly where your products are in the production or shipping process.
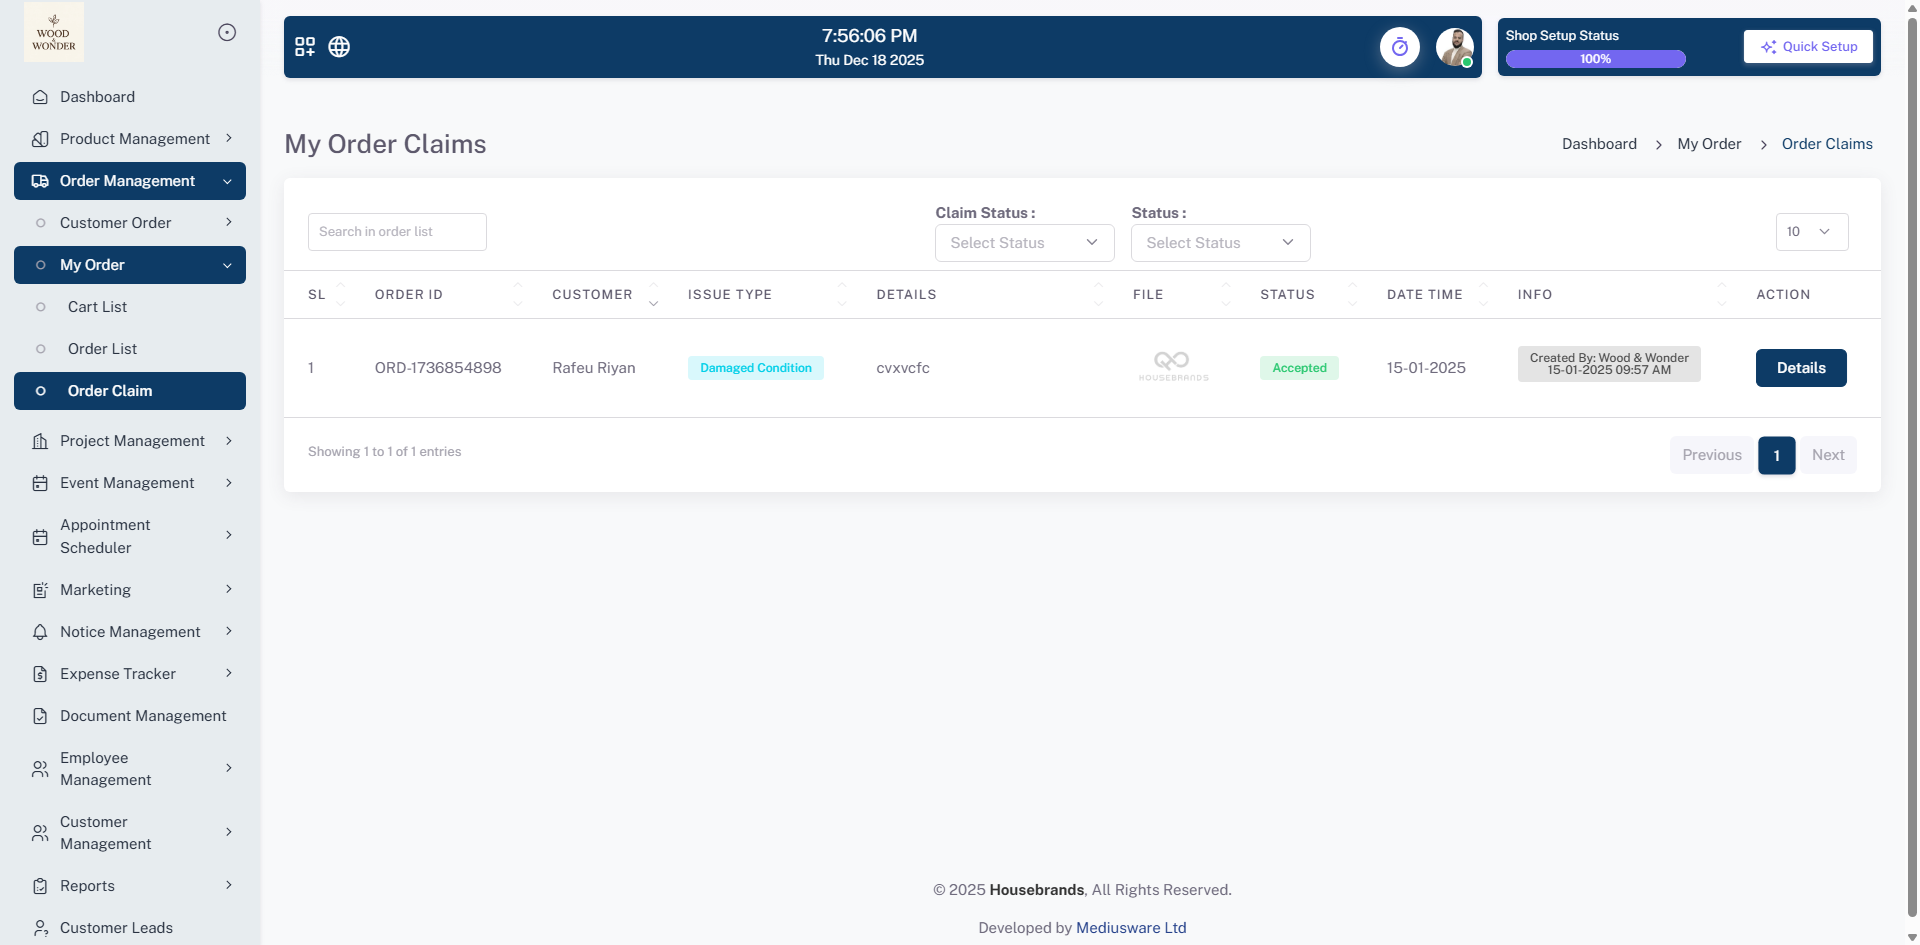
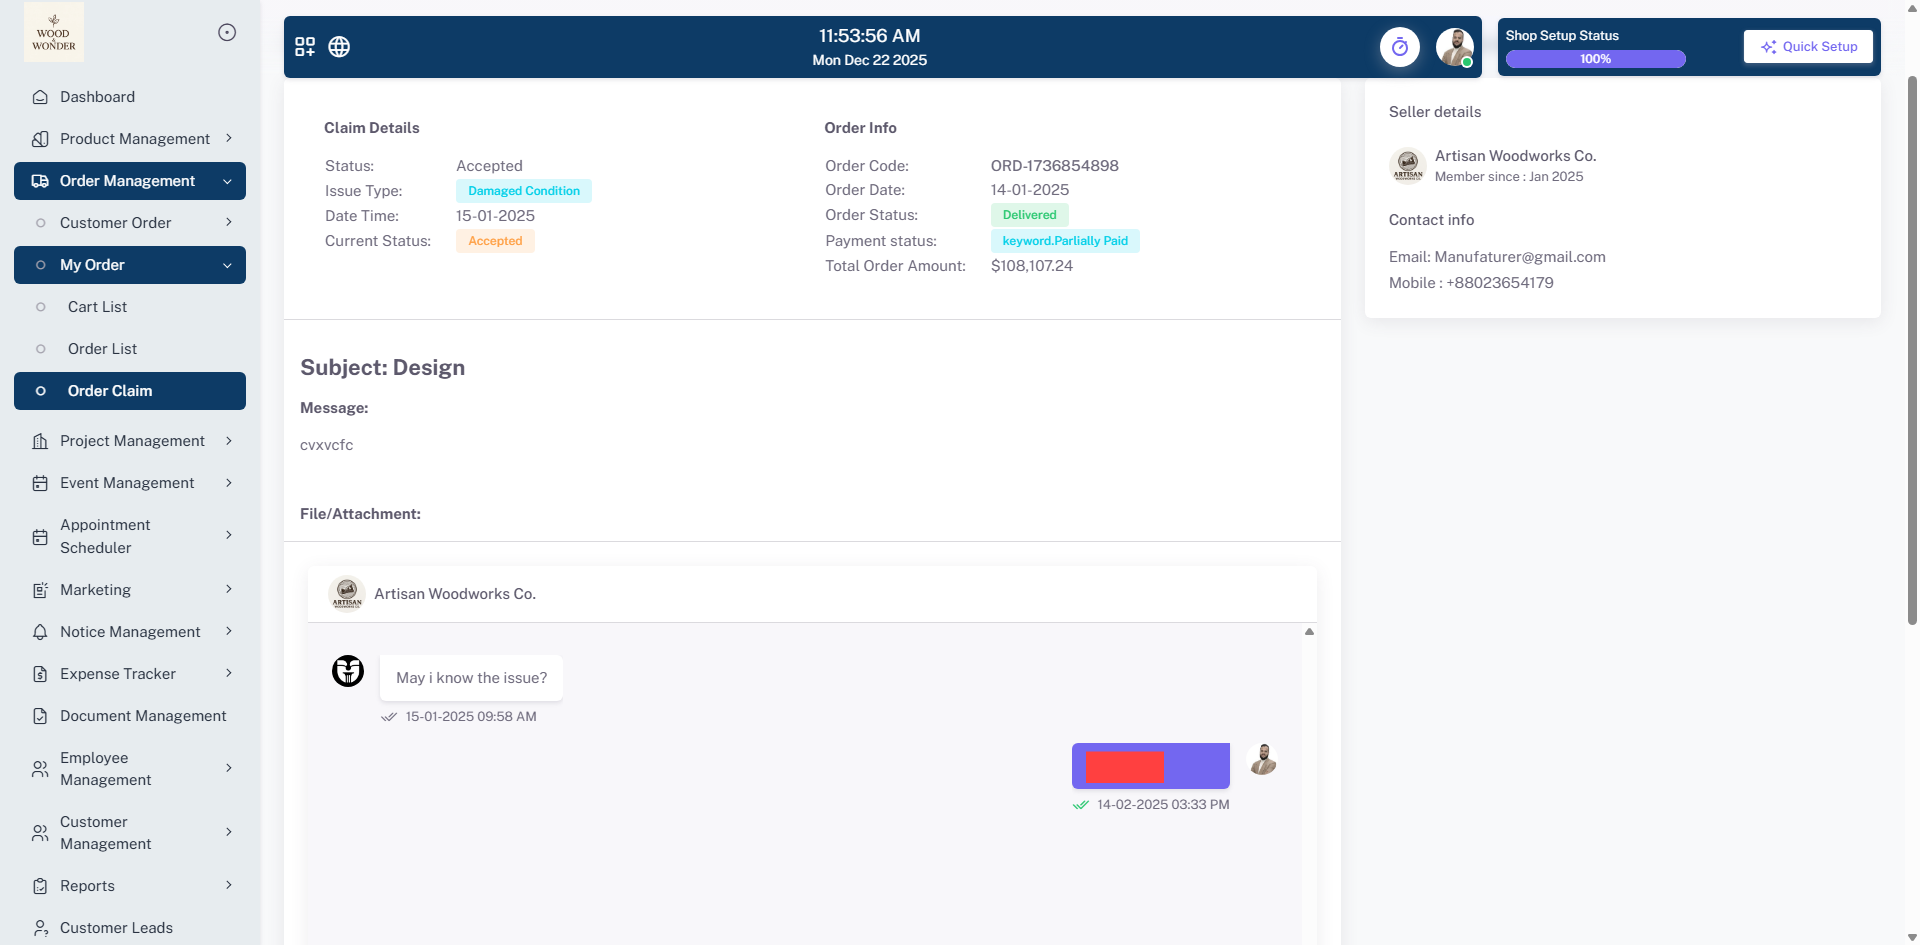
Order Claim
The My Order Claim section allows you to view all your claims in one organized location, providing a clear history of every dispute or request you have submitted. Within this area, you can engage in a real-time conversation with the seller, allowing for instant communication to resolve issues quickly. This dedicated messaging channel ensures that all updates regarding your claim are tracked accurately, keeping you informed until a resolution is reached.
Project Management
The Project Management module provides a comprehensive platform for overseeing the entire lifecycle of running projects. It serves as a centralized hub where administrators can monitor project health, manage creative assets, and ensure financial accountability through several integrated sub-modules
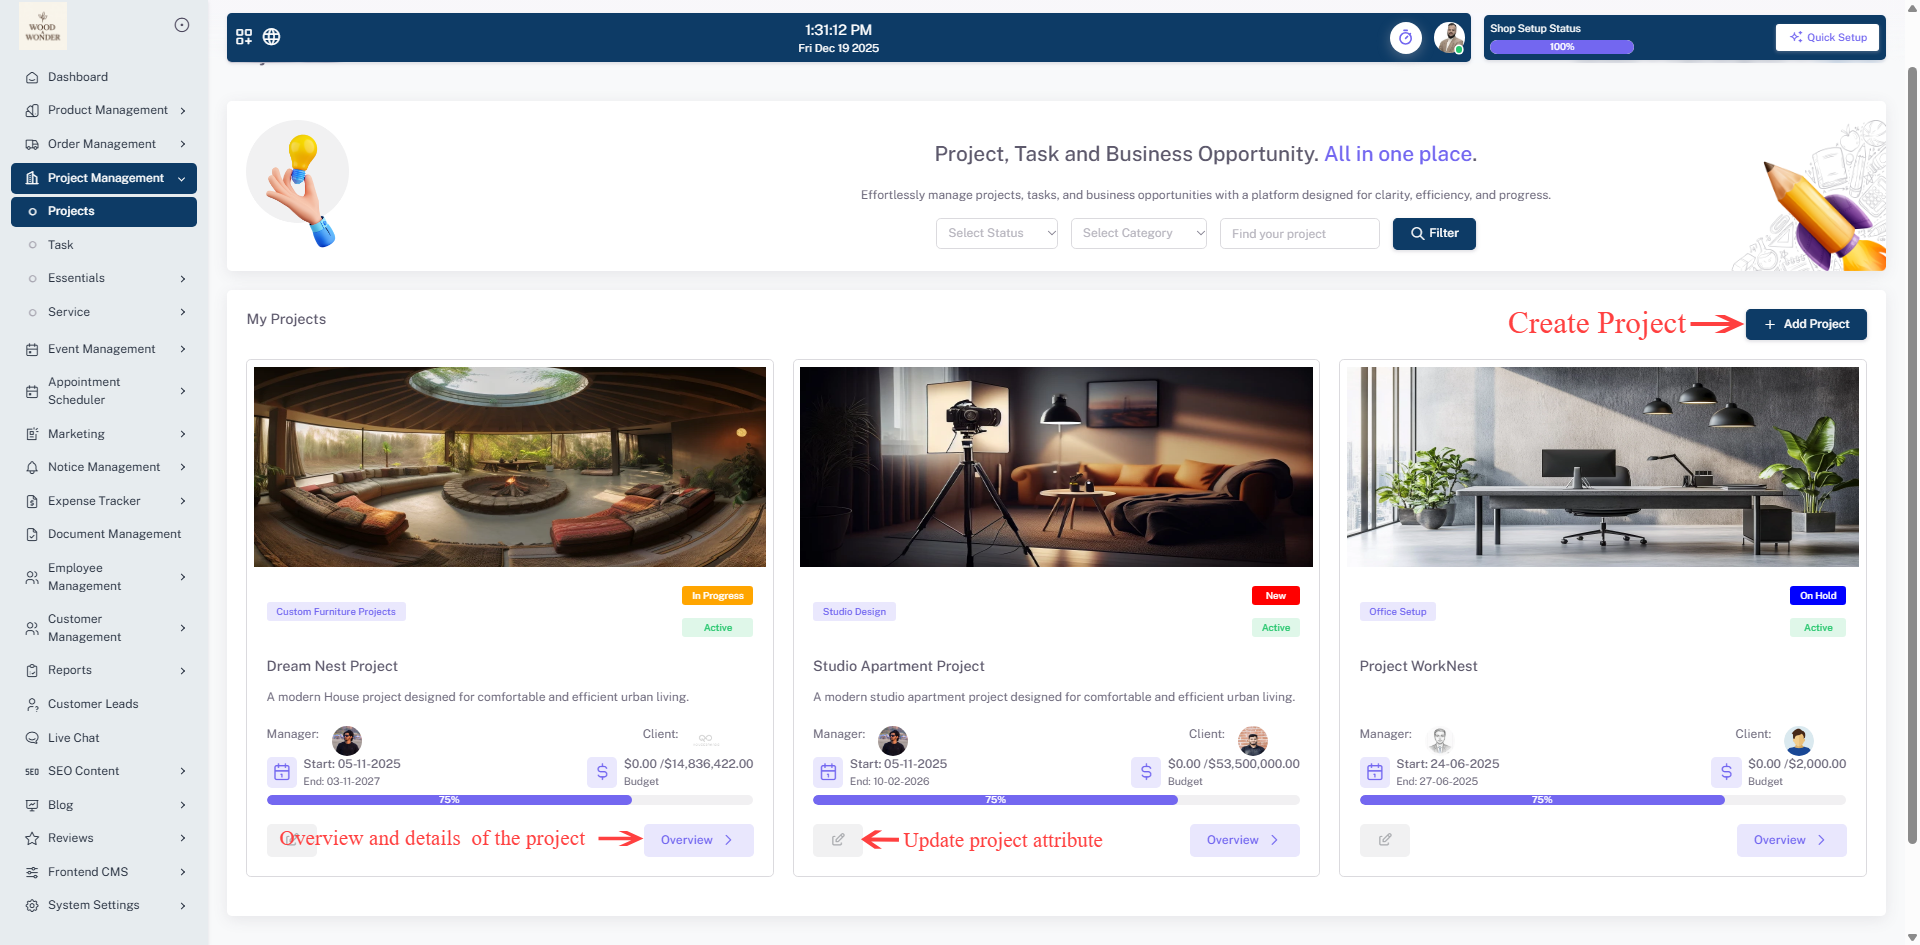
Projects
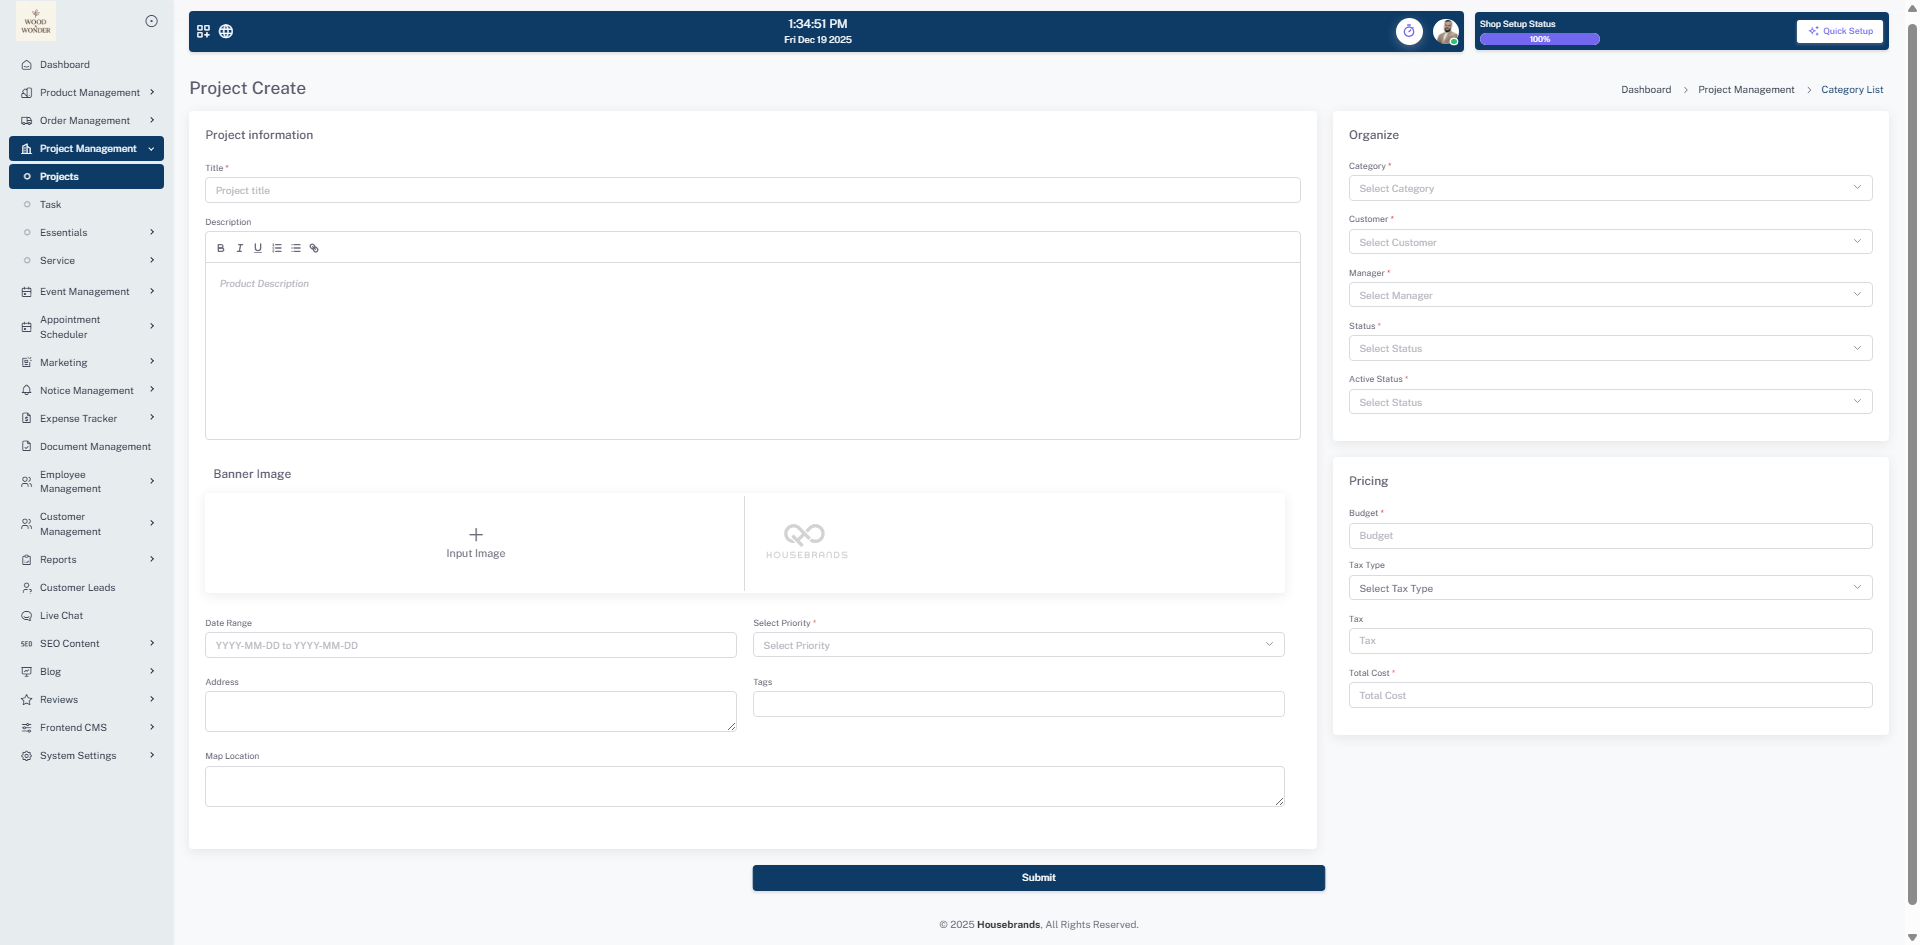
Projects (Main Dashboard) provides a visual "My Projects" dashboard to oversee all running initiatives. Projects are displayed as detailed cards that include a project image, a brief description, and current status labels such as "In Progress," "New," or "On Hold". Each card tracks critical data points at a glance, including the assigned Manager, the Client, the project timeline (Start and End dates), and the total Budget. A dynamic progress bar on each card visually indicates the project's completion percentage. Users can easily organize their view using filters for status and category, or use the "+ Add Project" button to launch new initiatives.
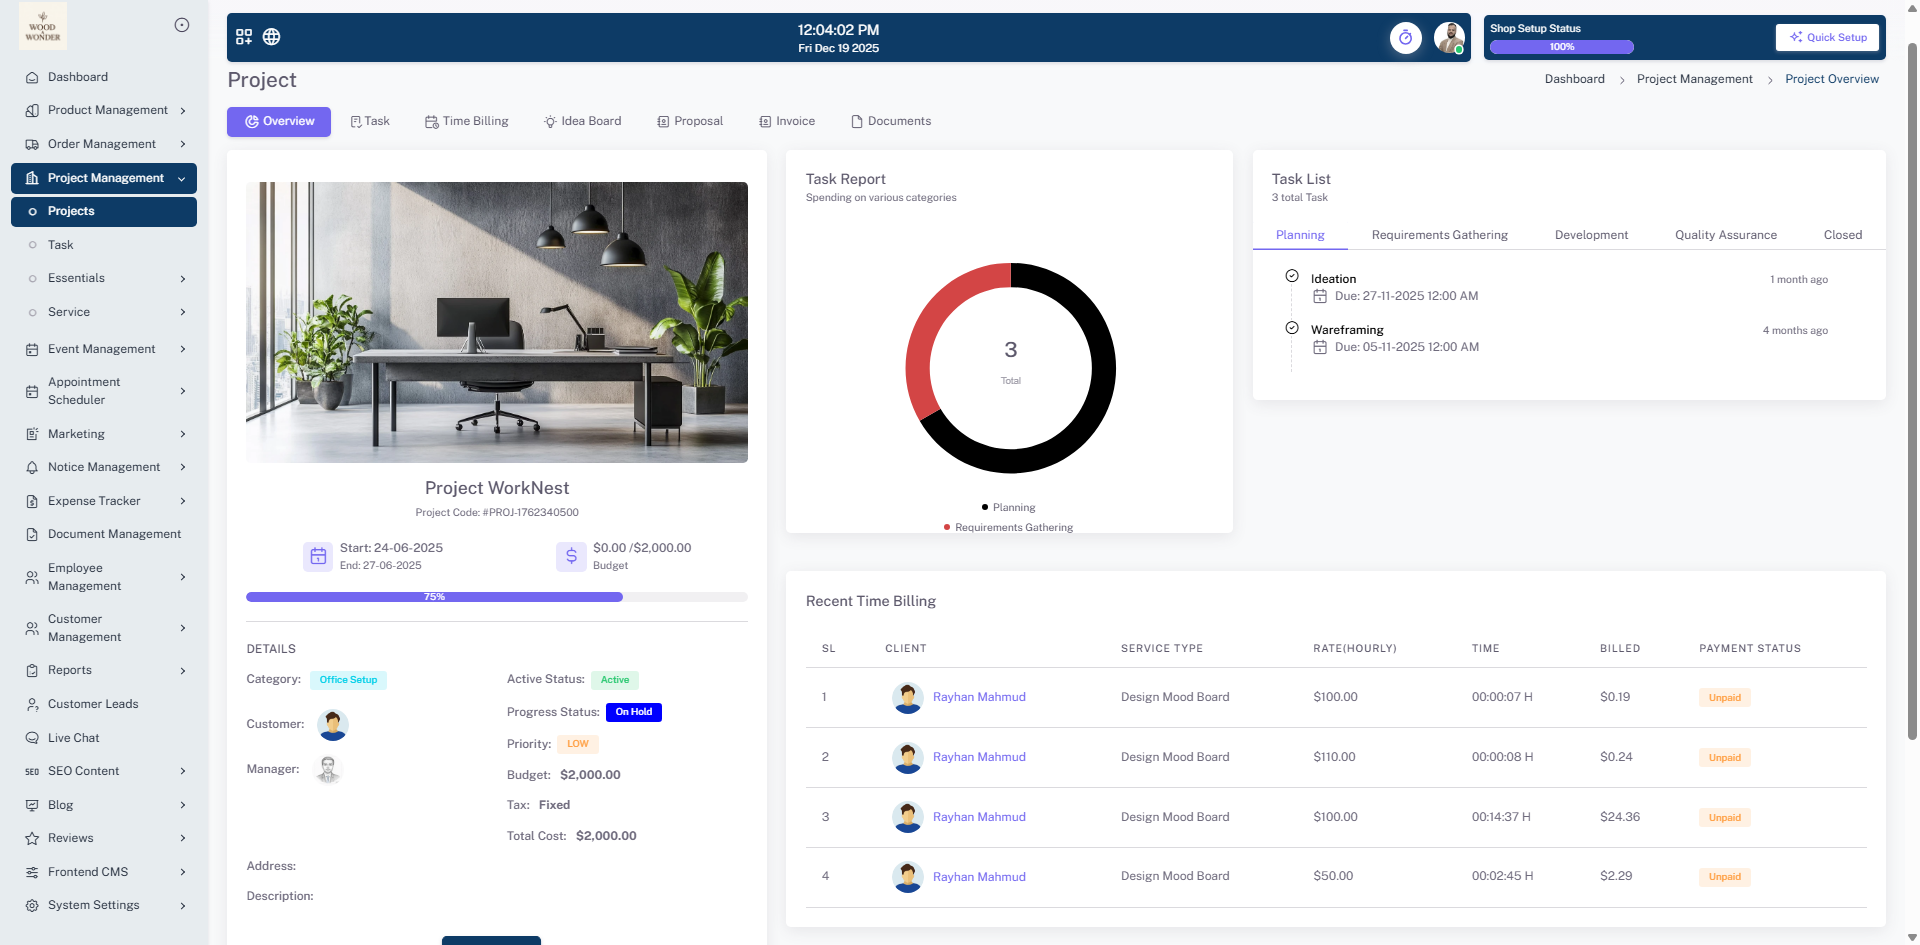
Project Overview
The Overview provides a deep dive into the health and specifics of a single selected project. It presents a comprehensive "Details" section covering the project category, customer, manager, priority level, and a full financial breakdown including the base Budget, Tax, and Total Cost. For quick analysis, it features a "Task Report" donut chart that visualizes task distribution and a "Task List" organized by stages such as Planning and Requirements Gathering. This view also includes snapshots of recent Time Billing and Invoices to maintain financial transparency without switching screens.
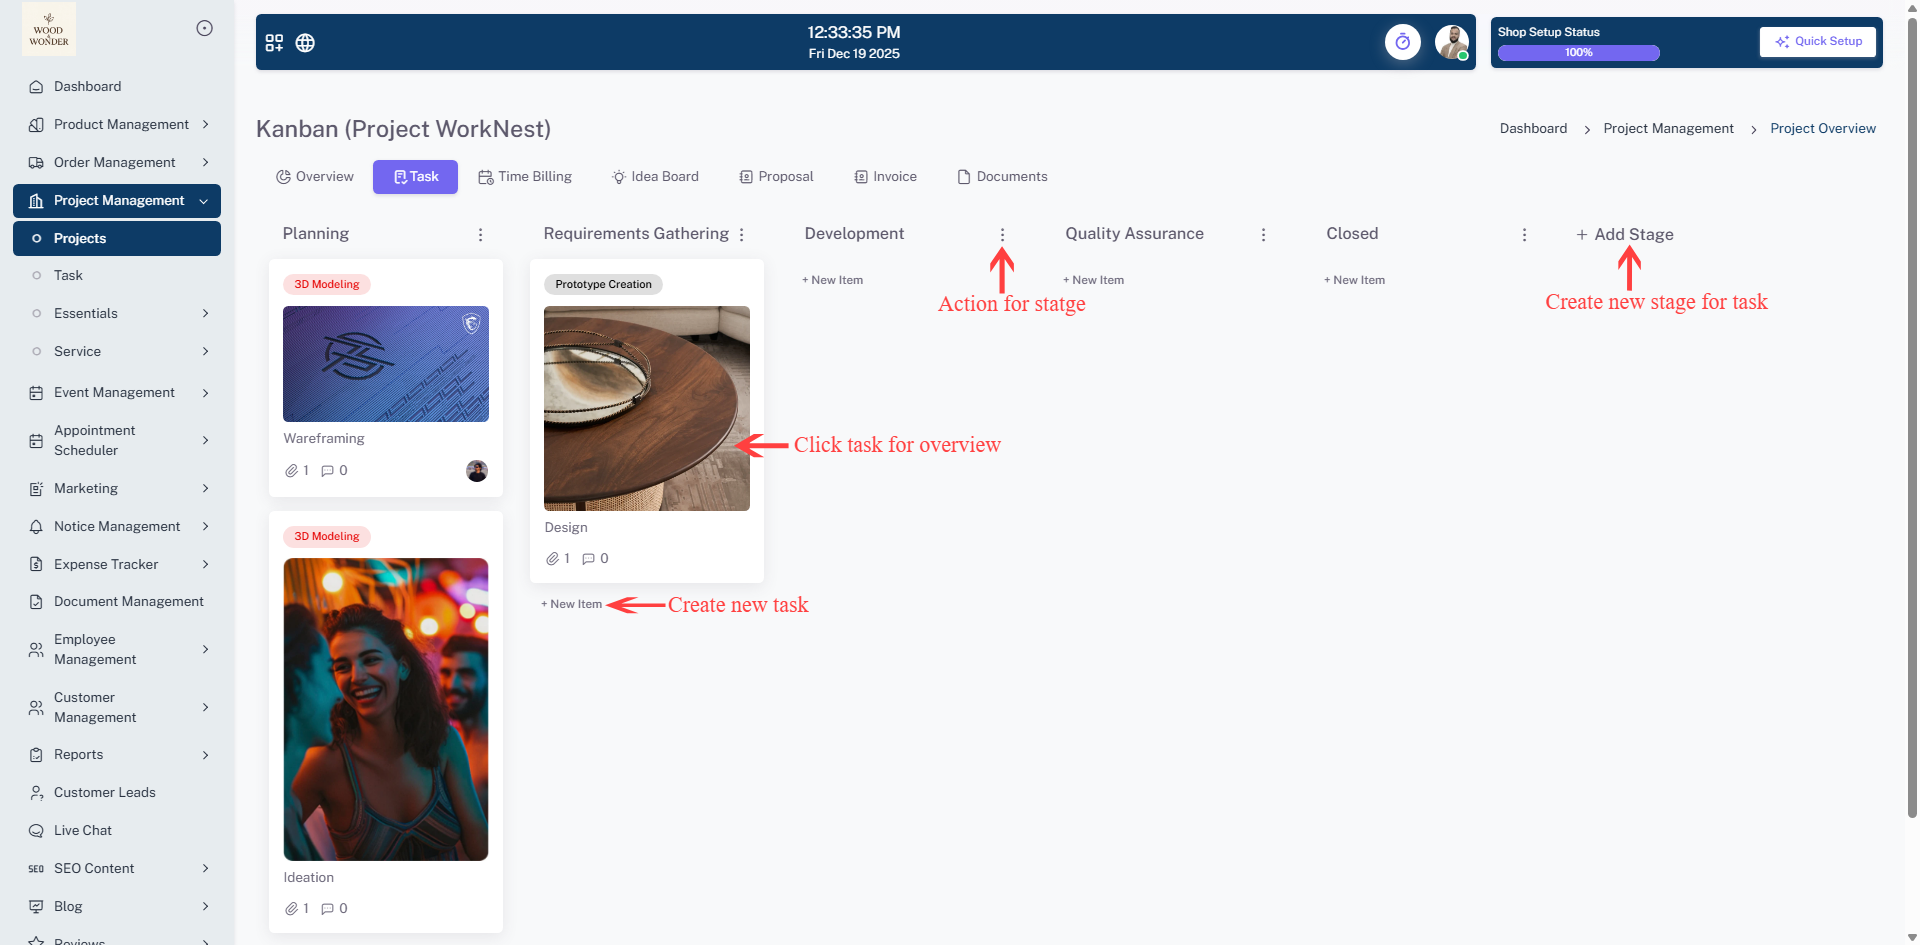
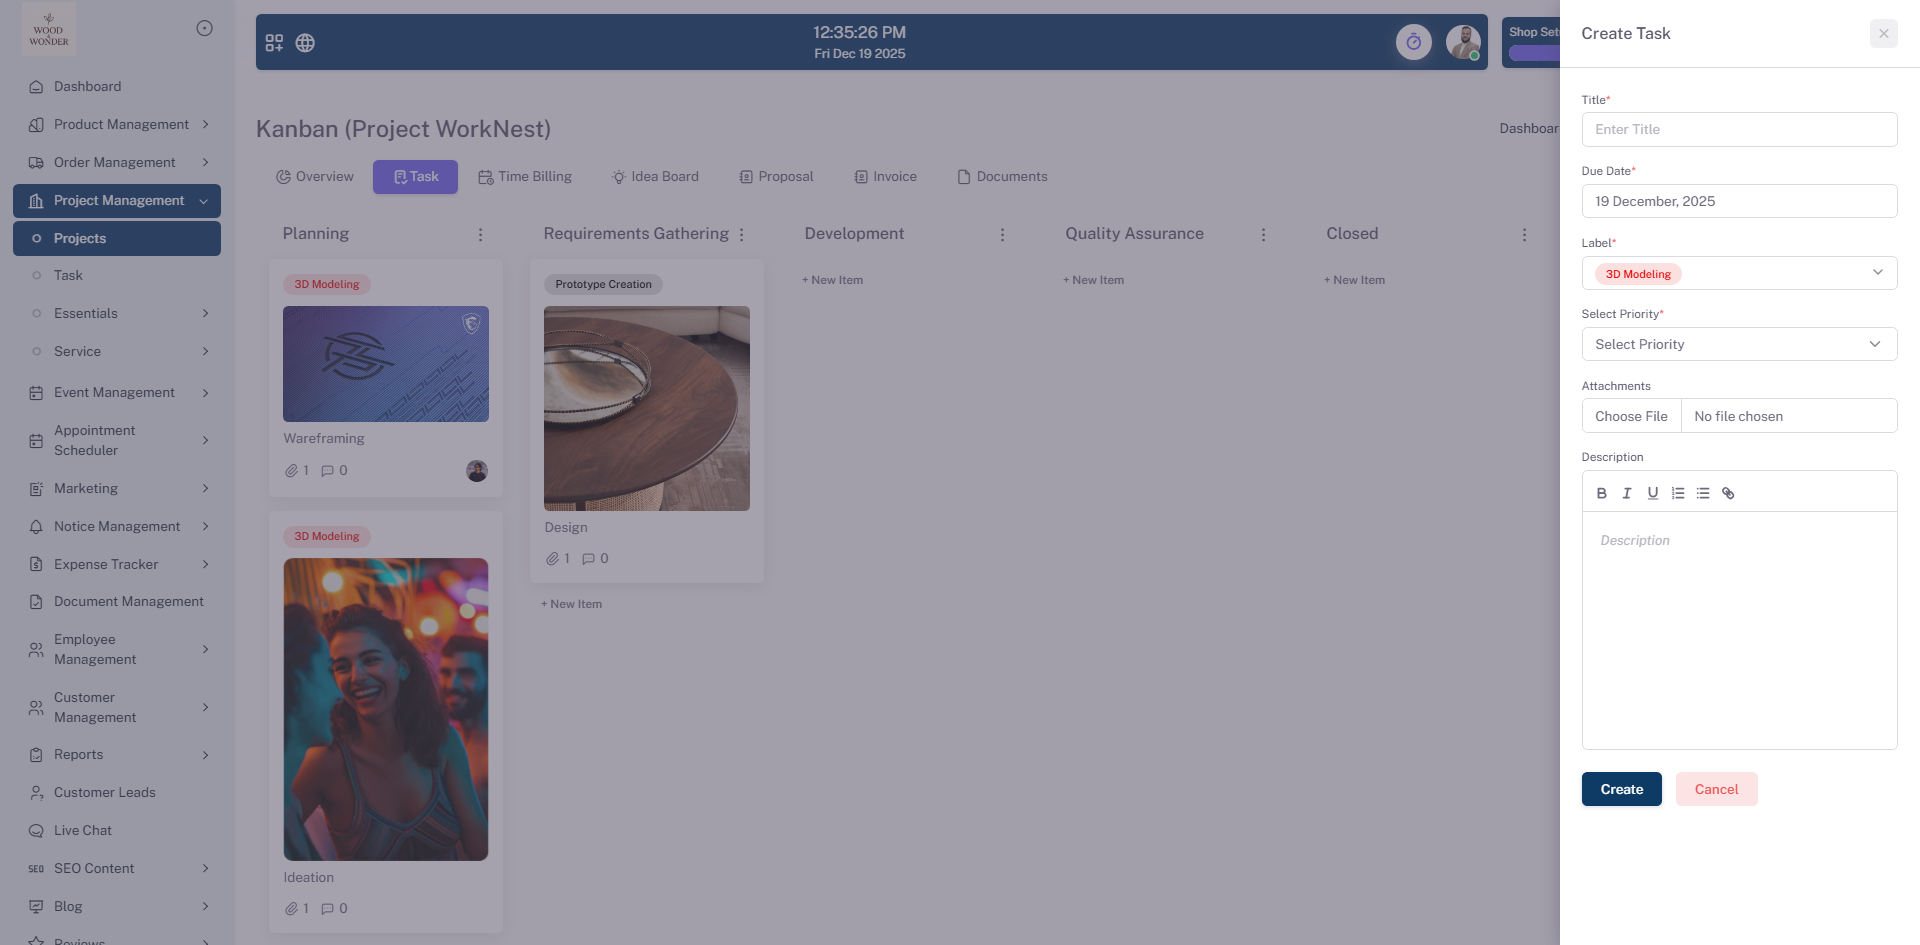
Task (Kanban)
The Task utilizes a visual Kanban board to manage project workflows efficiently. It organizes work into customizable columns such as Planning, Requirements Gathering, Development, Quality Assurance, and Closed. Each task card supports rich media, showing attachments and comment counts, allowing team members to track progress and identify bottlenecks visually. Administrators can also use the "Task List" project selector to switch between different projects and explore their specific deadlines and updates.
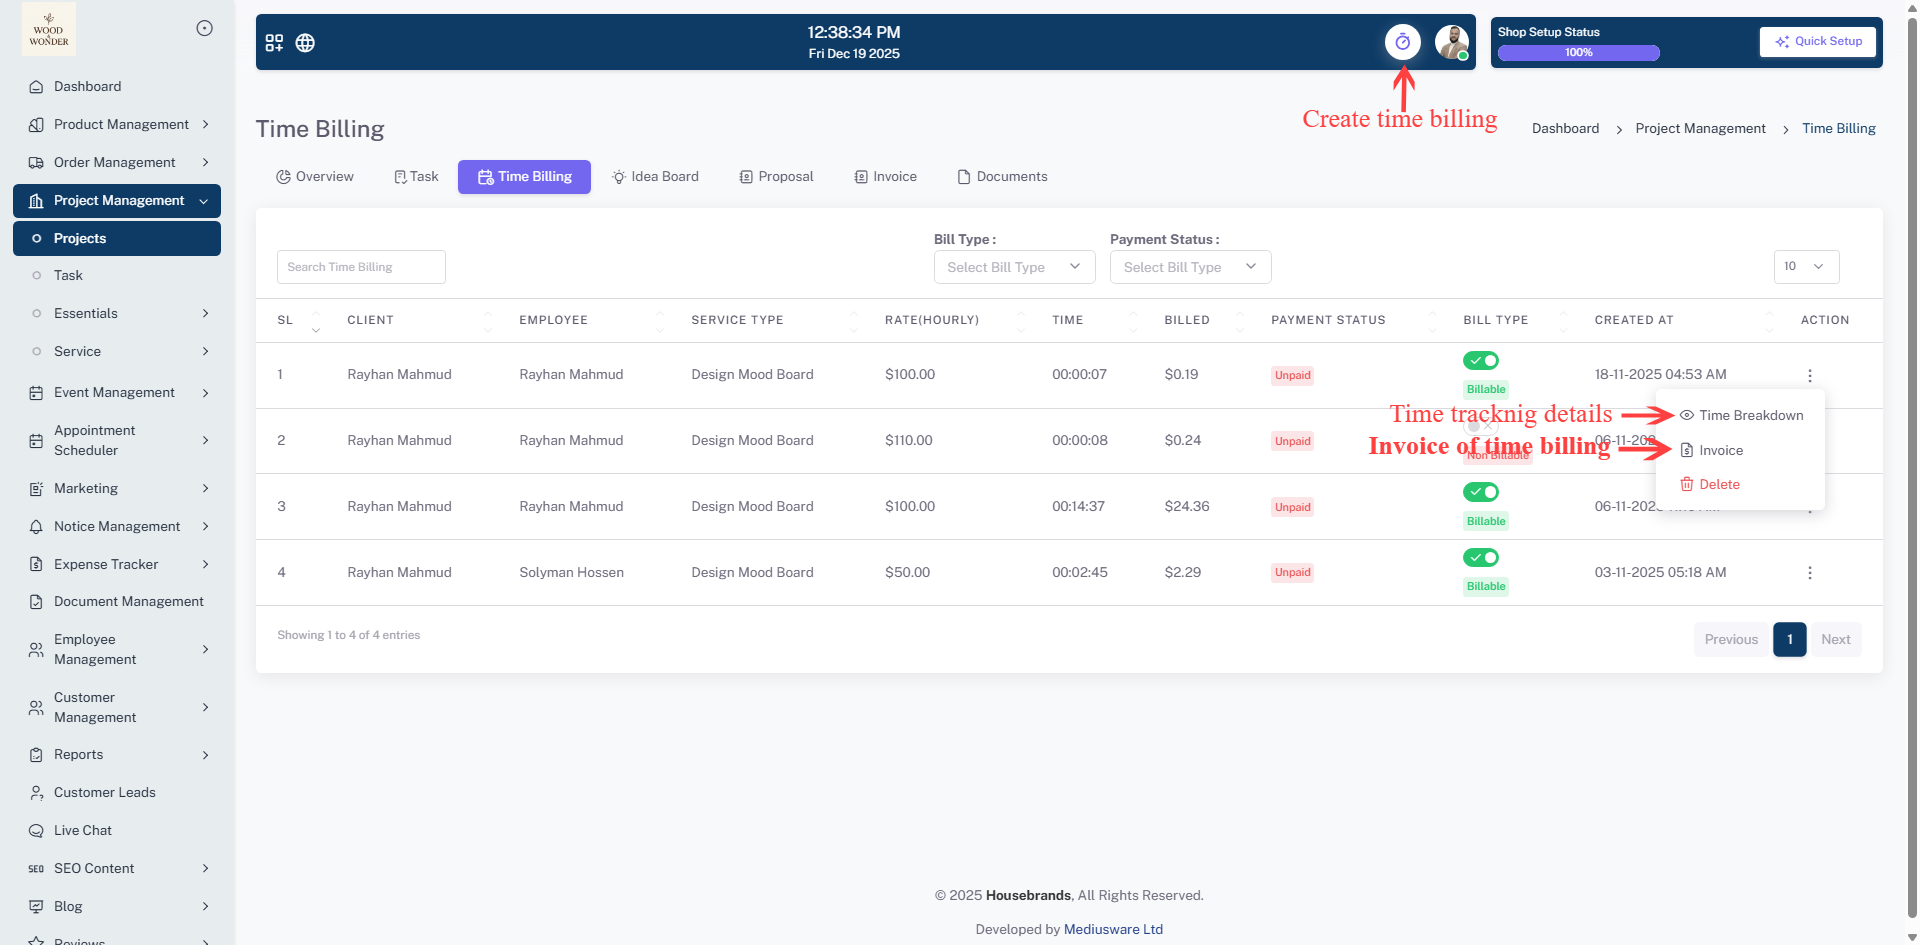
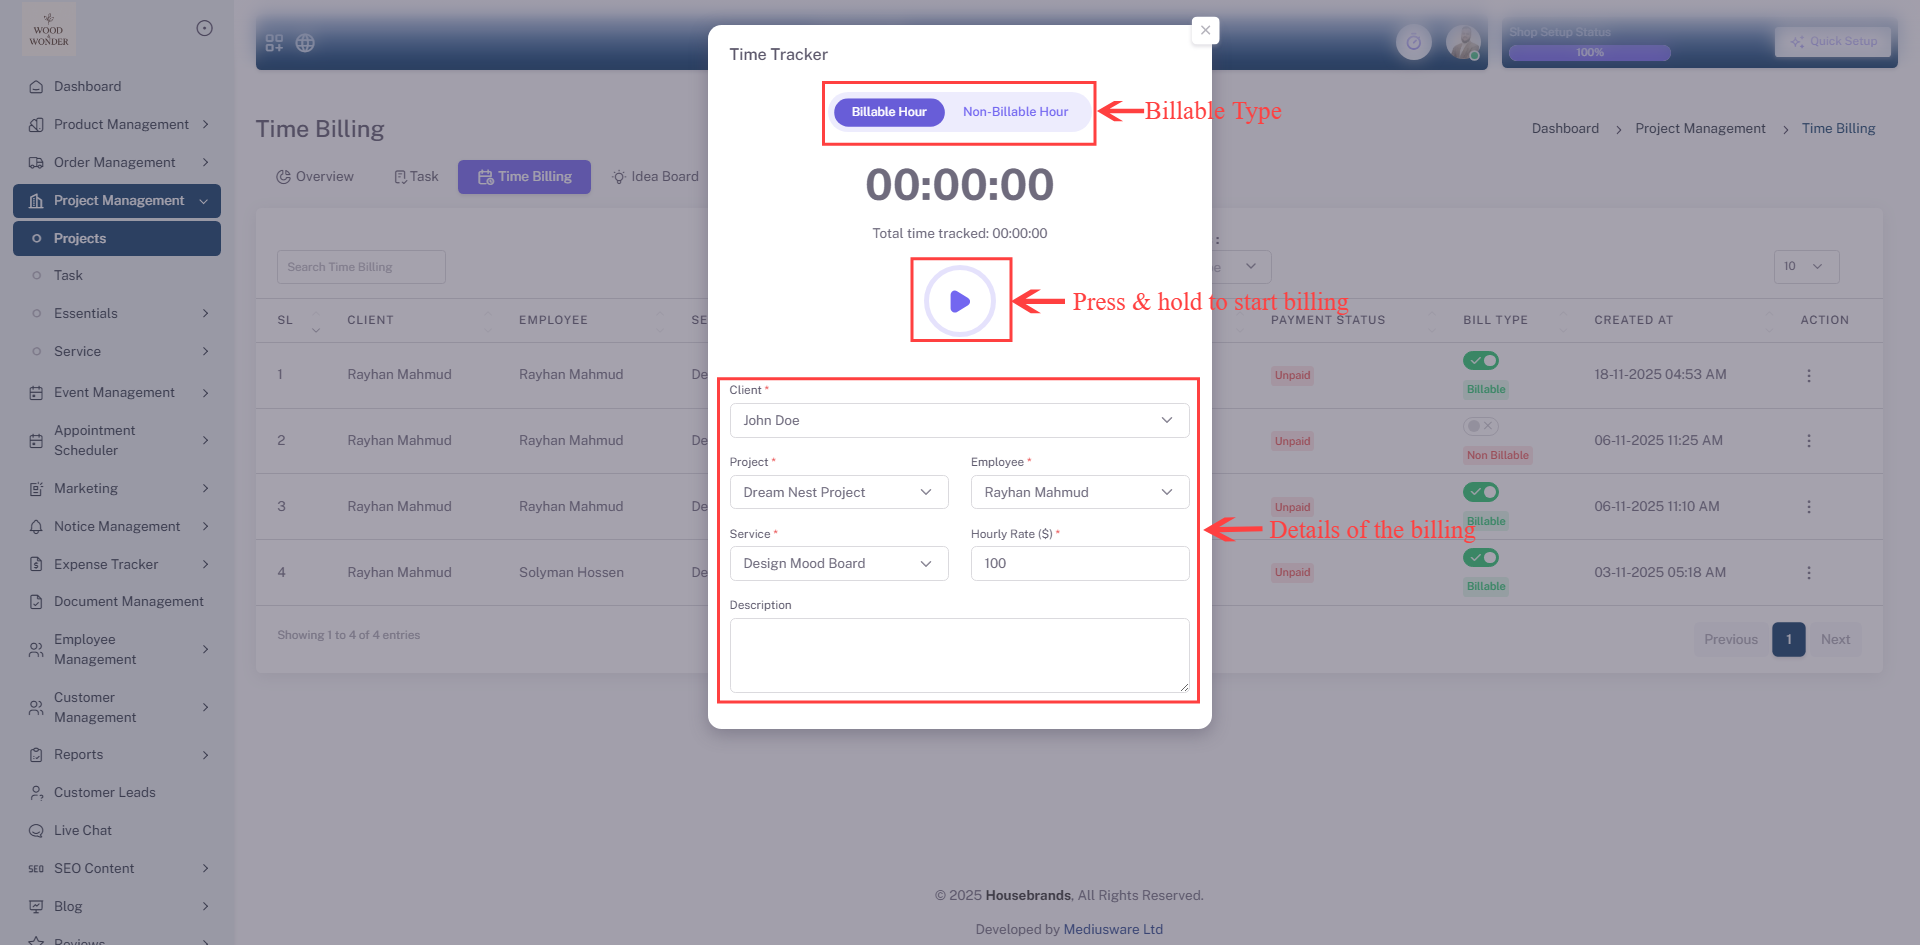
Time Billing
The Time Billing tracks labor costs and billable hours for specific project services. It records the Client, the Employee performing the work, the Service Type (e.g., Design Mood Board), and the hourly rate. It precisely logs the time spent and automatically calculates the "Billed" amount. Each entry tracks a "Bill Type" (Billable or Non-Billable) and "Payment Status" (e.g., Unpaid), ensuring that all work is accurately accounted for and ready for invoicing.
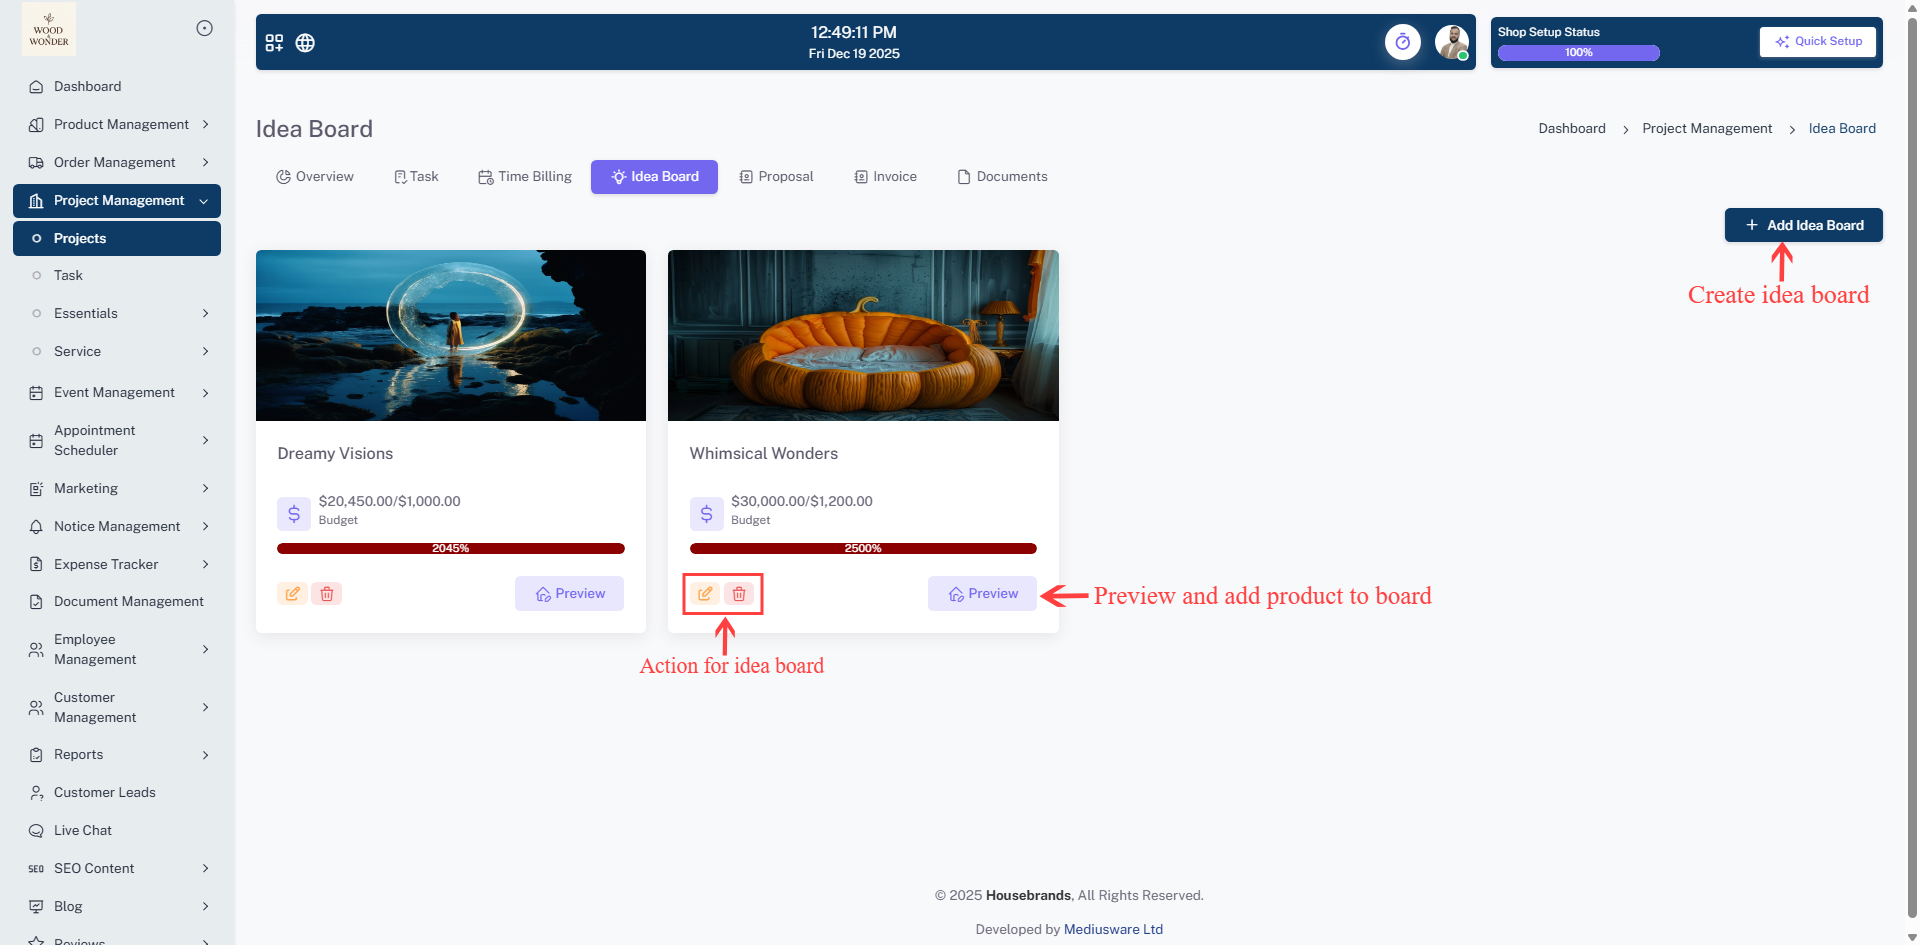
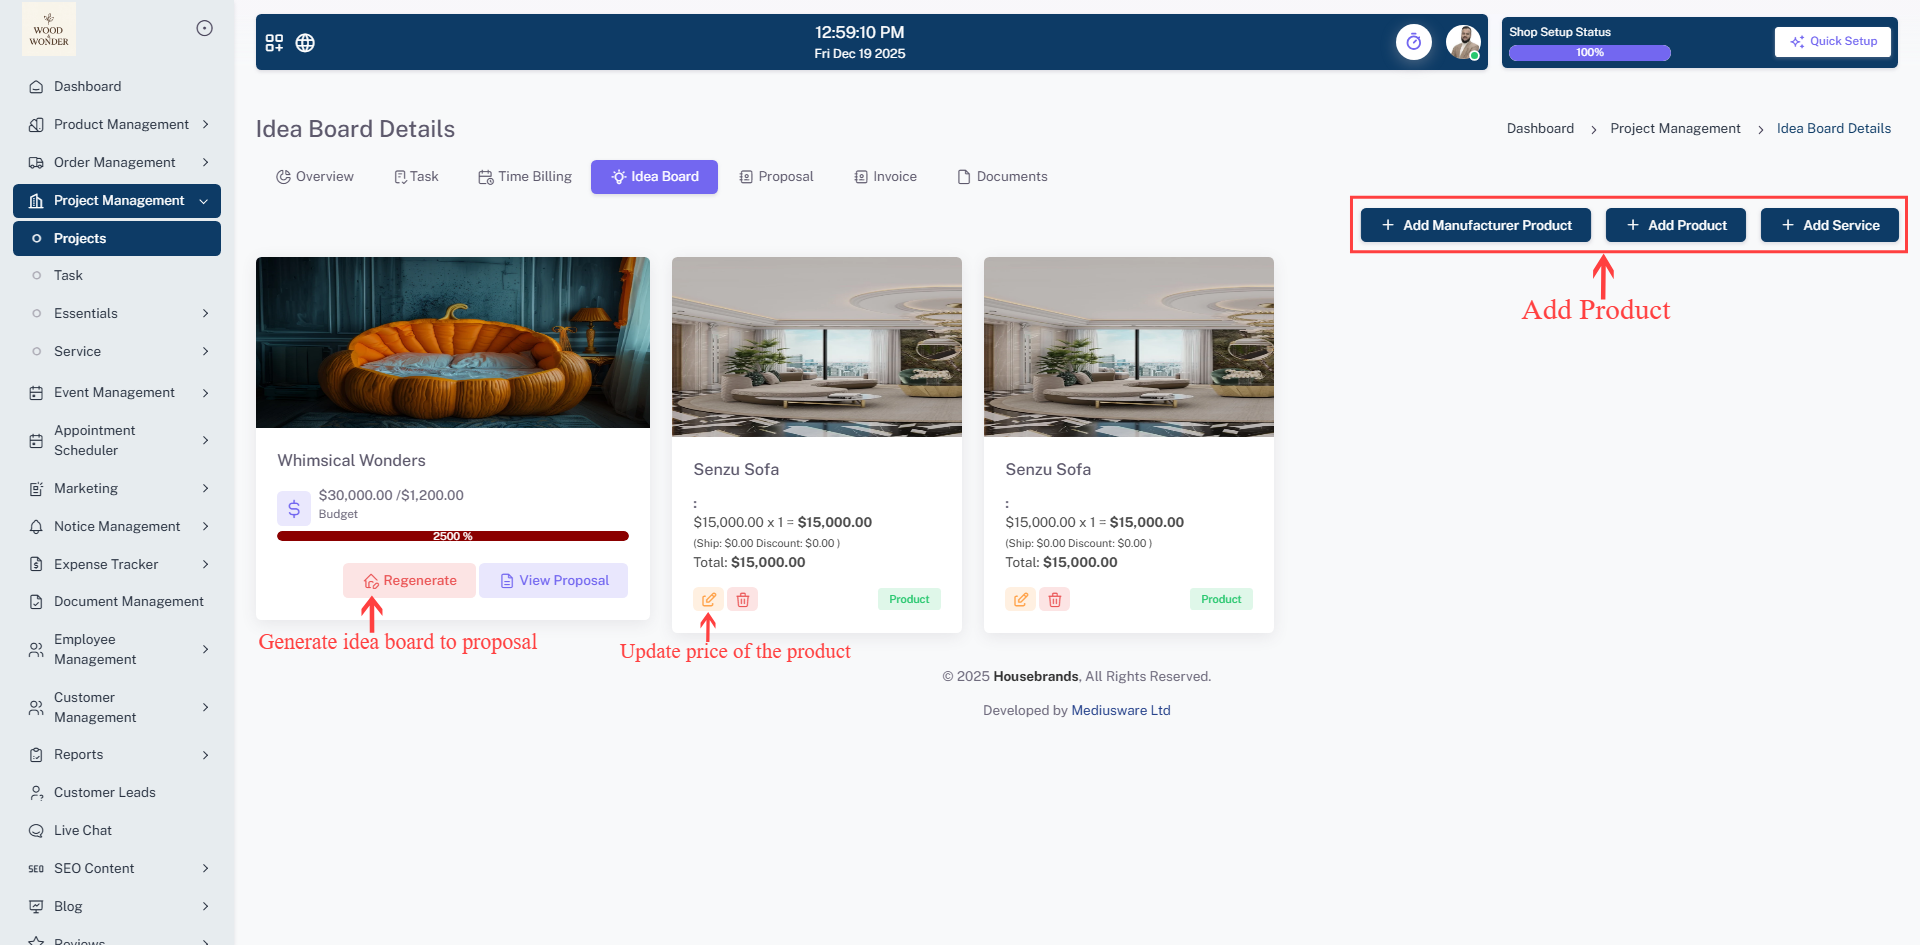
Idea Board
The Idea Board provides a creative workspace to manage project concepts and visual inspirations. Users can create multiple boards, such as "Dreamy Visions" or "Whimsical Wonders," each with its own allocated budget and a visual bar showing the percentage of budget consumption. Within each board's details, users can add specific manufacturer products or services, tracking the quantity and cost of individual items to ensure the creative vision stays within financial limits.
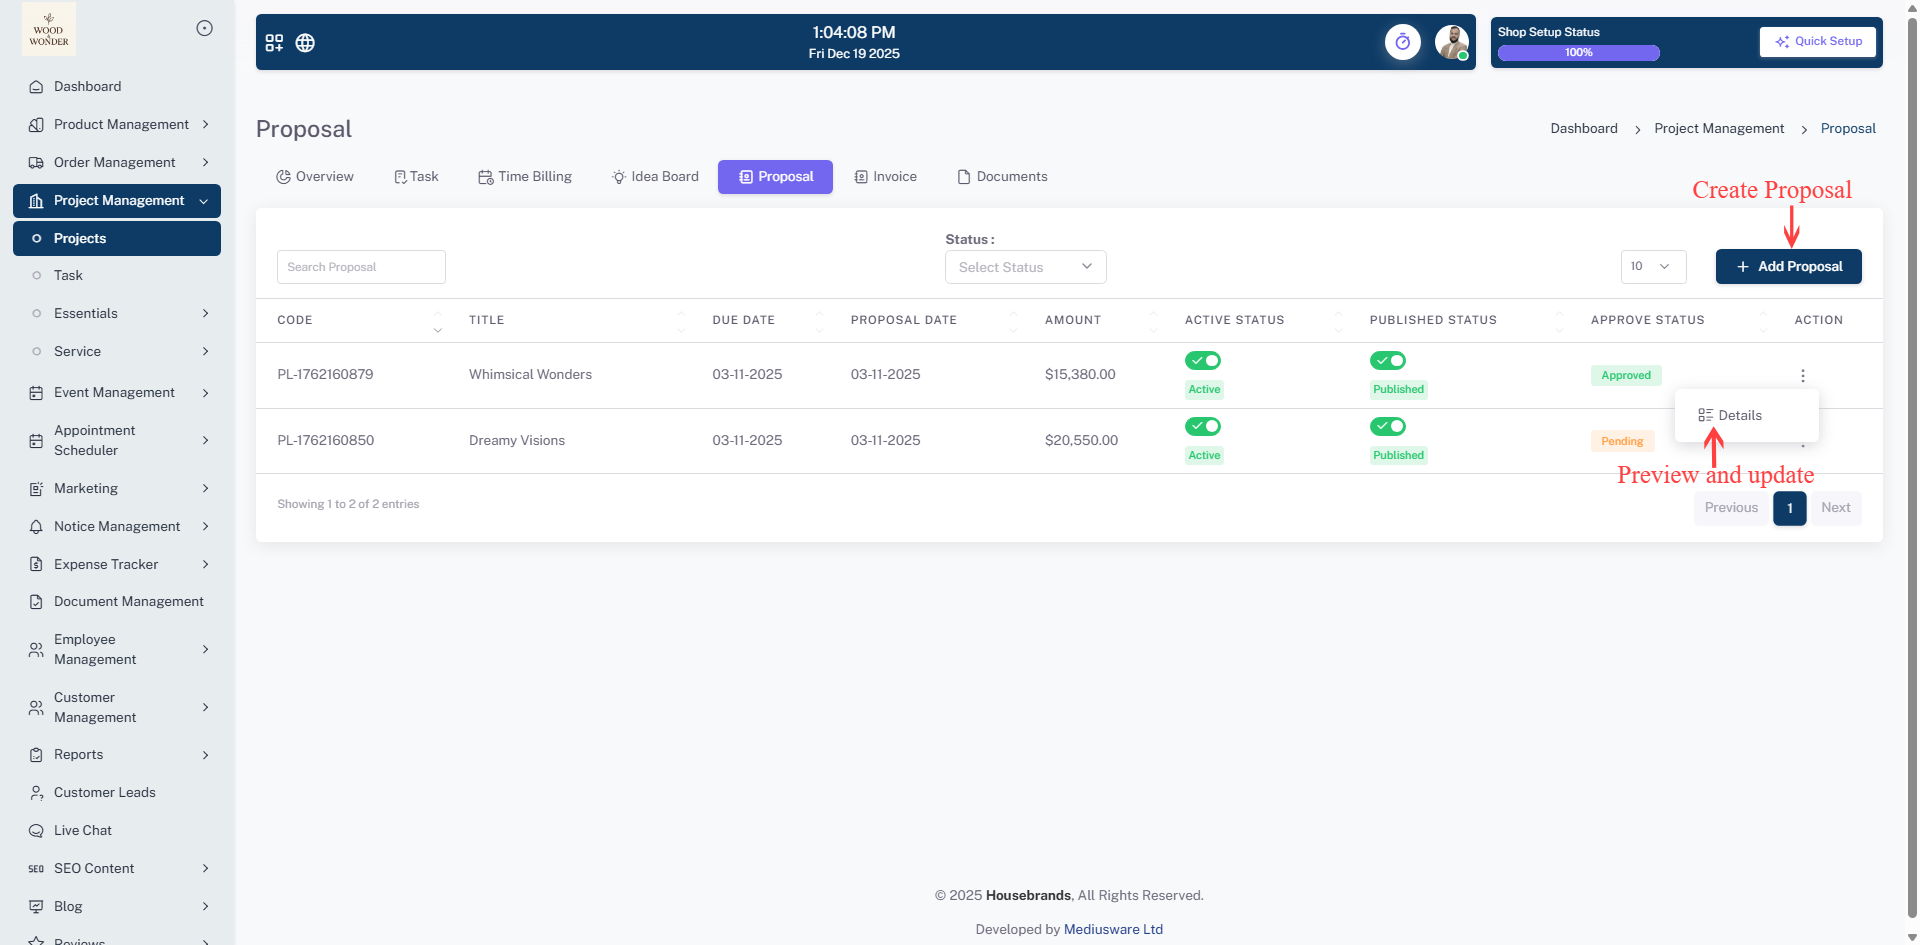
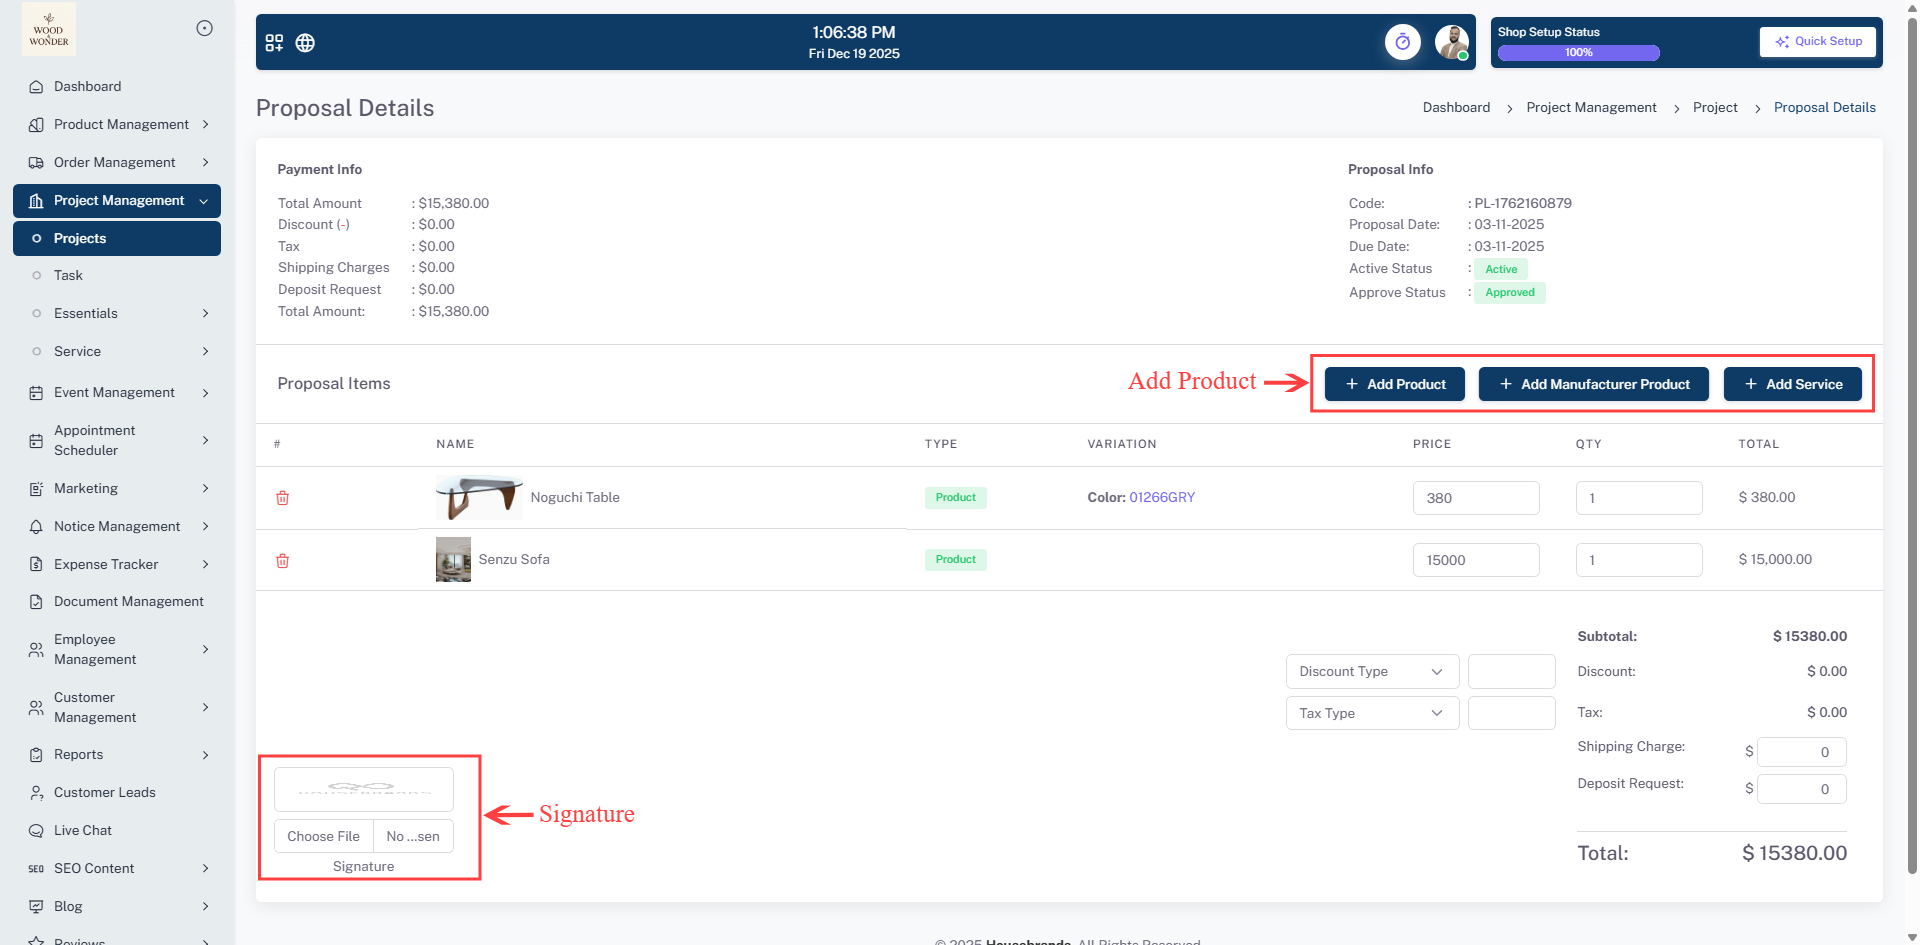
Proposal
The Proposal sub-module manages the initial bidding and contract phase. It lists every proposal with a unique code, title, and the proposed amount. Administrators can monitor the "Approve Status" to see which bids are "Pending" or "Approved," as well as the "Published Status" of the document. The interface allows users to search for specific proposals, add new ones, or use the action menu to edit or delete existing entries.
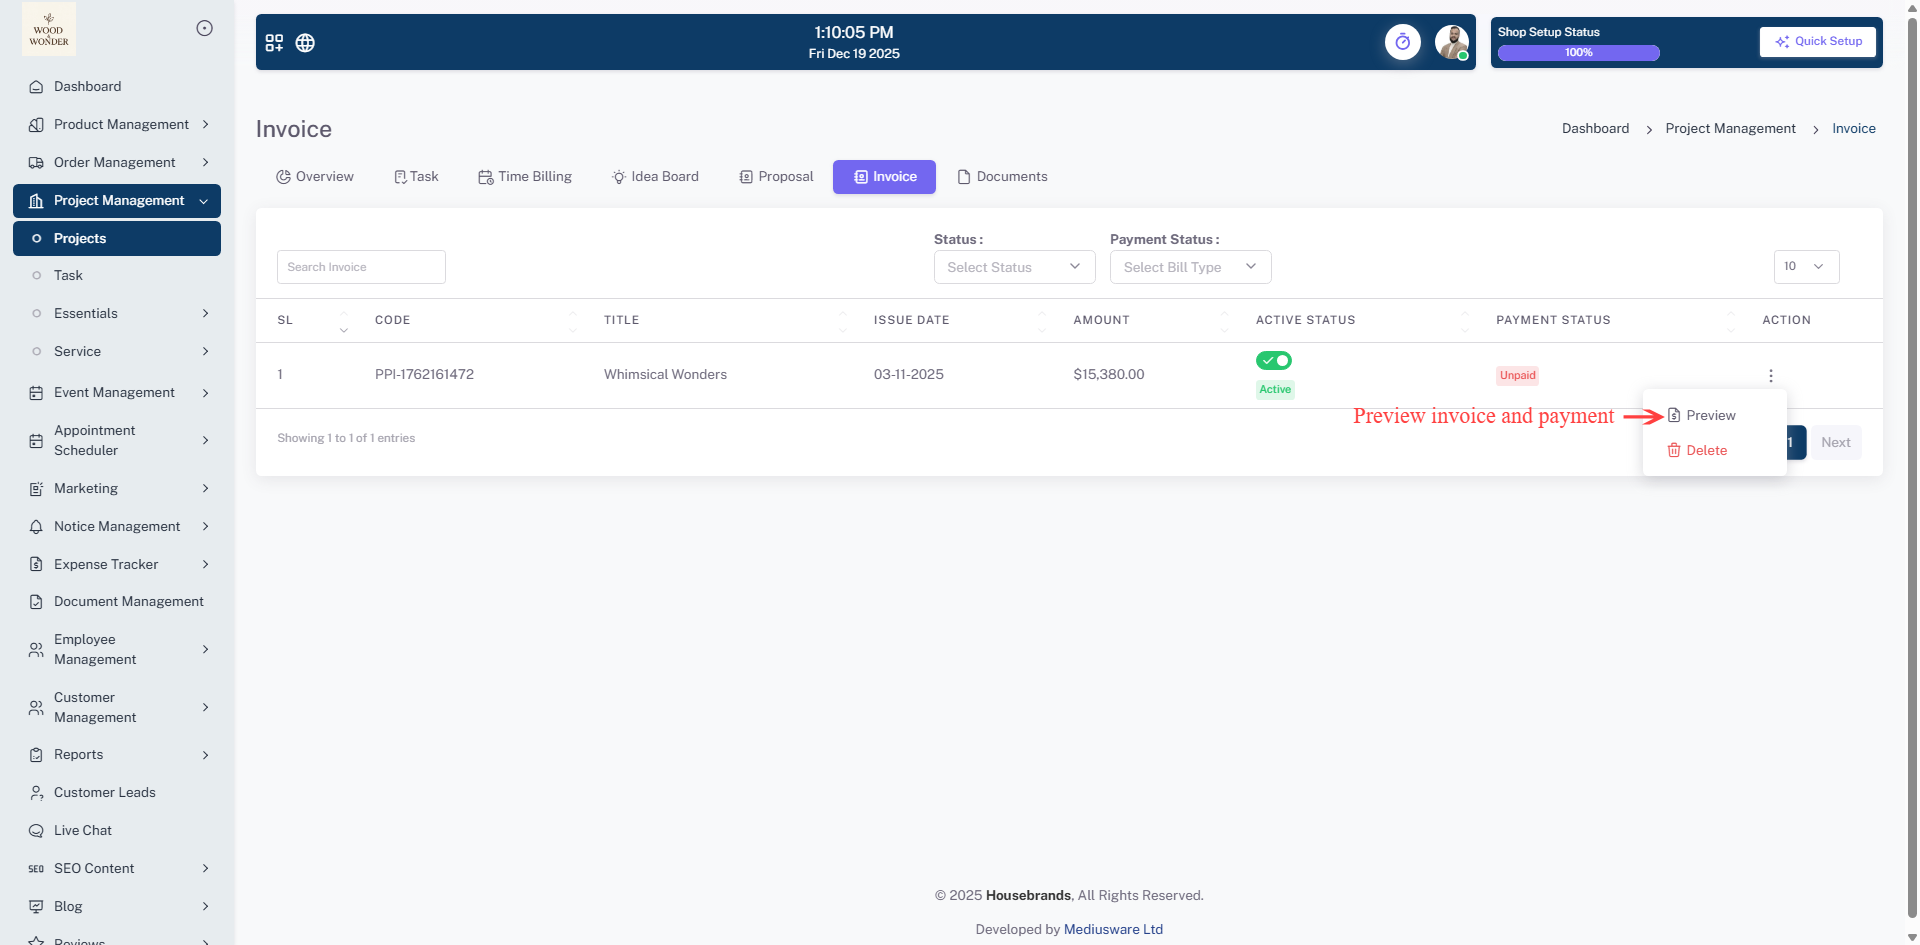
Invoice
The Invoice serves as the revenue tracking hub for each project. It displays a chronological list of all invoices issued, including the invoice code, associated project title, issue date, and total amount. It clearly flags the "Payment Status" (such as Unpaid) in the tabular view, making it simple for administrators to track outstanding balances and manage collections.
Documents
The Documents provides a secure repository for all project-related assets and files. It supports various file types, including PDFs and images, and organizes them by title. Each document record includes an audit trail showing who created or updated the file and at what time. Users can toggle the "Active" status of documents and use the search and filter tools to quickly locate critical agreements, requirement lists, or sample images.

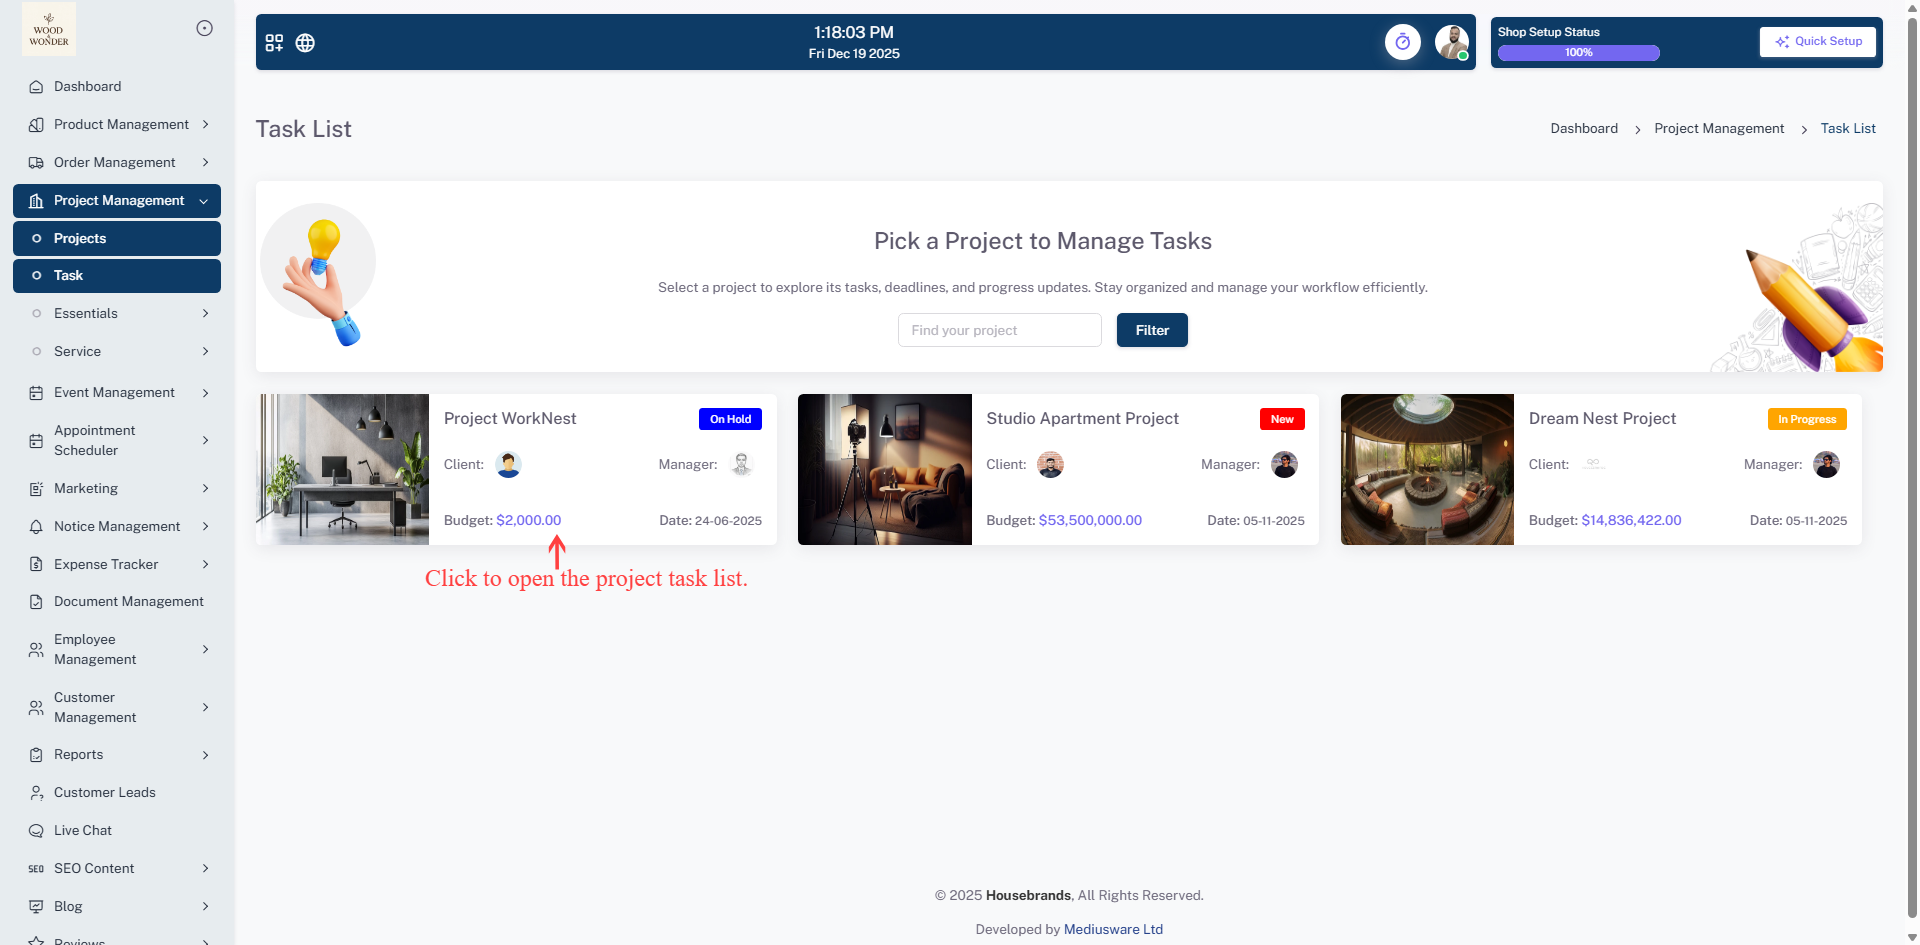
Task
The Task List is designed to streamline productivity by allowing users to quickly identify, filter, and access individual projects to manage their respective tasks, deadlines, and progress updates.
Essentials
The Essentials section under the Project Management module serves as the configuration backbone for the entire system, providing a structured way to define and manage the fundamental attributes used across all projects. By standardizing project statuses, task stages, and organizational tags, this module ensures consistency and clarity in how workflows are tracked and reported.
Category
The Category List is used to classify projects into broad operational groups, such as "Office Setup" or "Studio Design". Each category includes a descriptive summary and a representative image, ensuring that projects are easily searchable and logically grouped within the broader system.
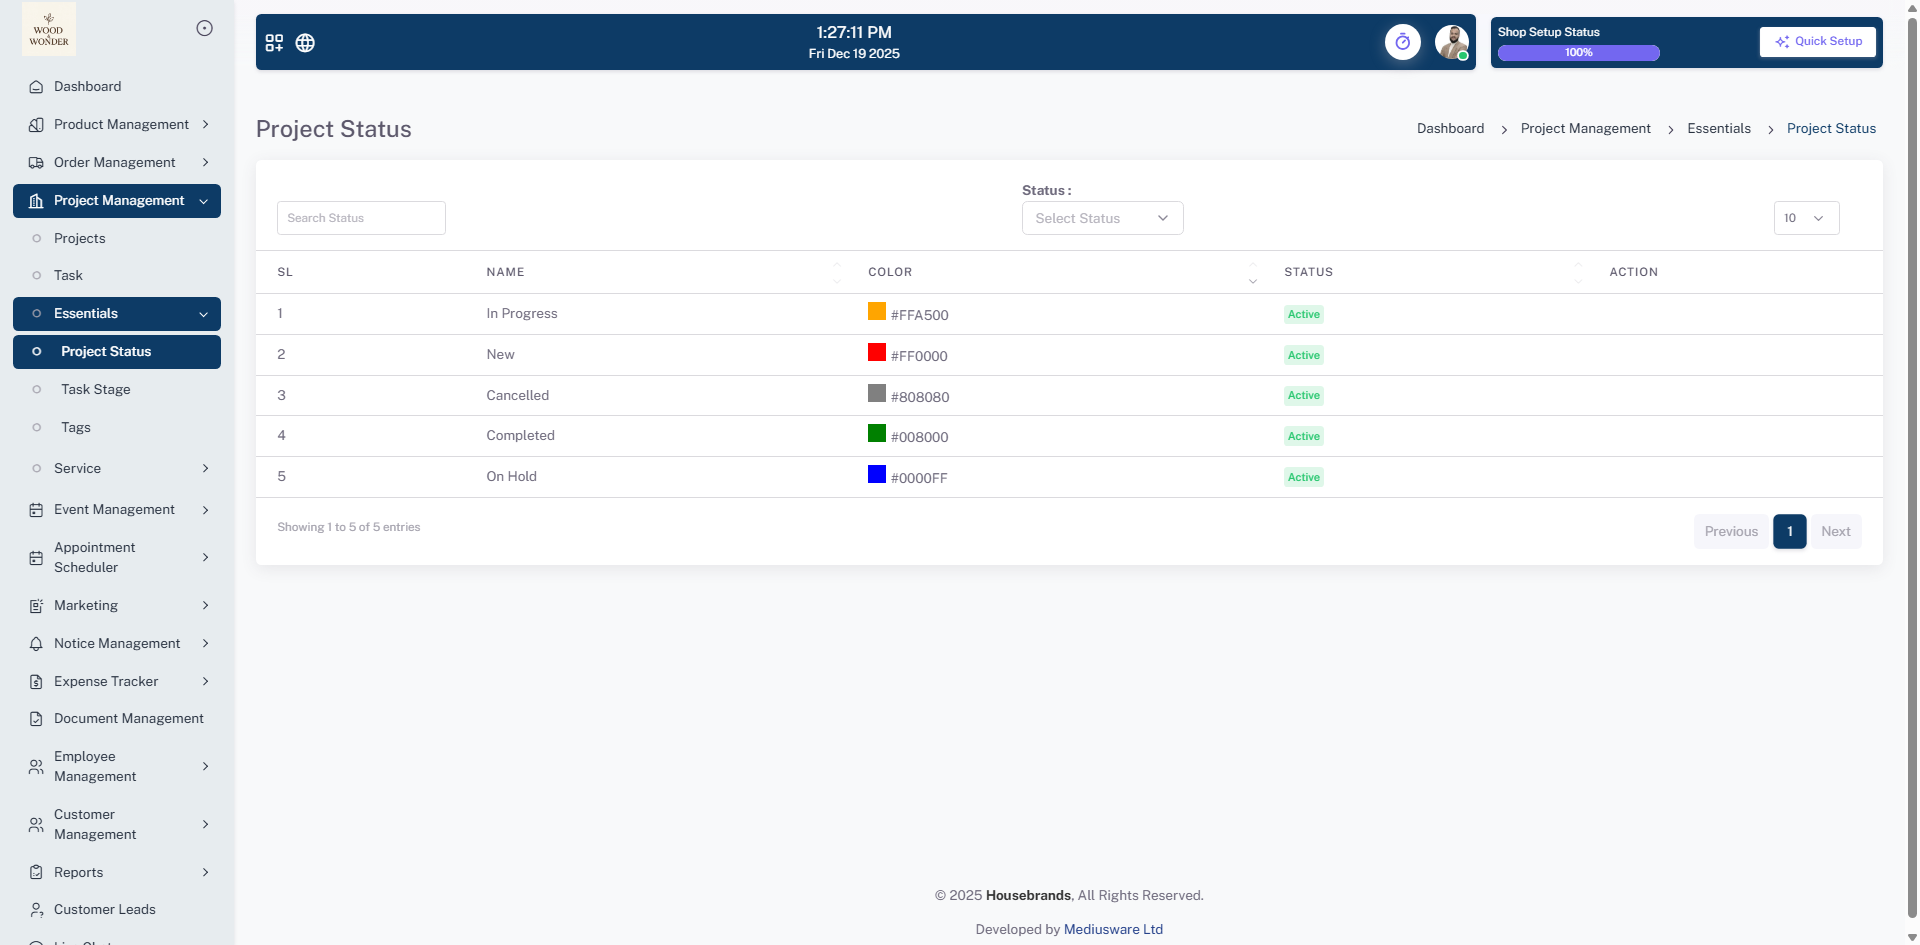
Project Status
The Project Status allows administrators to define high-level milestones for project lifecycles, such as "In Progress," "Completed," or "On Hold". Each status is assigned a specific hex color code to provide immediate visual recognition across project dashboards, ensuring stakeholders can gauge project health at a glance.
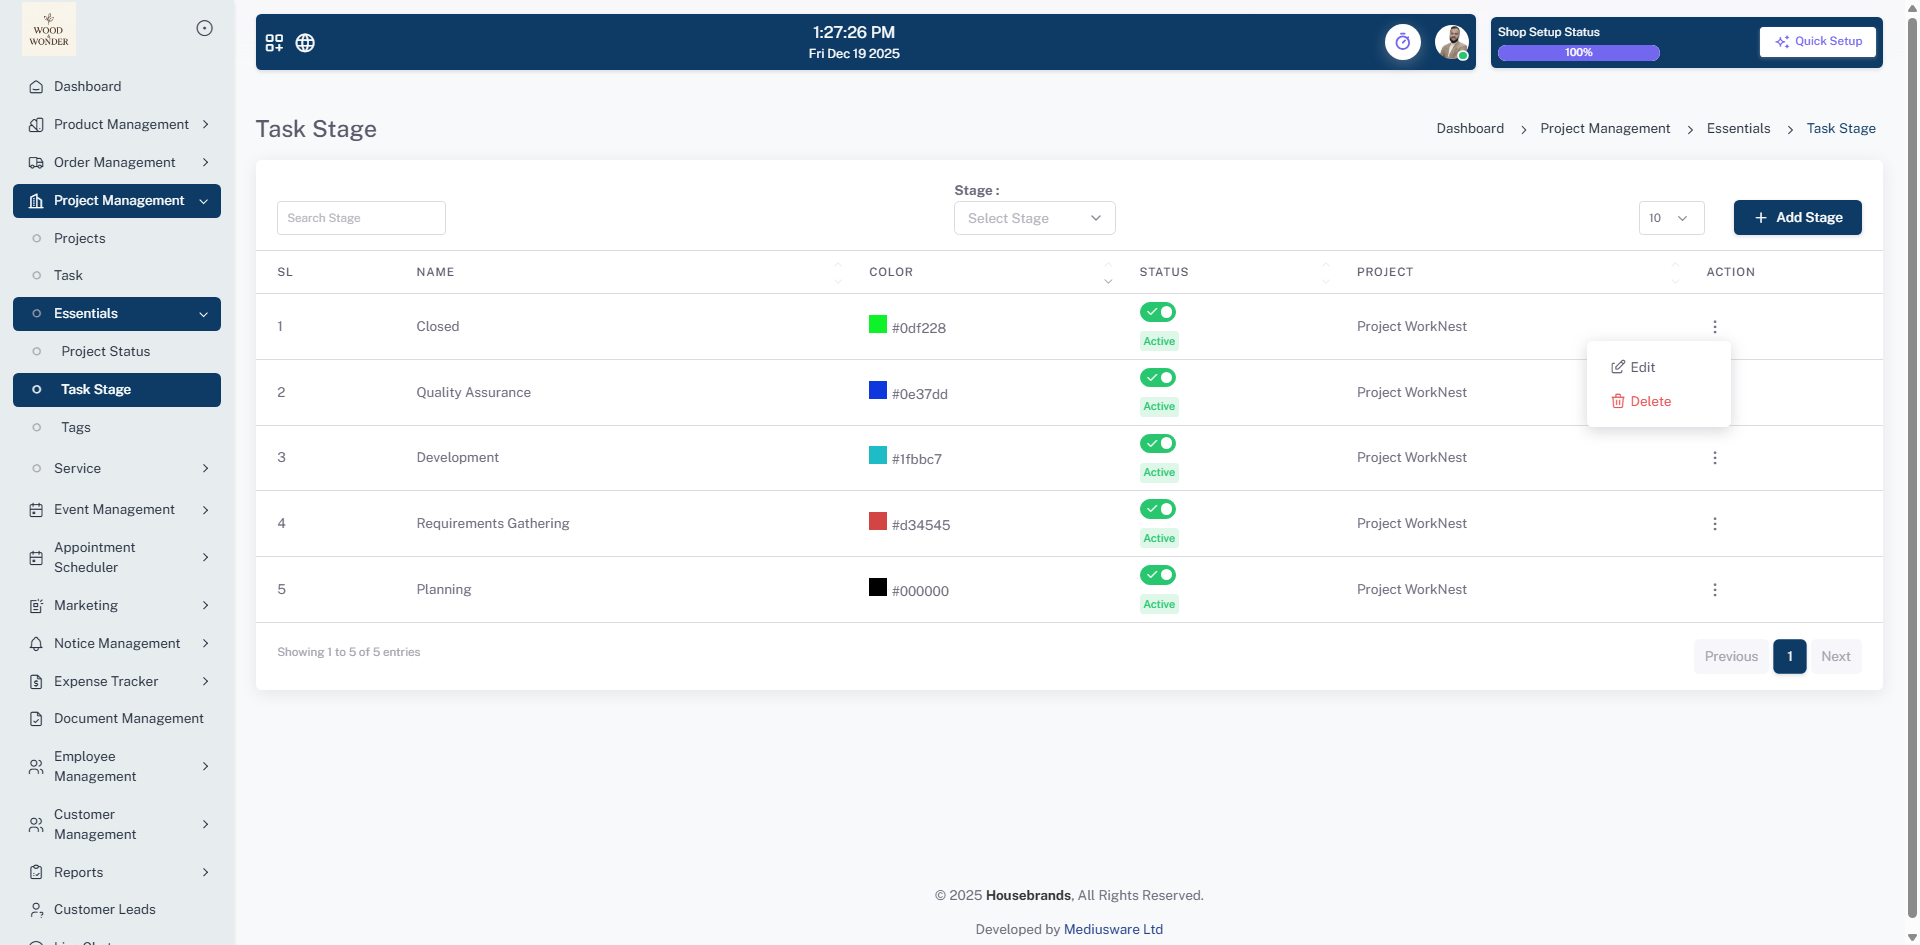
Task Stage
The Task Stage provides granular control over the progress of individual activities within a project. By defining stages like "Planning," "Development," and "Quality Assurance," teams can map out their internal workflows precisely. These stages are linked to specific projects, such as "Project WorkNest," to maintain organized and traceable task transitions.
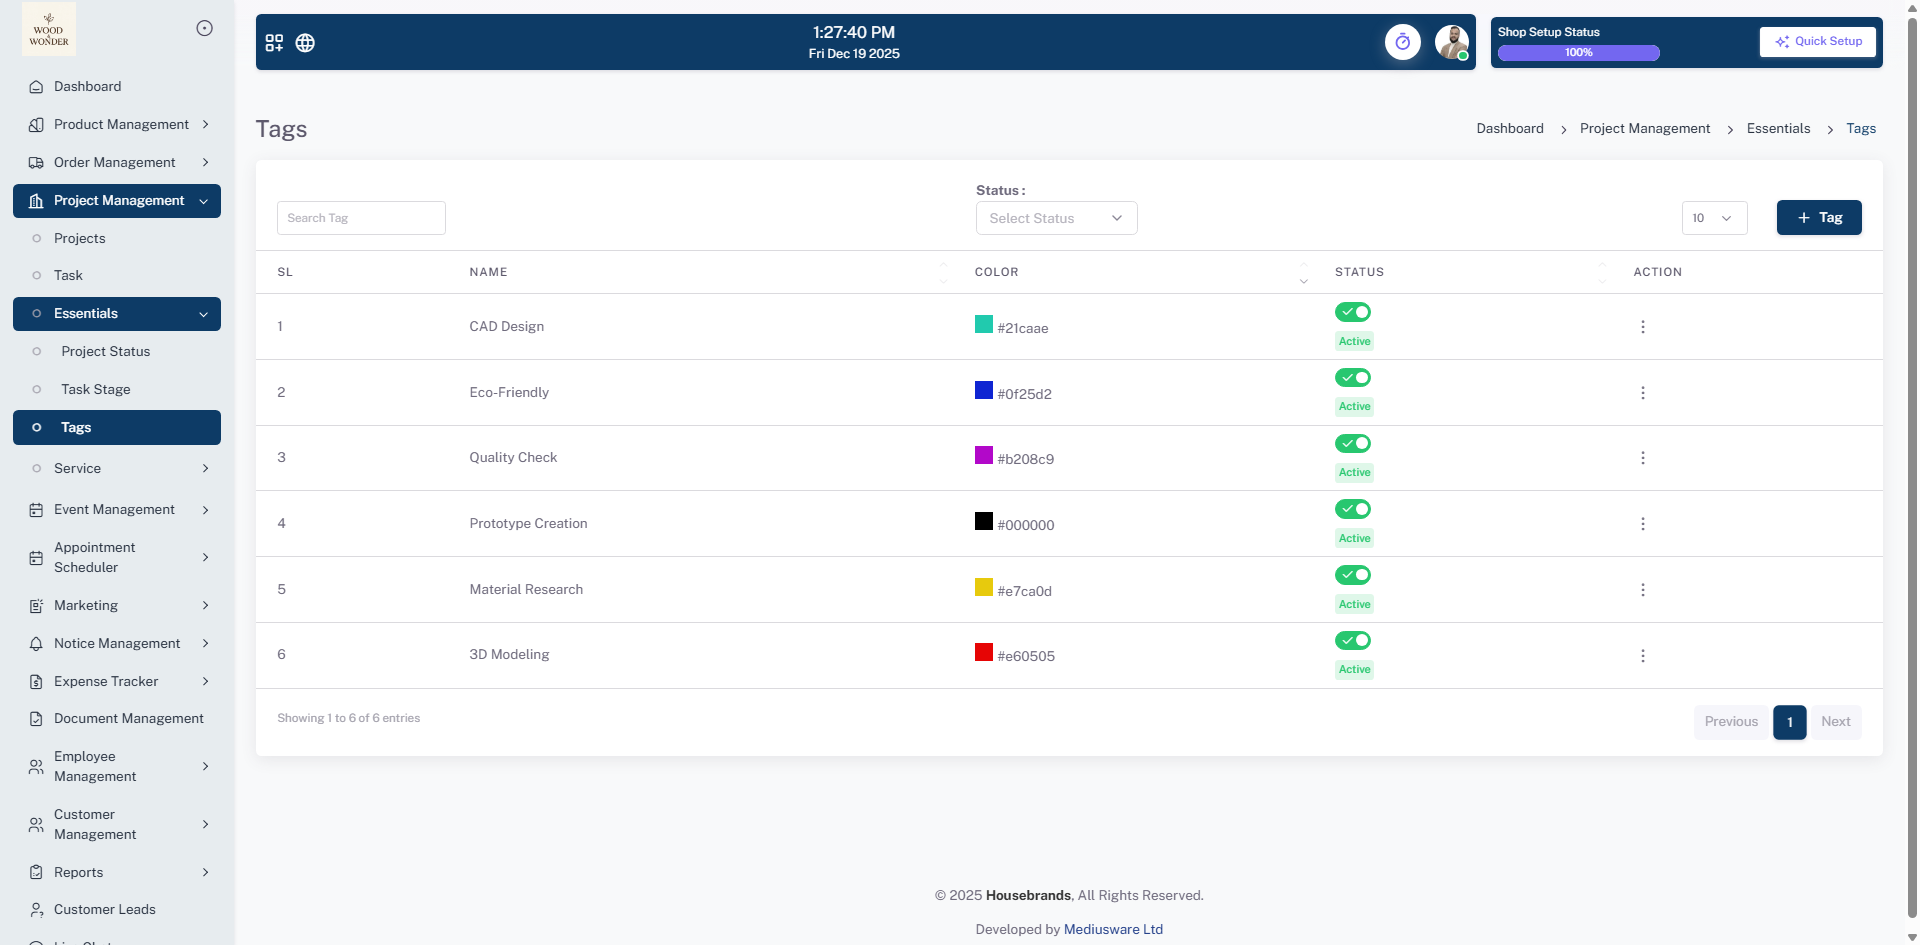
Tags
The Tags offers a flexible categorization system to label projects and tasks with specific attributes like "CAD Design," "Eco-Friendly," or "Quality Check". These customizable tags enhance the system's searchability and filtering capabilities, allowing for better organization and data retrieval based on specialized project requirements.
Service
The Service module within the Project Management suite allows the organization to define and manage professional services that can be offered and billed as part of a project. By categorizing these offerings and setting clear cost structures, it ensures that project estimates and resource allocations are both accurate and consistent.
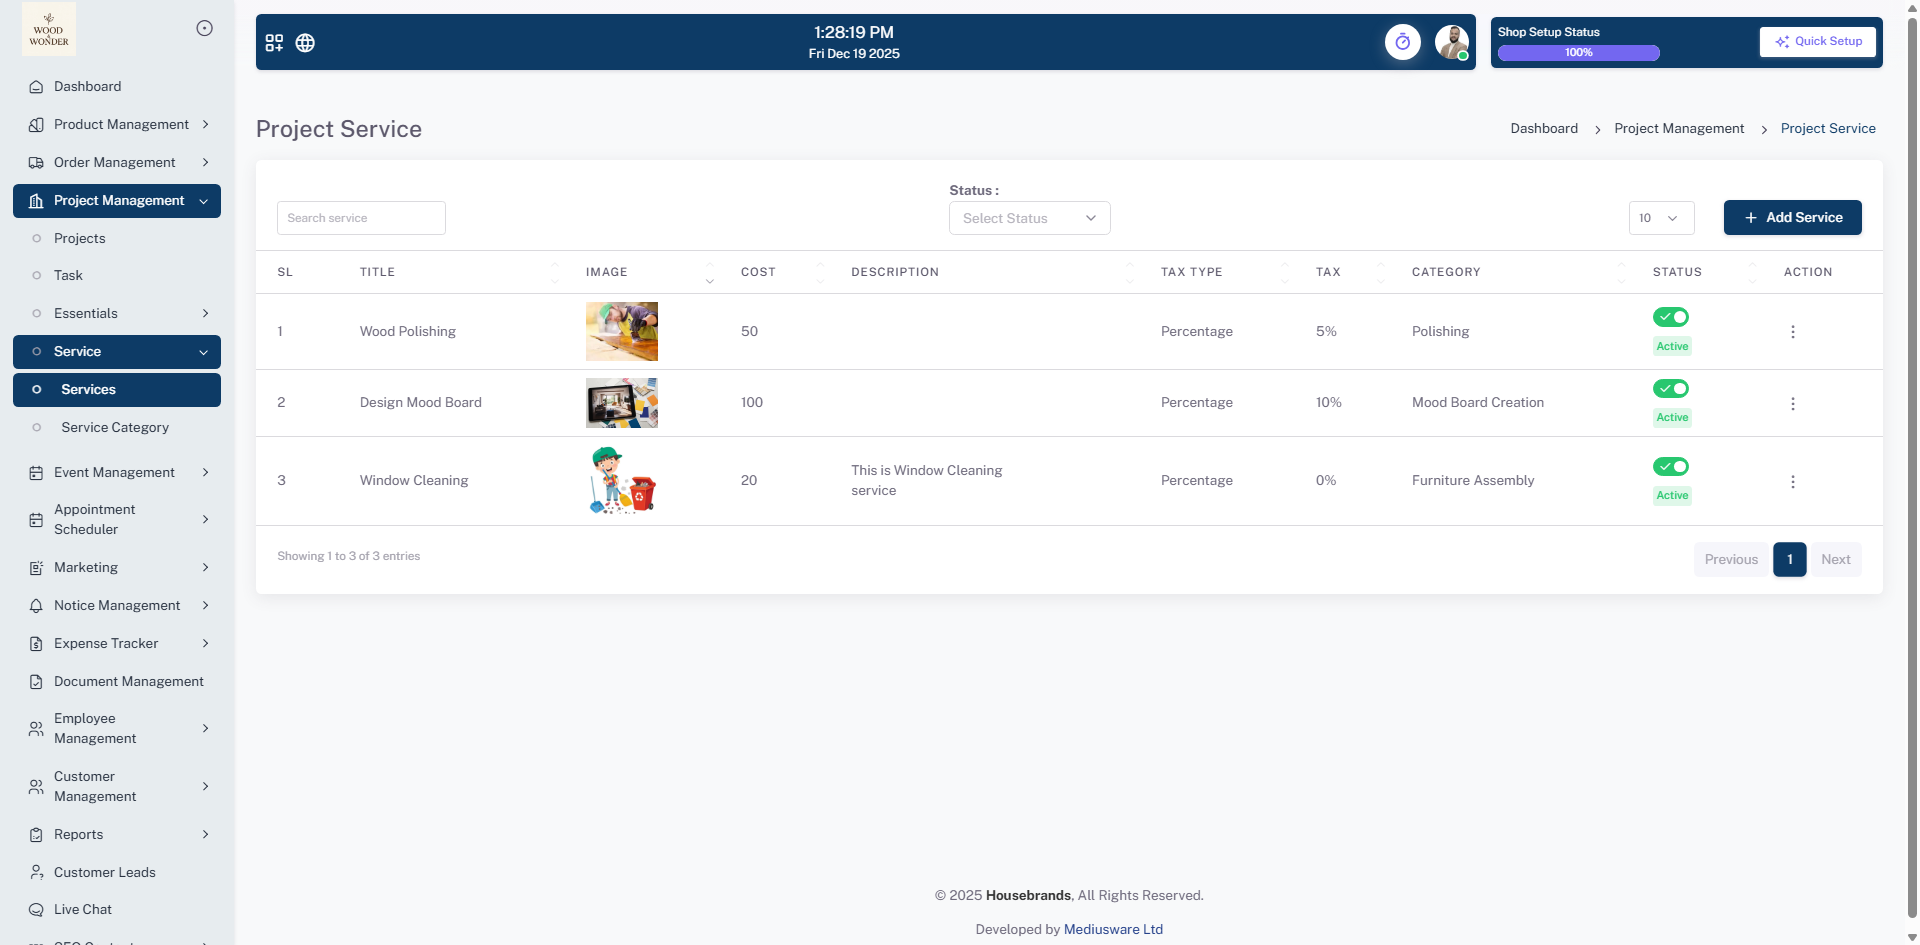
Services
The Services sub-module functions as a comprehensive catalog of all billable activities provided by the organization. This interface allows administrators to manage key service details including: Service Identity: Assigning titles and representative images for services such as "Wood Polishing" or "Window Cleaning". Financial Configuration: Setting the base cost and applying specific tax percentages (e.g., 5% or 10%) to ensure automated and accurate invoicing. Categorization: Linking each service to a specific category, like "Furniture Assembly," to maintain a structured service directory.

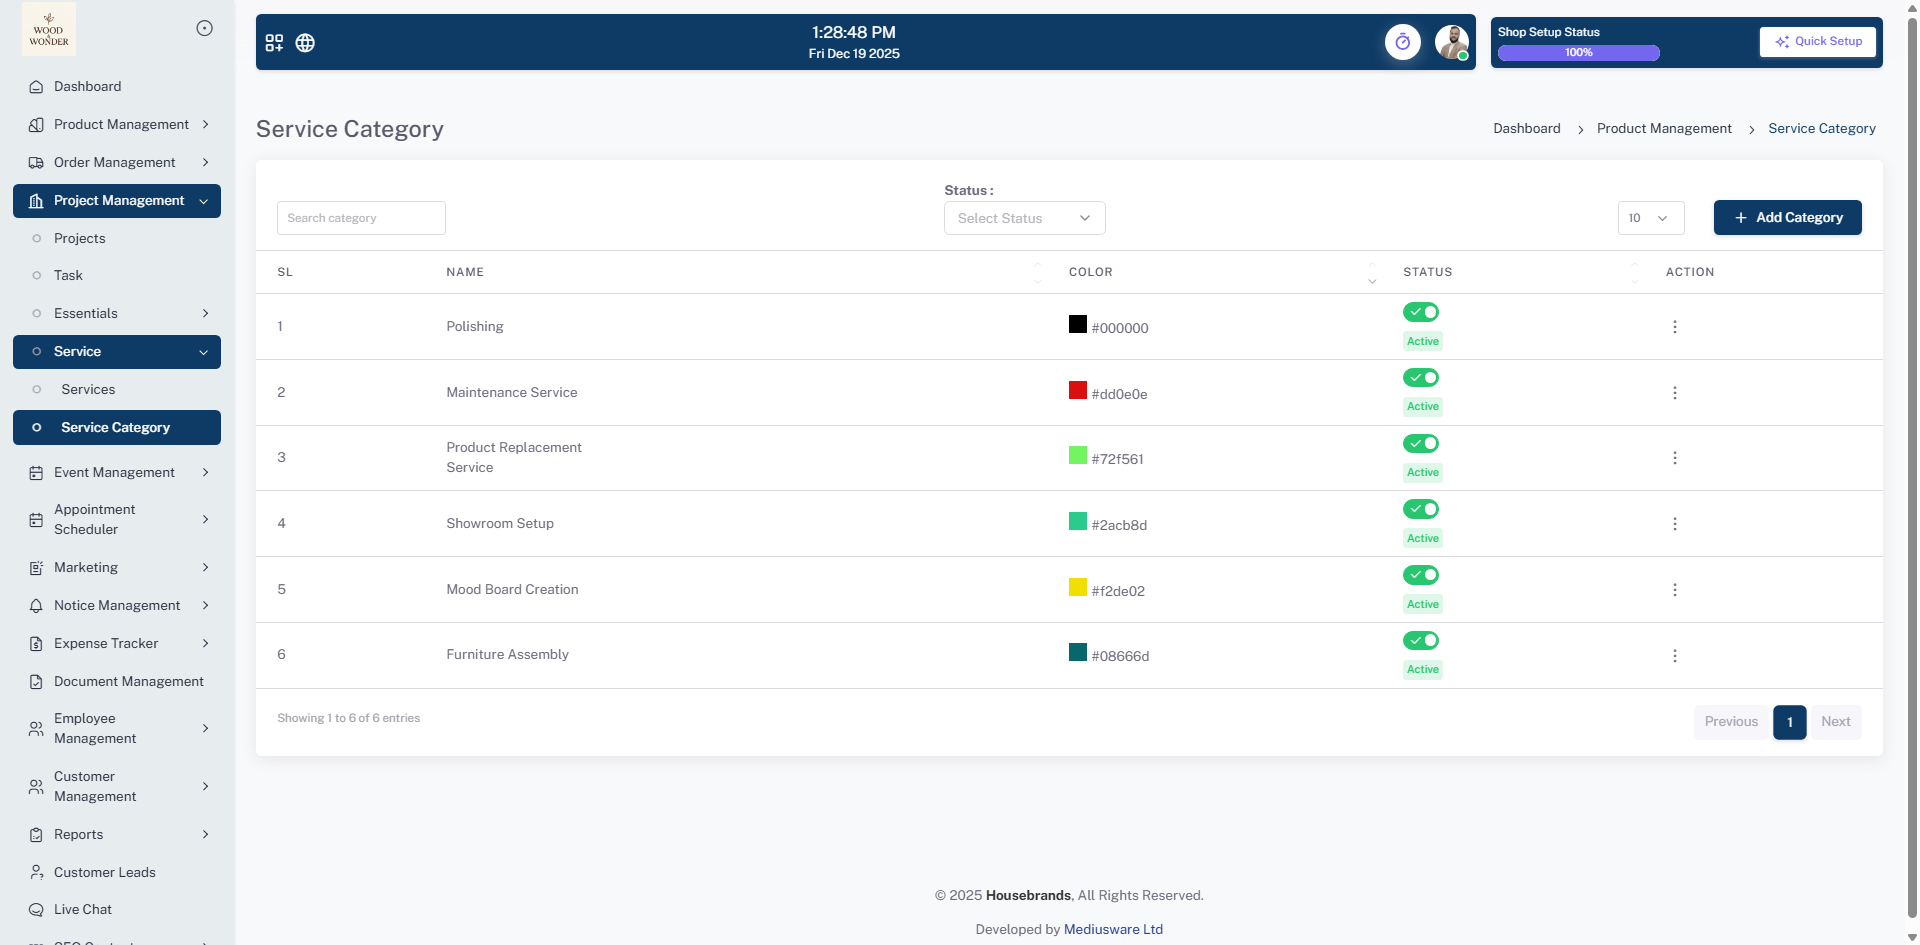
Service Category
The Service Category sub-module is used to organize the organization’s diverse range of services into logical groupings. It provides a high-level classification system that improves system navigation and reporting. Logical Grouping: Categories such as "Maintenance Service," "Showroom Setup," and "Mood Board Creation" help in filtering and selecting appropriate services during the project planning phase. Visual Identification: Each category is assigned a unique hex color code (e.g., #08666d for Furniture Assembly), enabling quick visual differentiation within lists and project schedules. Status Management: Administrators can easily toggle the "Active" status of entire categories to control which service types are currently available for new projects.
Event Management
The Event Management module allows users to efficiently create, organize, and track various types of events, such as exhibitions, product launches, or meet & greets. It provides tools to manage event types, add or edit events, schedule them via a calendar, and filter or search for specific events. The module ensures a structured, intuitive interface with options for status management, notifications, and easy navigation for seamless event planning and coordination.
Event Type
The Event Type section is used to manage different kinds of events in the system.
Examples
include exhibitions, fairs, product launches, or meet & greet events. These event types
help
organize and identify events easily.
Where to find it: Dashboard →
Event Management → Event Type
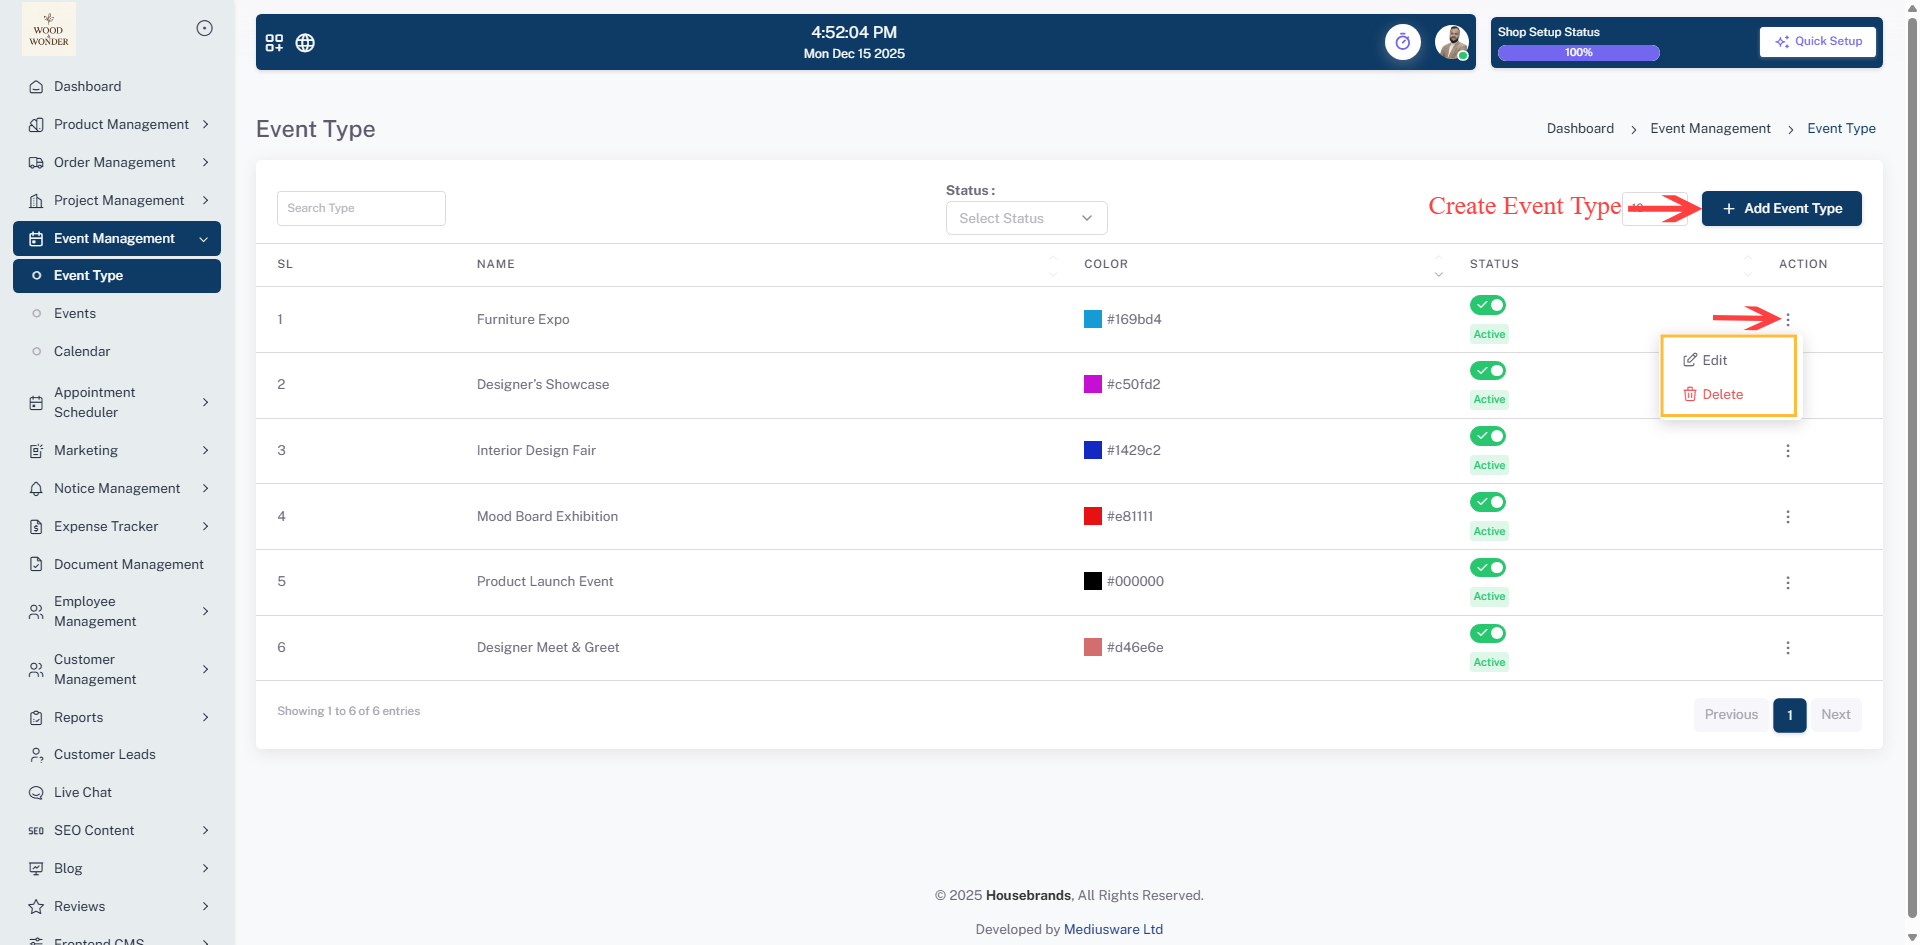
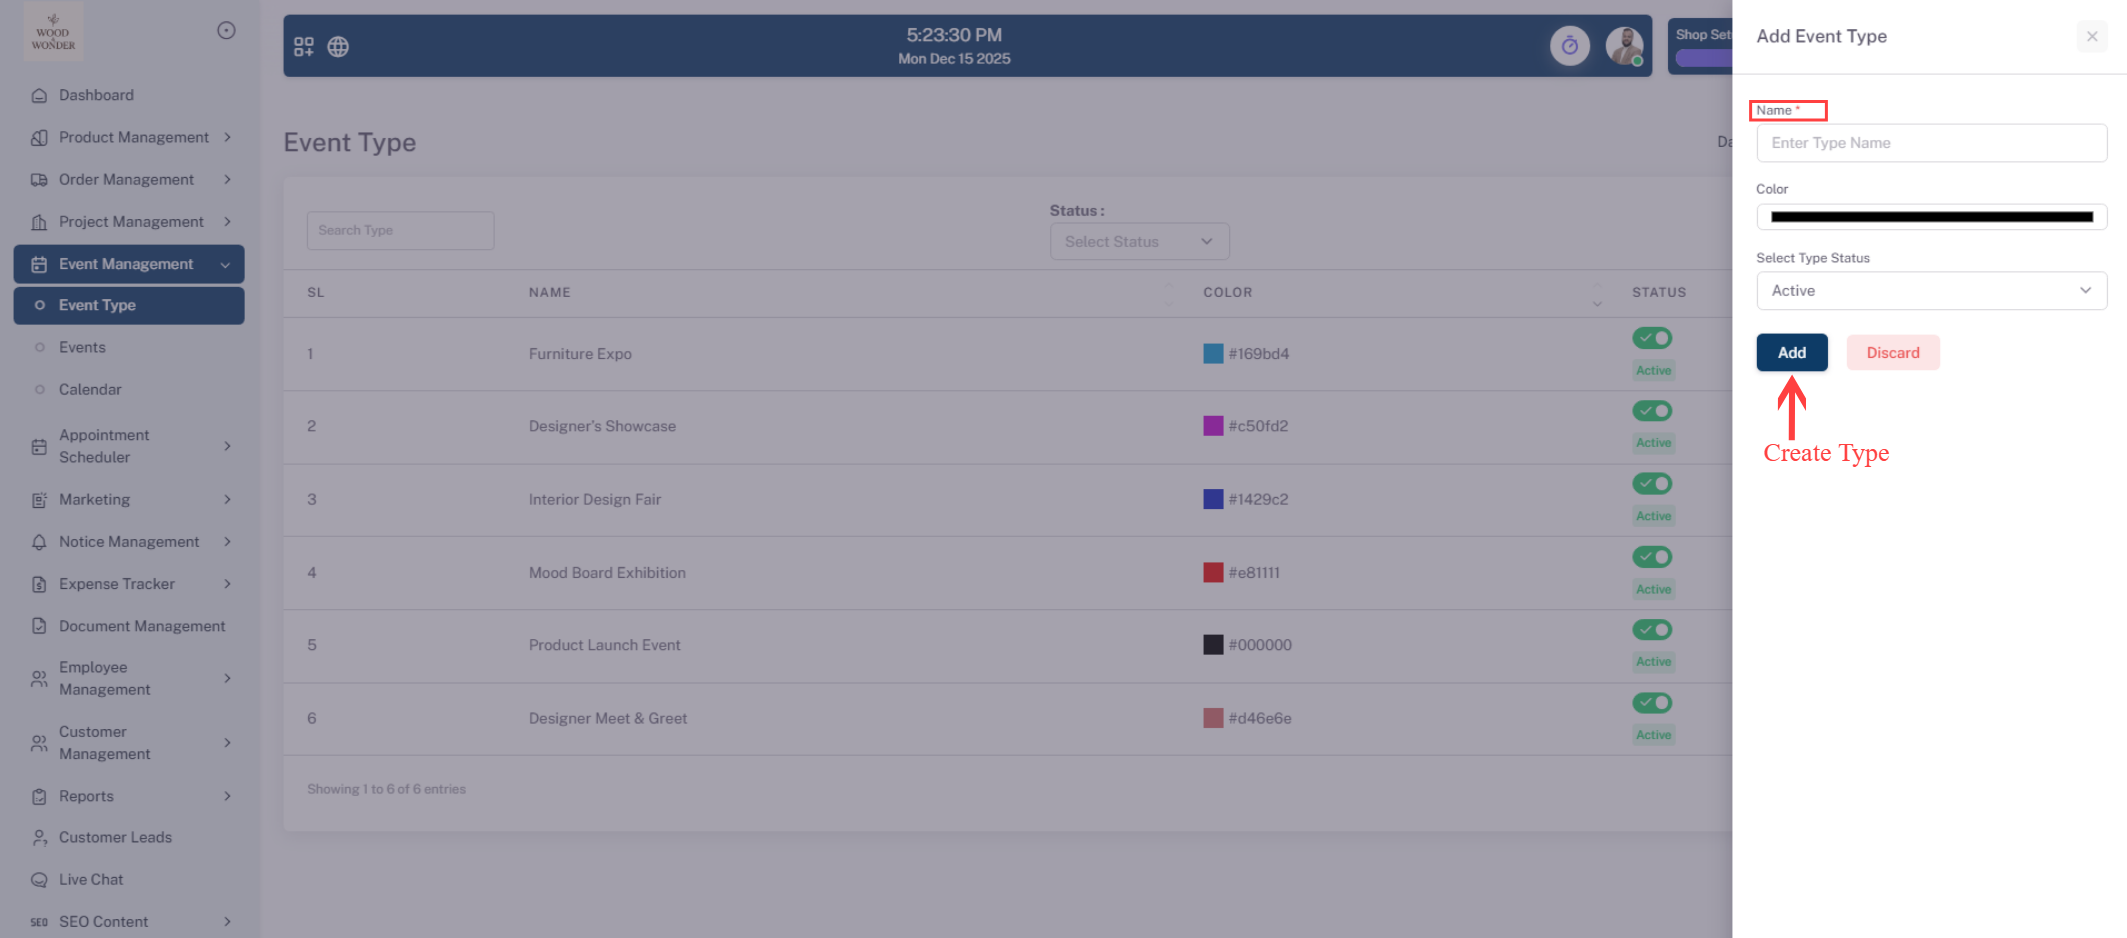
The Event Type section allows users to manage different categories of events within the system. Users can search for a specific event type using the Search Type box and filter results by status (Active or Inactive). New event types can be added by clicking + Add Event Type, entering the name, selecting a color and status, and saving it to the list. Existing event types can be edited by selecting Edit from the action menu, updating the details, and saving changes. The status of an event type can be toggled on or off, with active types available when creating new events. If permitted, event types can also be deleted via the action menu, though deleted items may not be recoverable.
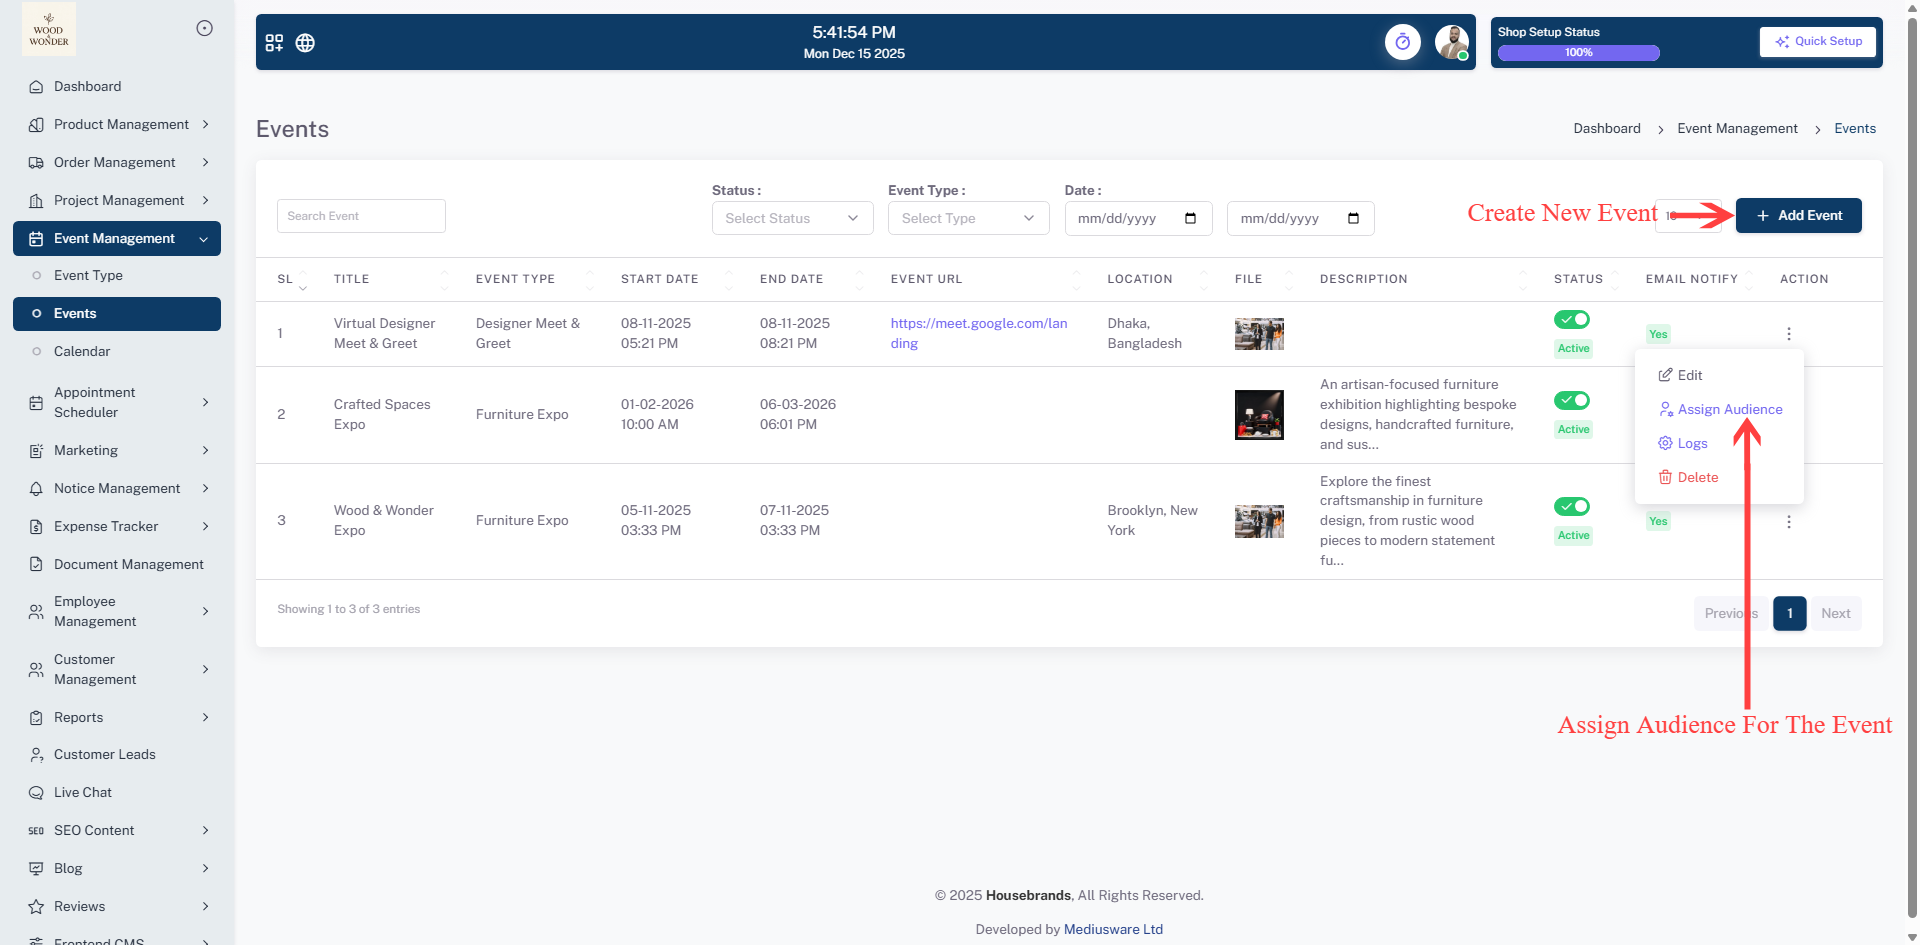
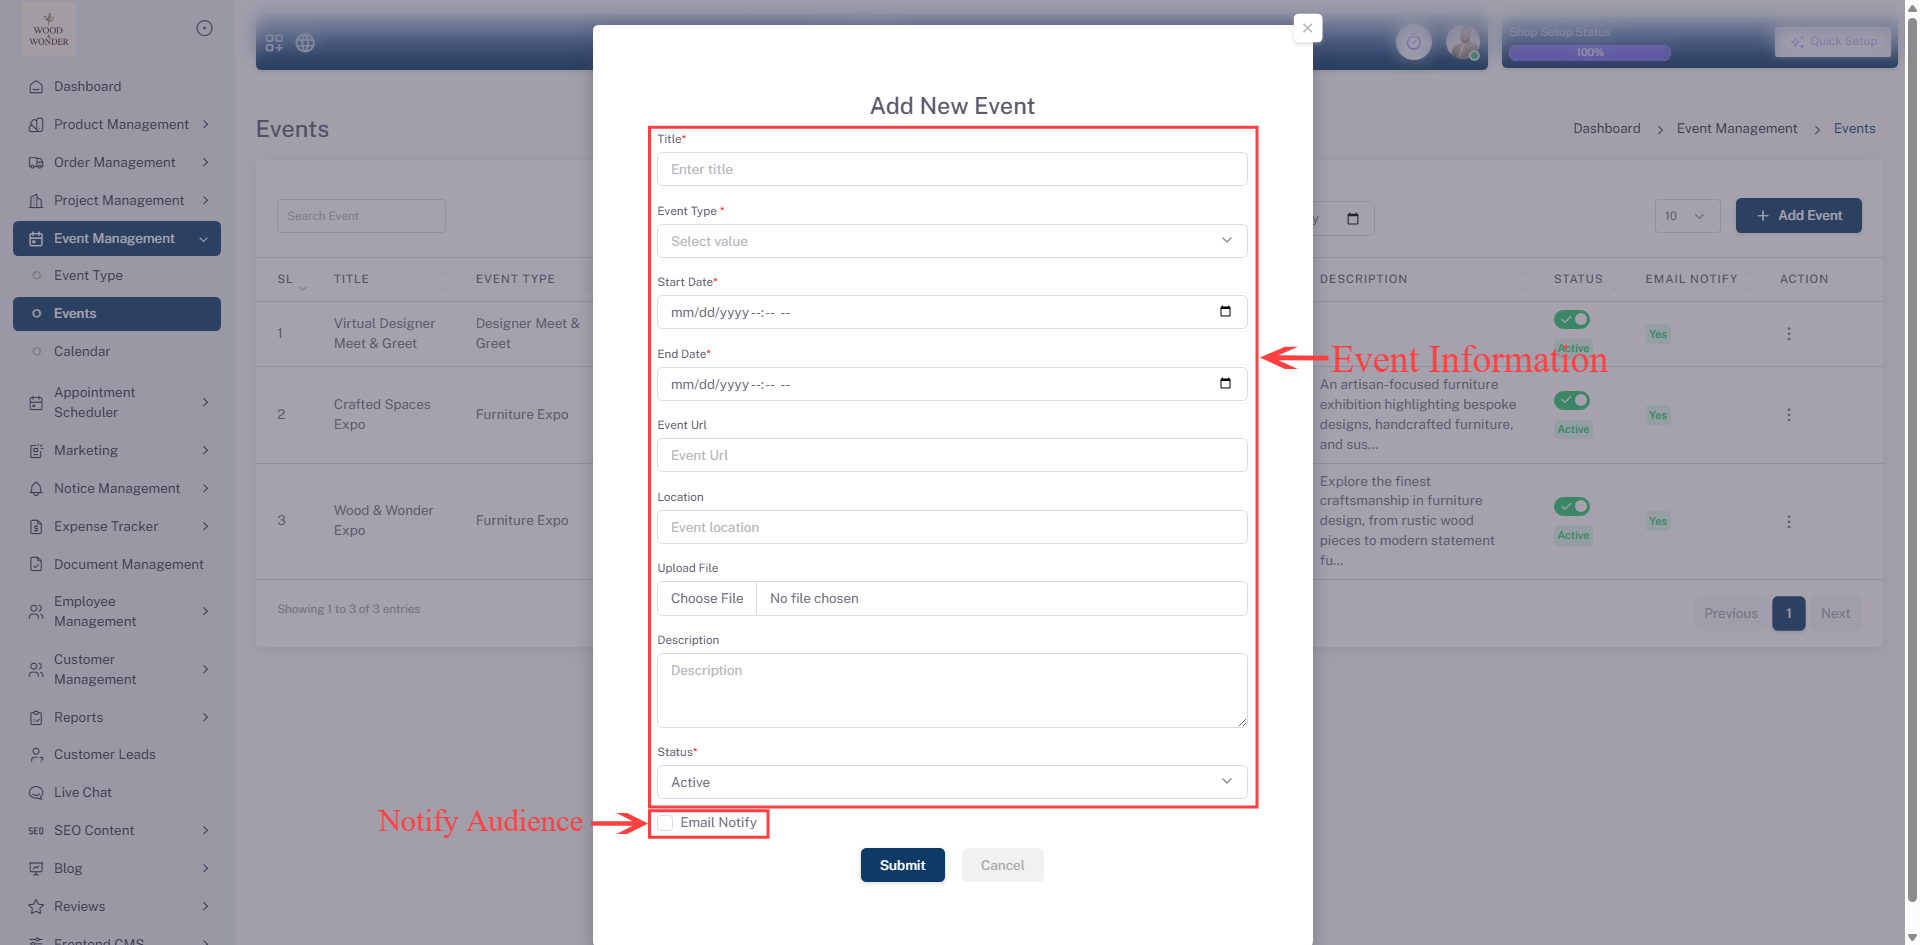
Events
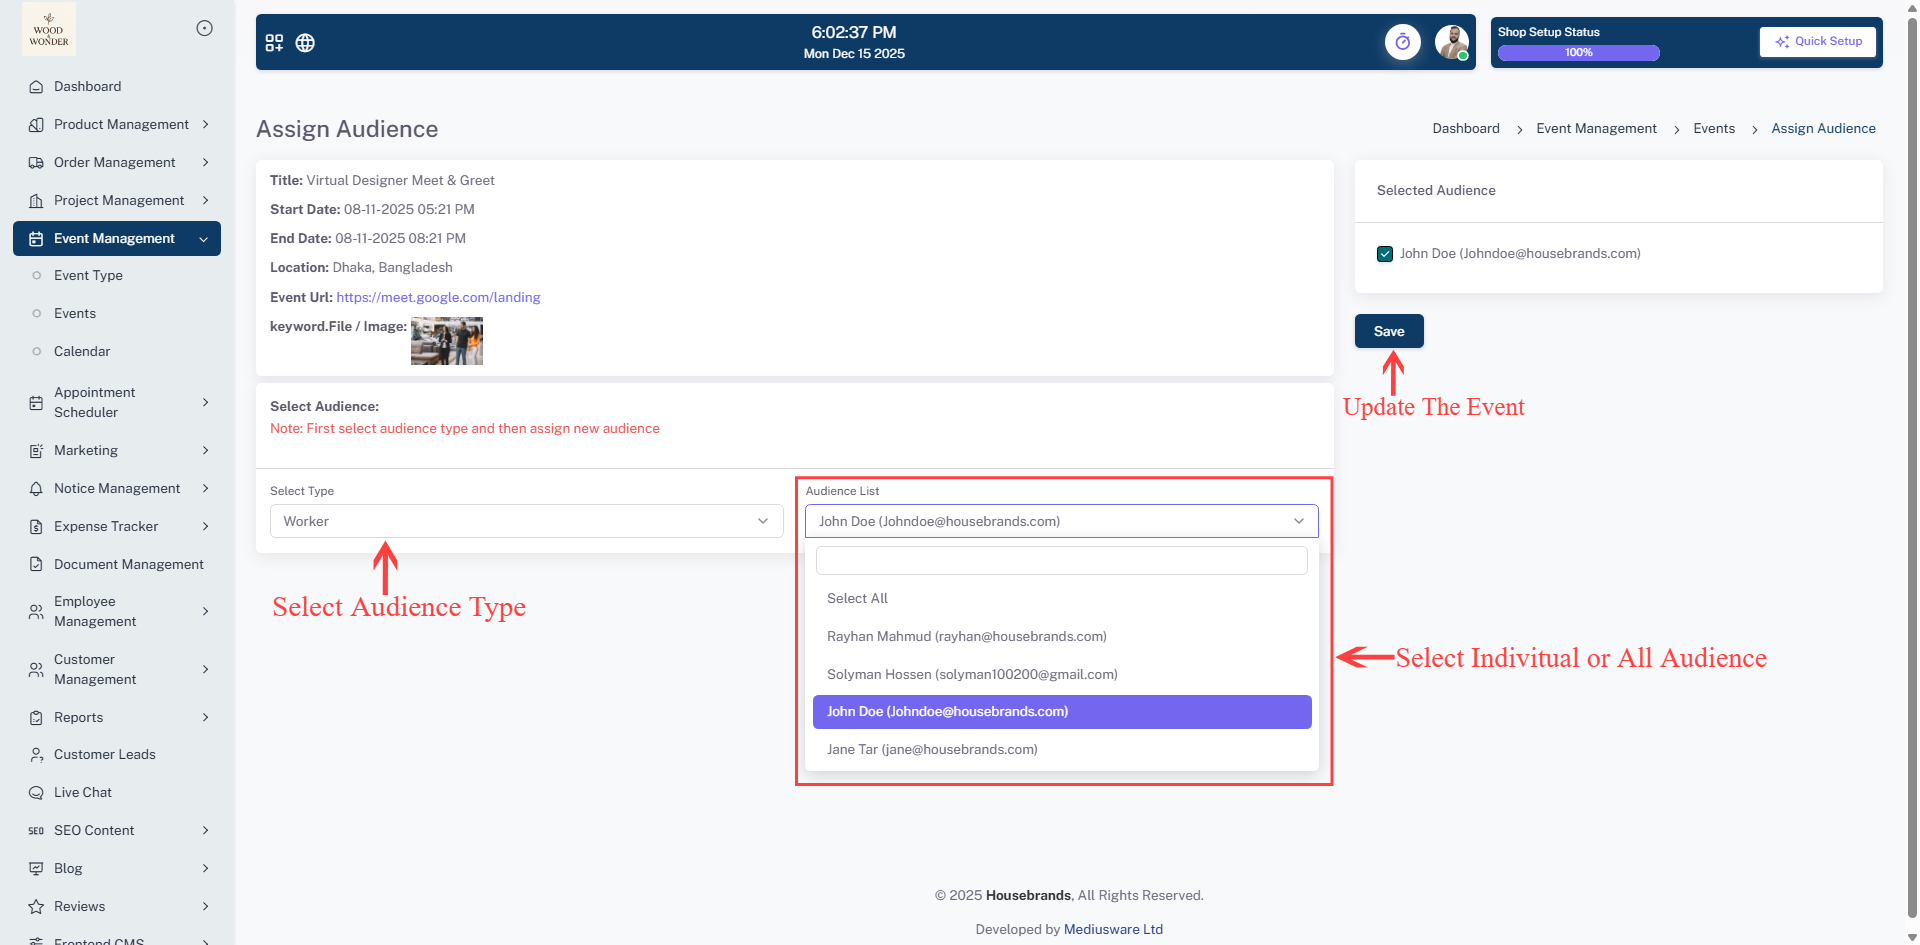
Where users can create and manage events. The interface includes a sidebar menu for navigation, with the "Event Management" section expanded, highlighting the "Events" option. A pop-up form titled "Add New Event" is displayed, allowing users to input details such as the event title, type, start and end dates, event URL, location, and description. There is also an option to upload a file and select the event's status, along with a checkbox for email notifications. At the bottom of the form, the "Submit" and "Cancel" buttons provide options to save or discard changes. The design follows a modern and structured layout, ensuring an intuitive user experience.
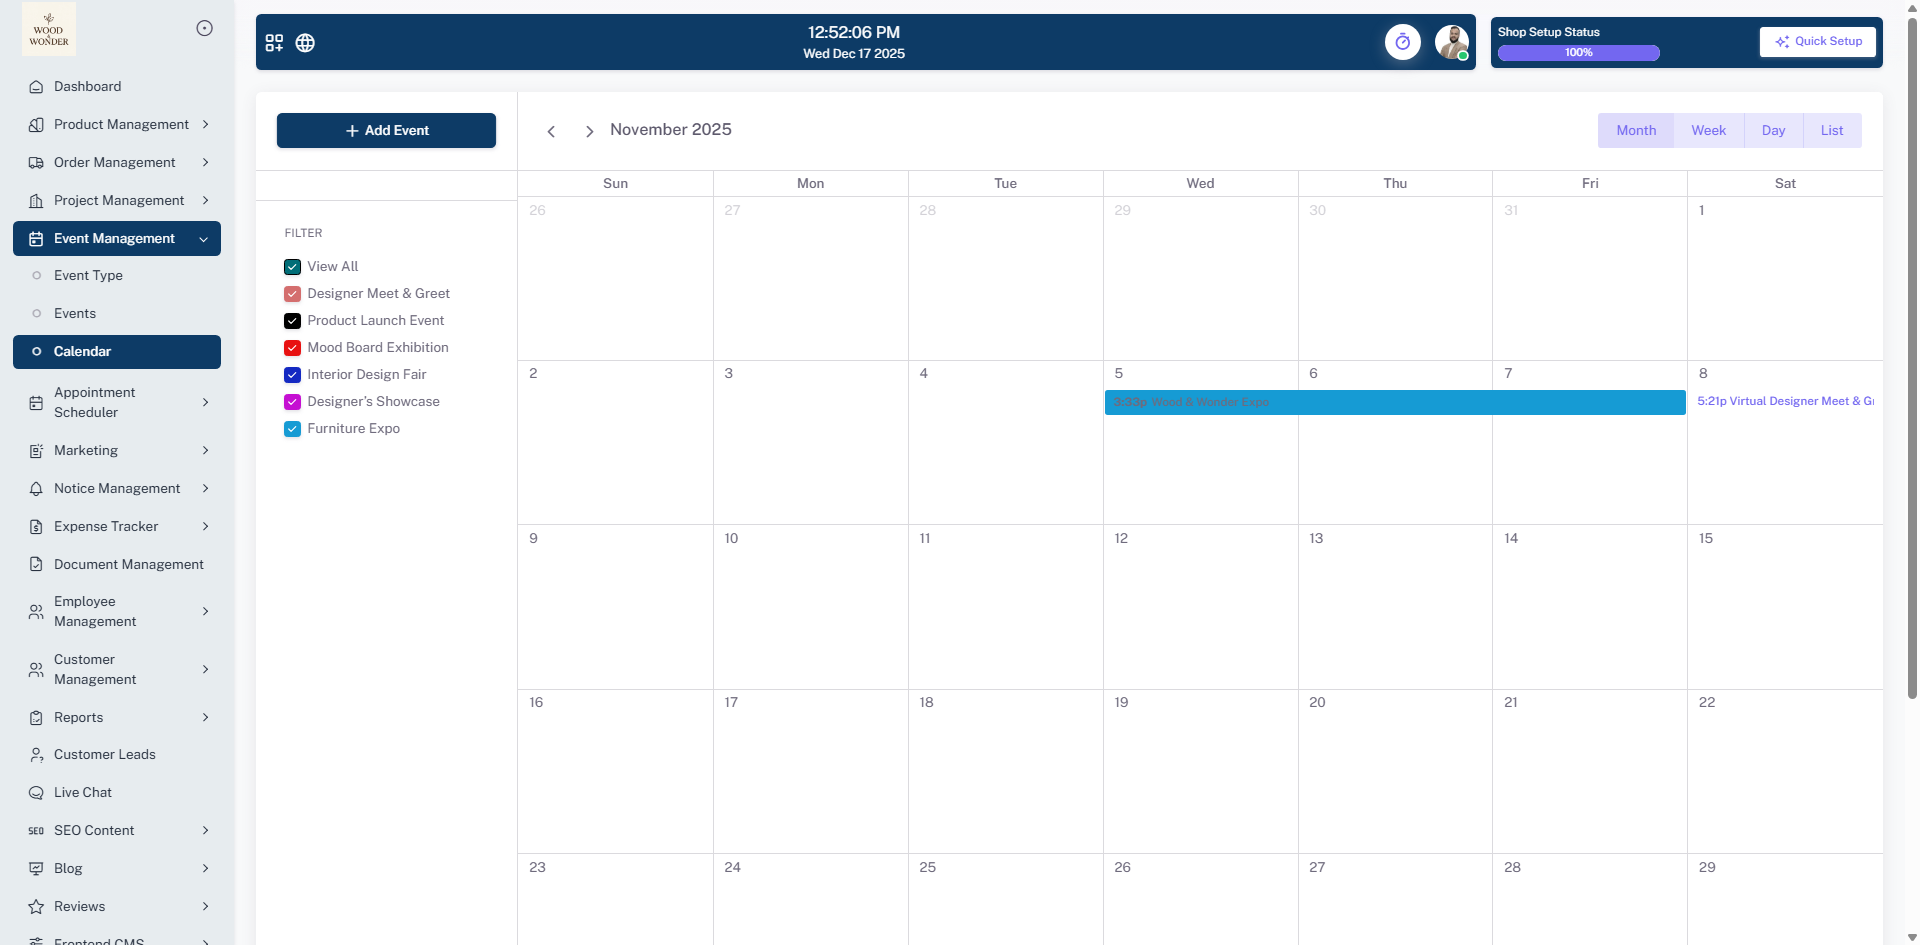
Calendar
This calendar page is part of the event management module, displaying a monthly view. Users can add new events using the "+ Add Event" button and filter events based on categories like "test" and "test event reminder." The calendar is structured in a grid format, with each date represented as a blank space unless events are scheduled. Navigation controls allow users to move between months, and a "today" button helps quickly return to the current date. The interface is clean and minimalistic, focusing on event organization and scheduling.
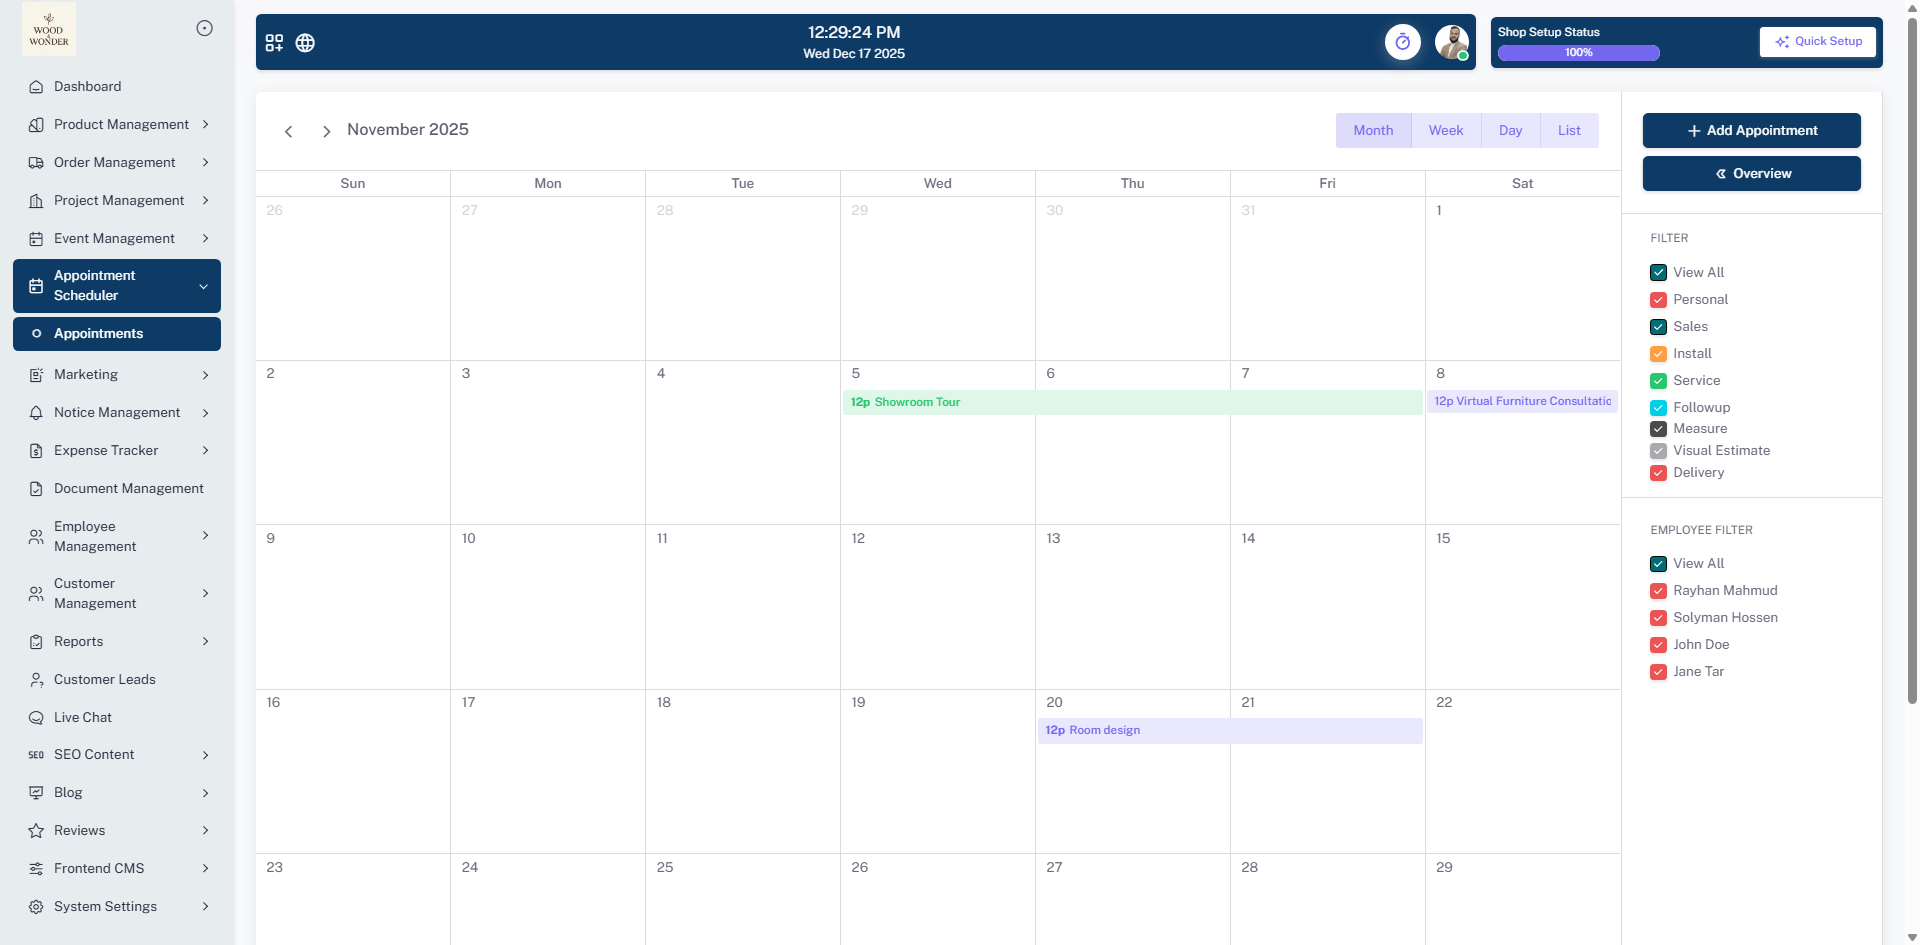
Appointment Scheduler
The Appointment Scheduler shows all appointments in a calendar view. It helps you easily track, plan, and manage appointments by date, type, and assigned employee.
Appointments
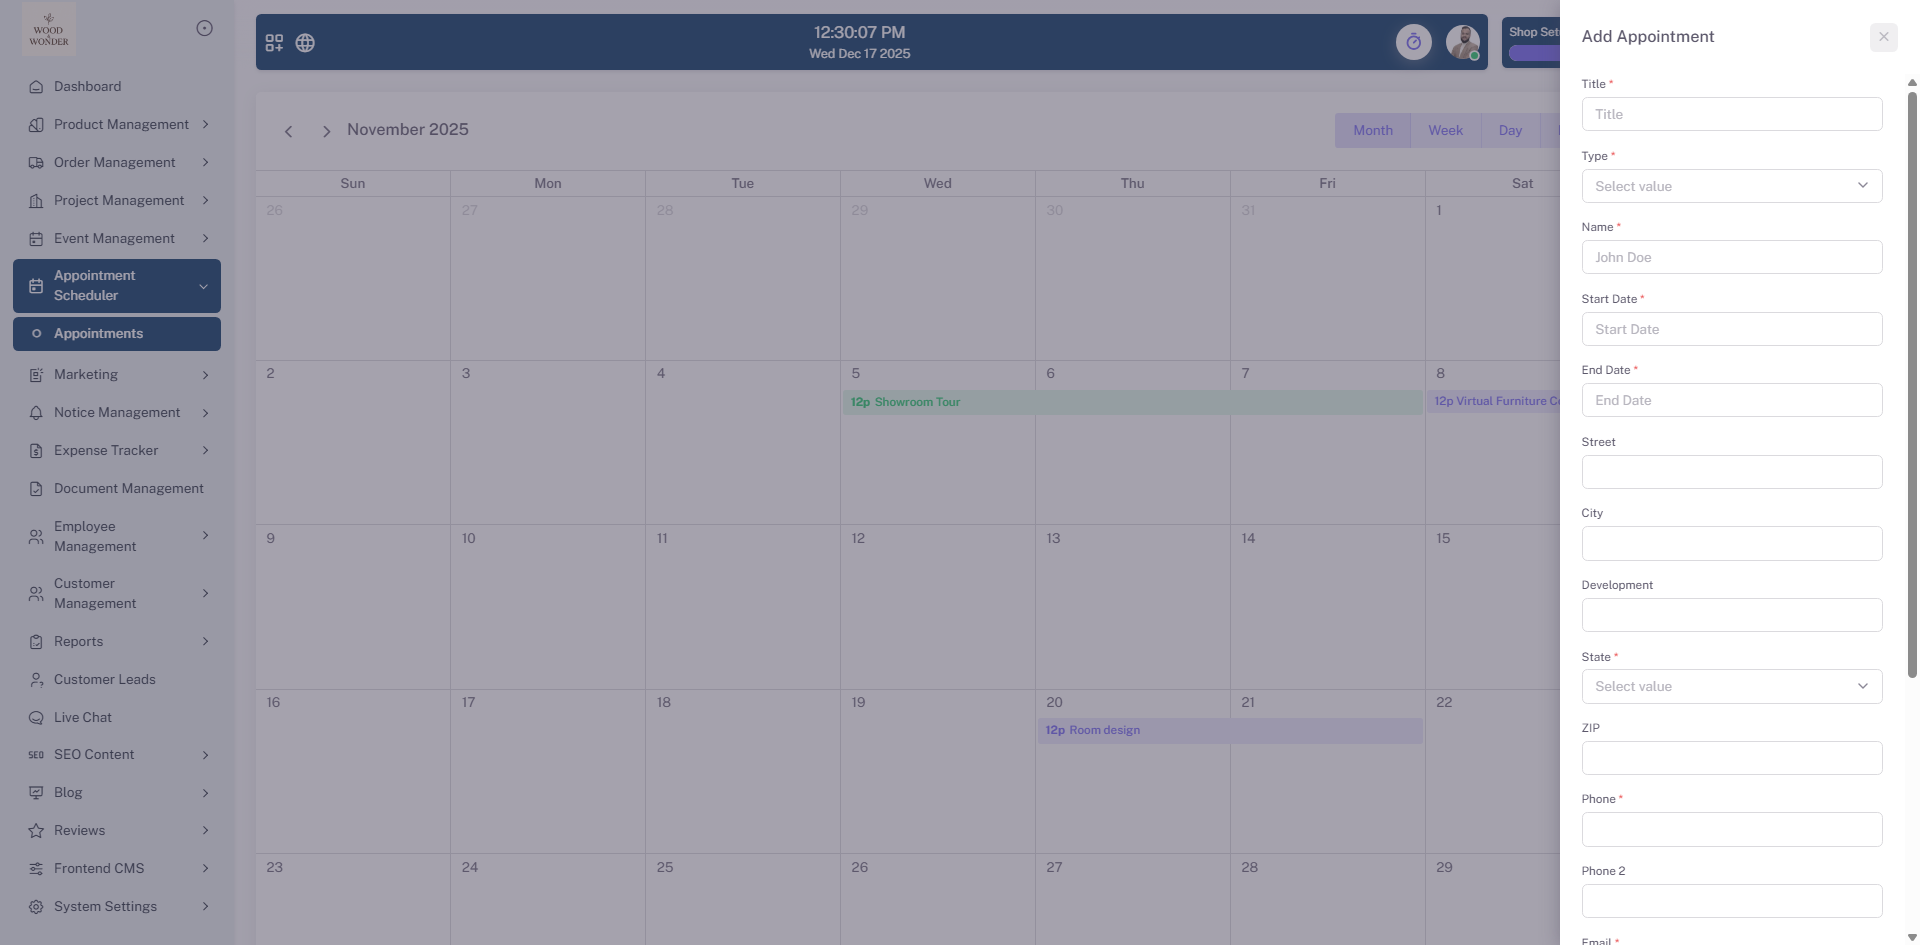
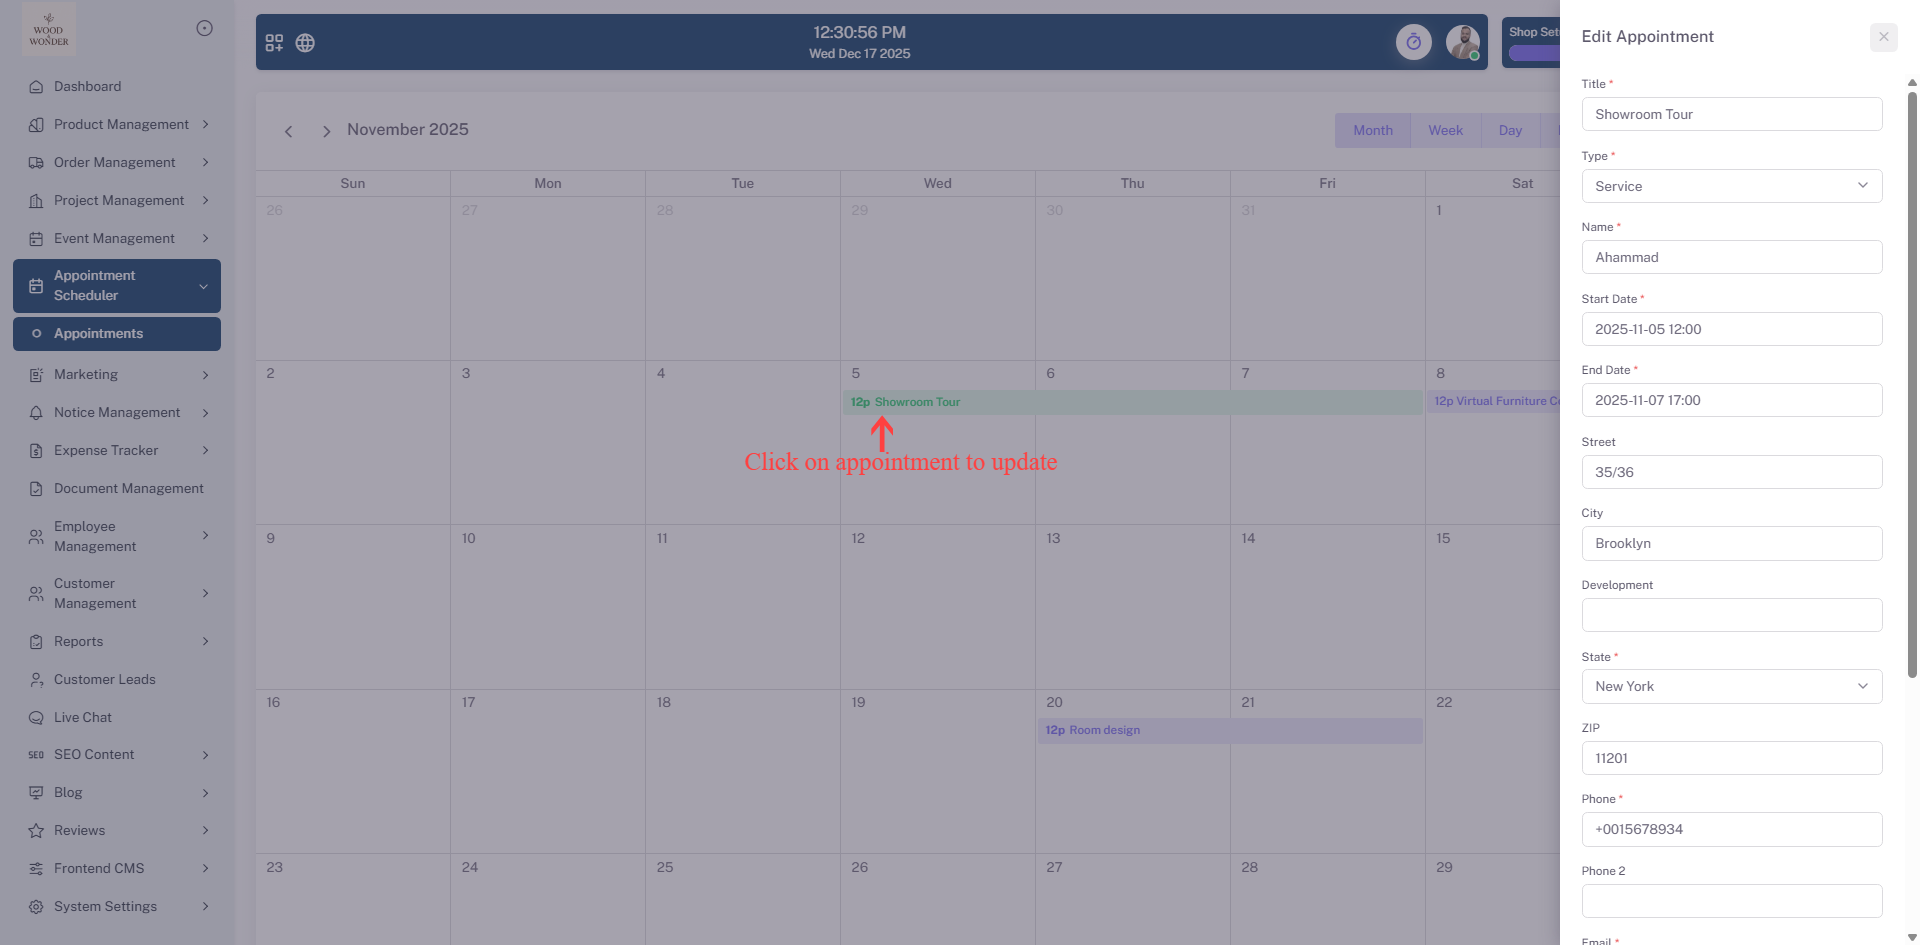
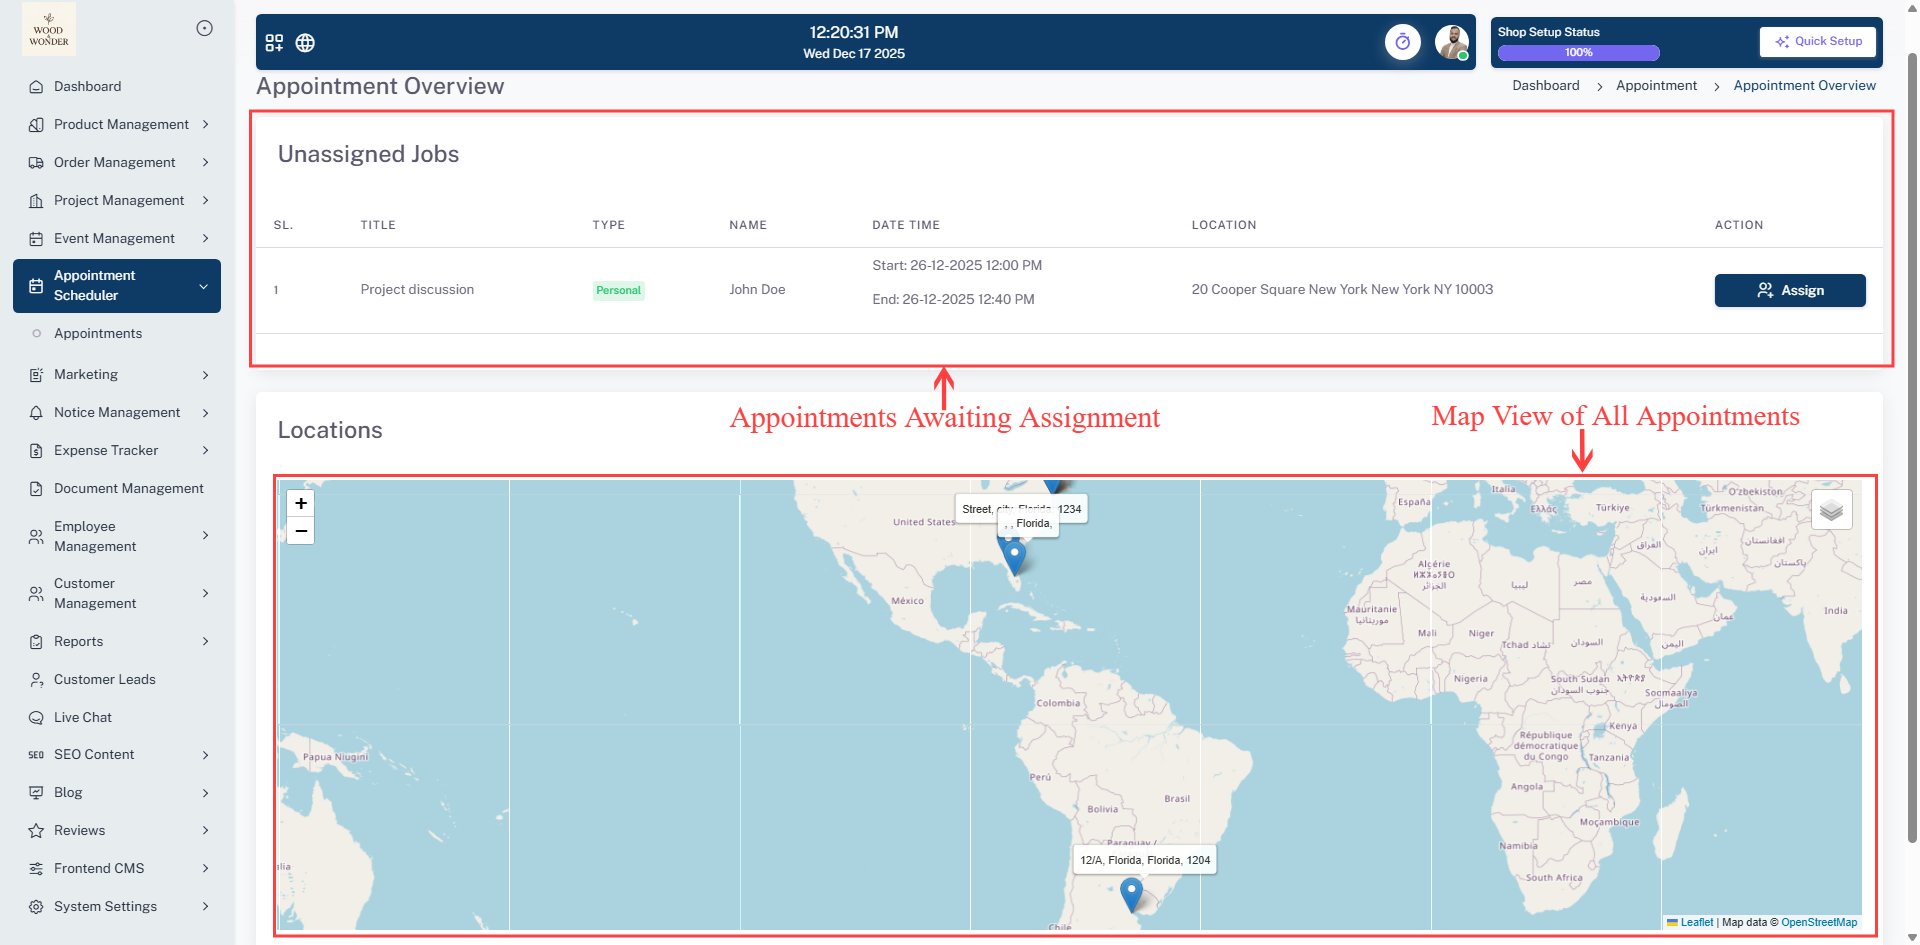
The Calendar section provides a flexible and intuitive interface for managing appointments. Users can switch between Month, Week, Day, and List views to see their schedule in the preferred format. New appointments can be added using the + Add Appointment button, with all relevant details entered and saved directly to the calendar. Navigation between dates is easy with arrow buttons, and the current month and year are always displayed. Appointments are visually represented on the calendar with color-coded titles for easy identification. Users can filter appointments by type or by employee using the right panel, and the Overview button provides a summarized view of all scheduled appointments.
Marketing
The Marketing module allows you to create, assign, and send marketing campaigns directly from the platform. You can add campaigns, set their status, filter by progress, and send bulk emails. This module ensures a clean, intuitive workflow for managing email communications related to events, making it easy to organize, send, and track campaigns efficiently.
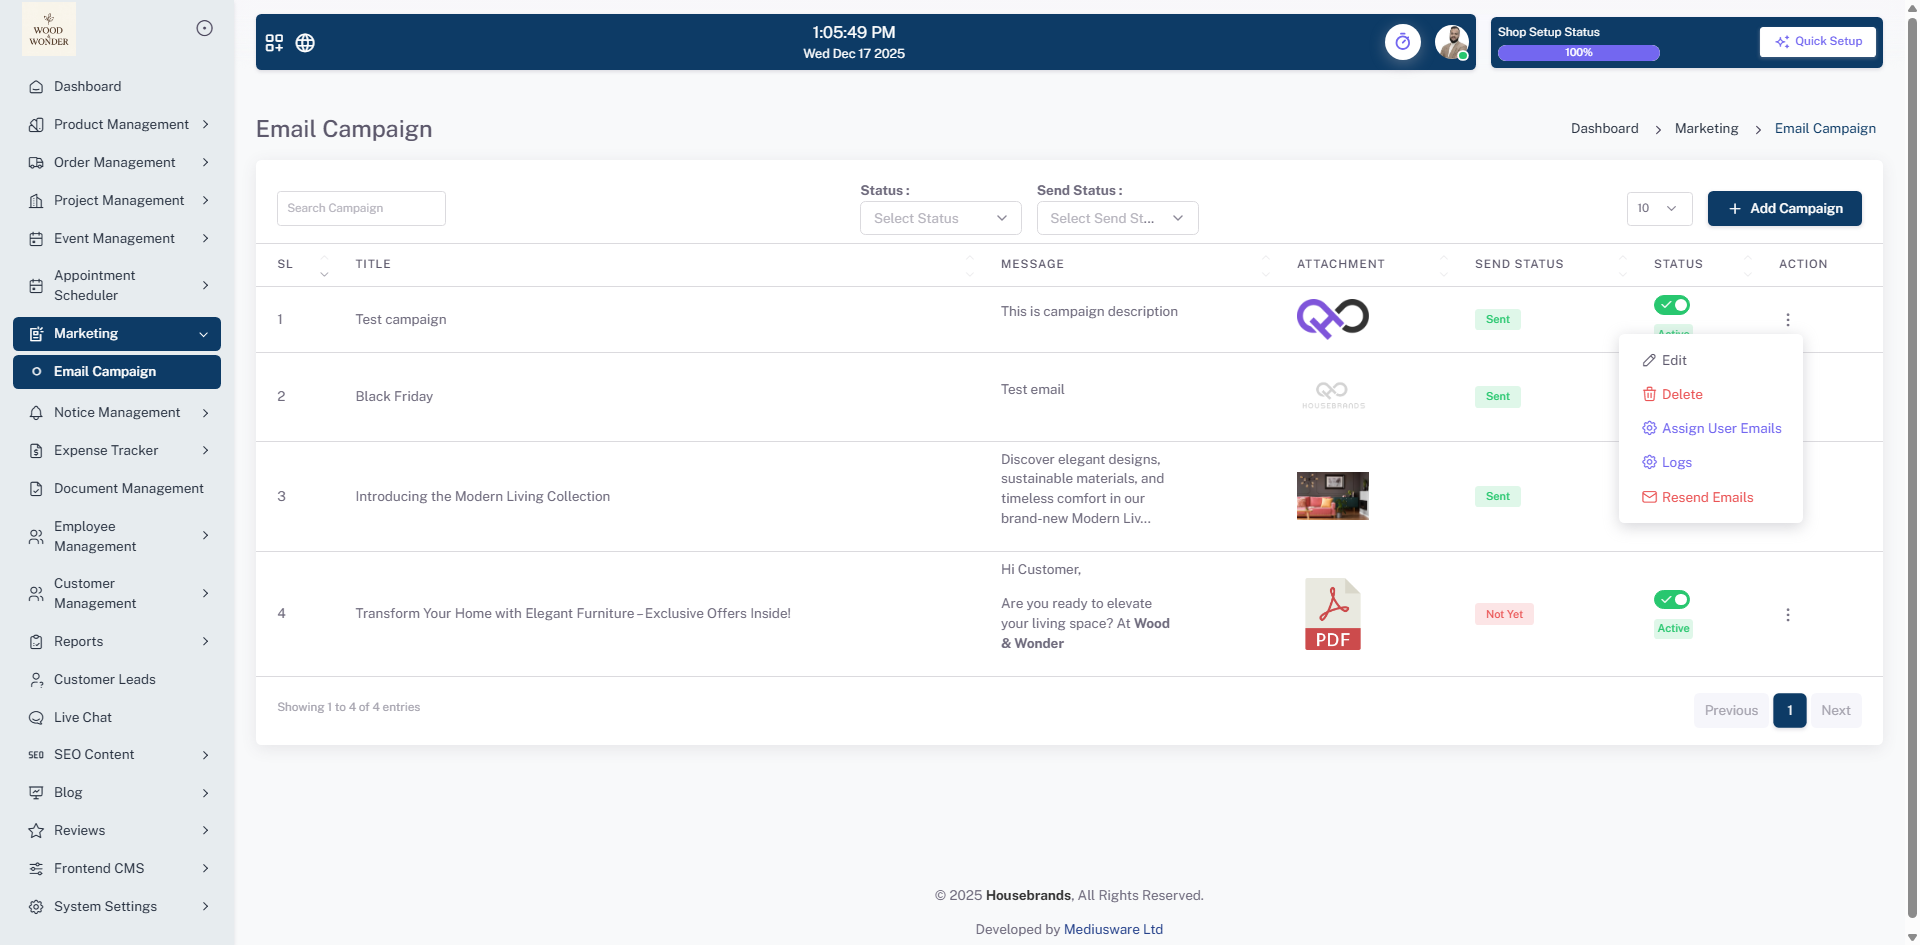
Email Campaign
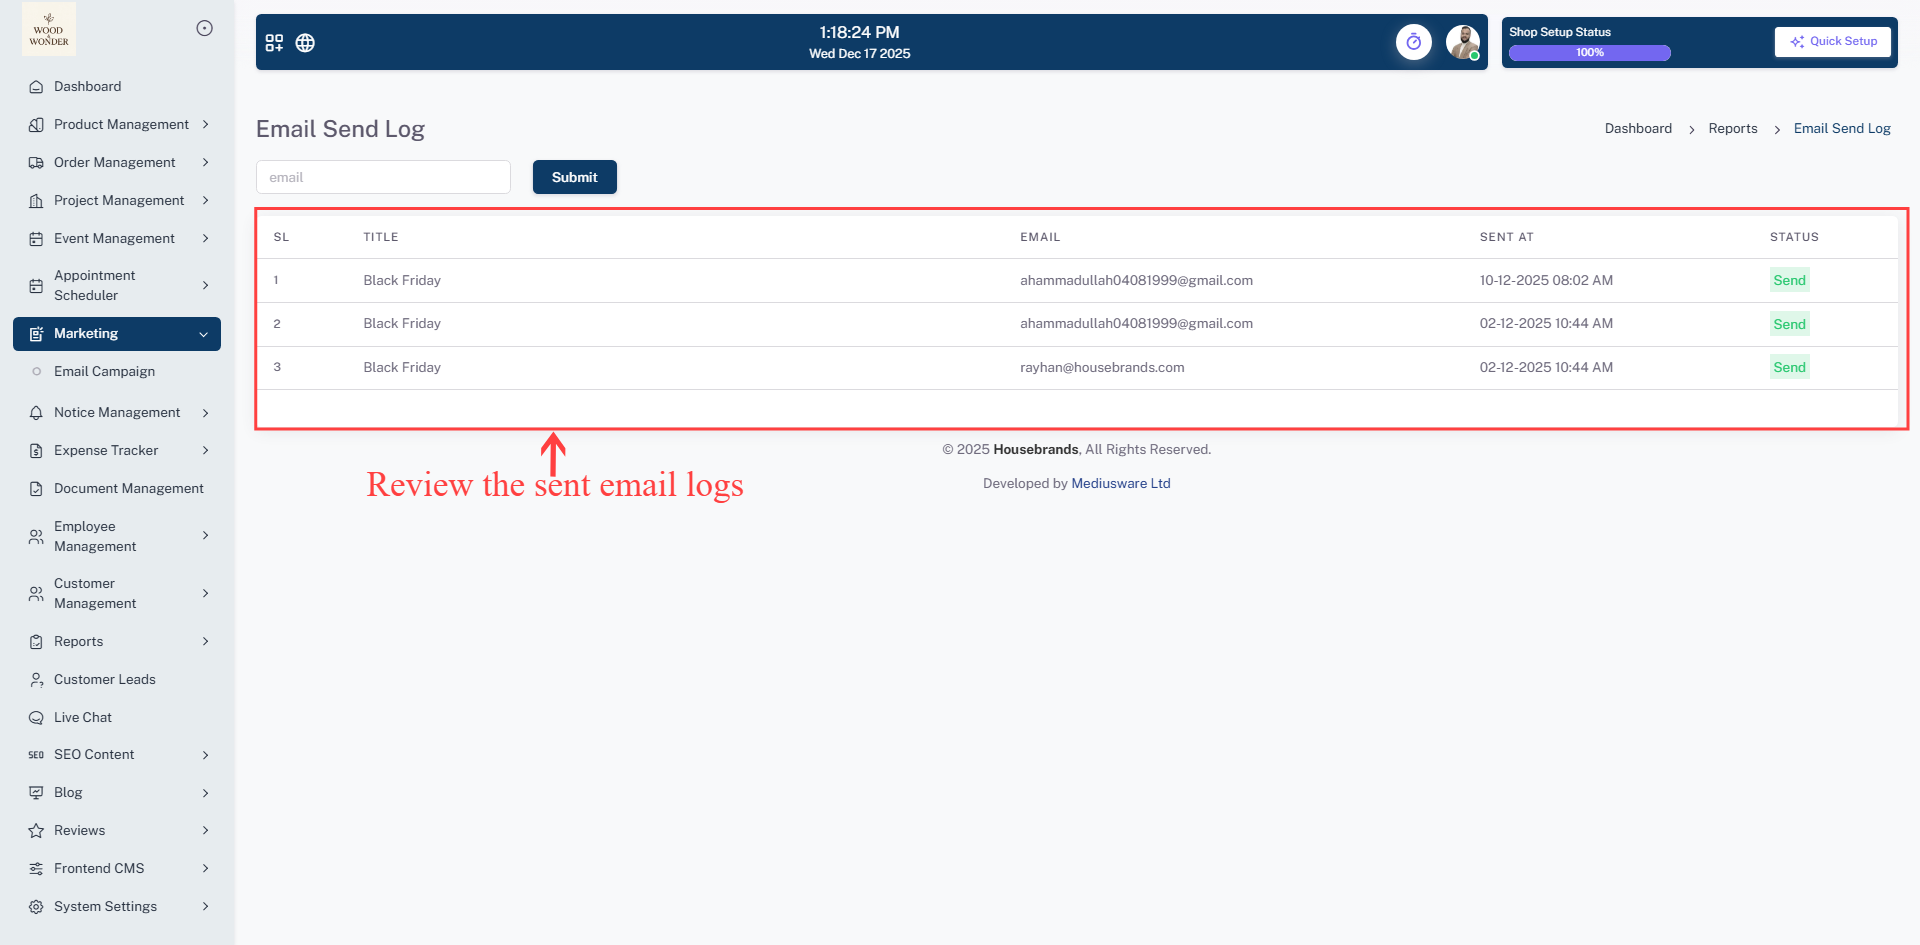
The Email Campaign section within the Event Management module allows users to create, manage, and send email campaigns to targeted recipients. Users can view all campaigns in a structured table, with columns for title, message, attachment, send status, and overall status. Actions such as Edit, Delete, Assign User Emails, View Logs, and Send/Resend Emails are available via the action menu for each campaign.
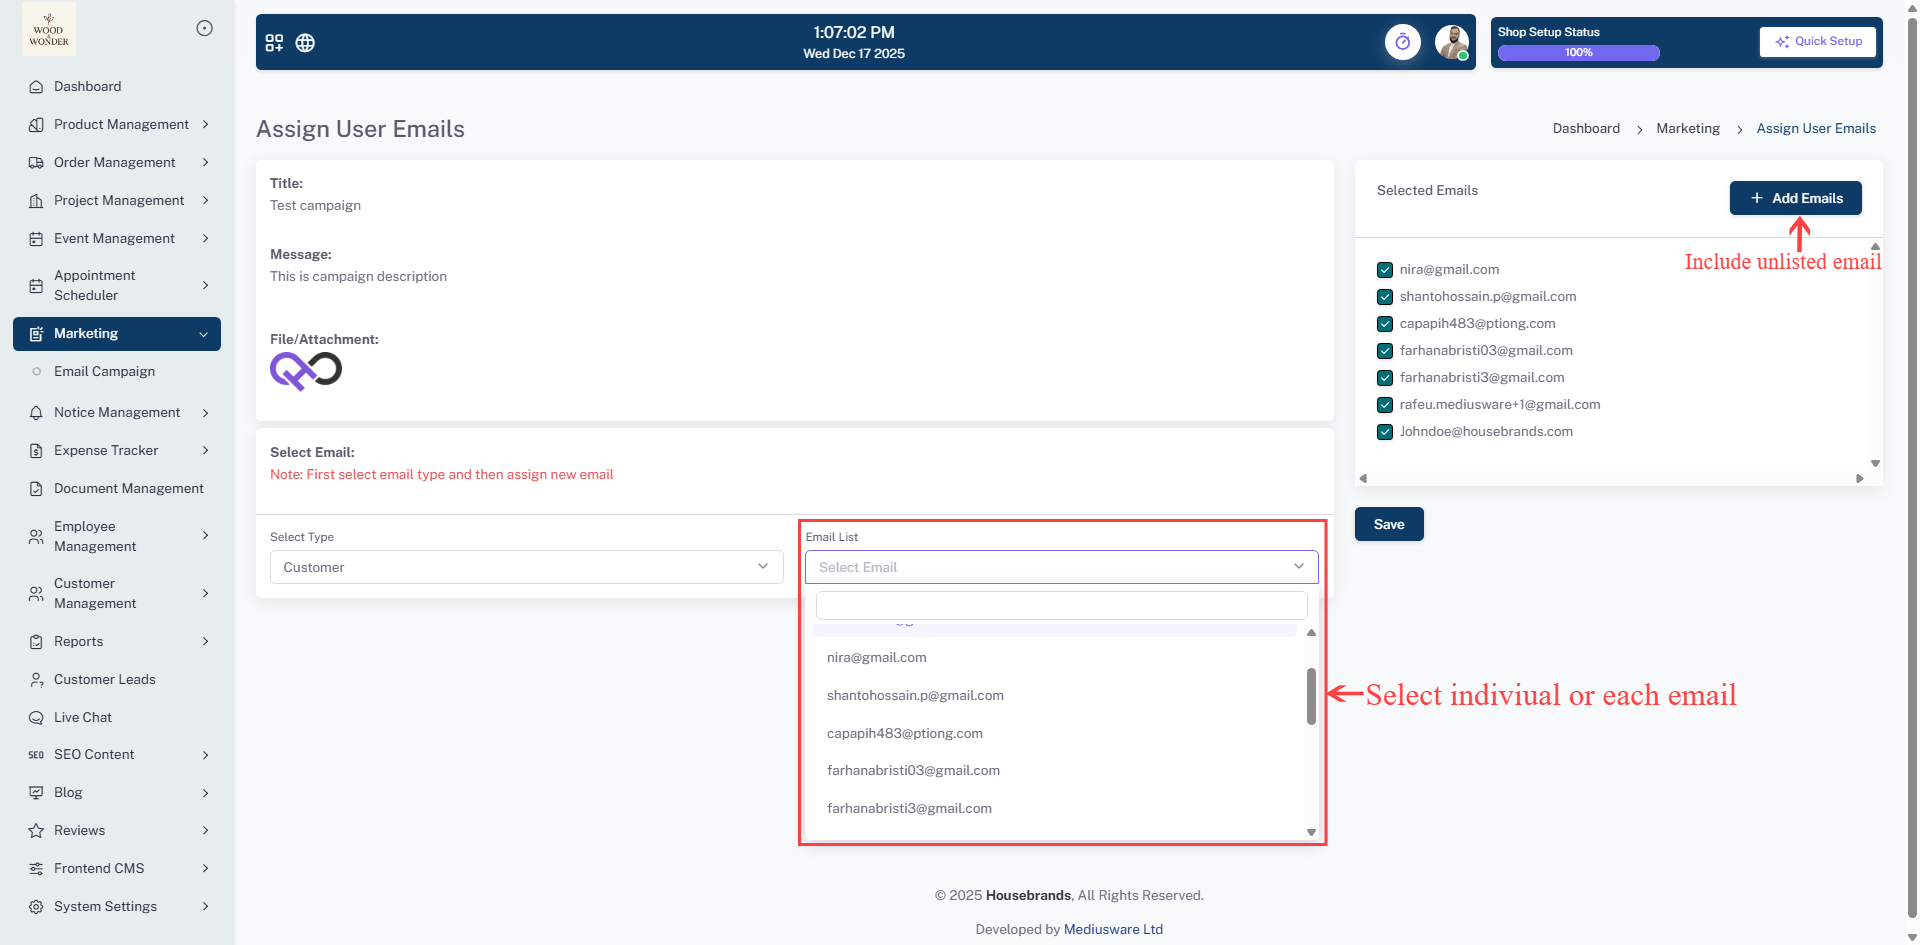
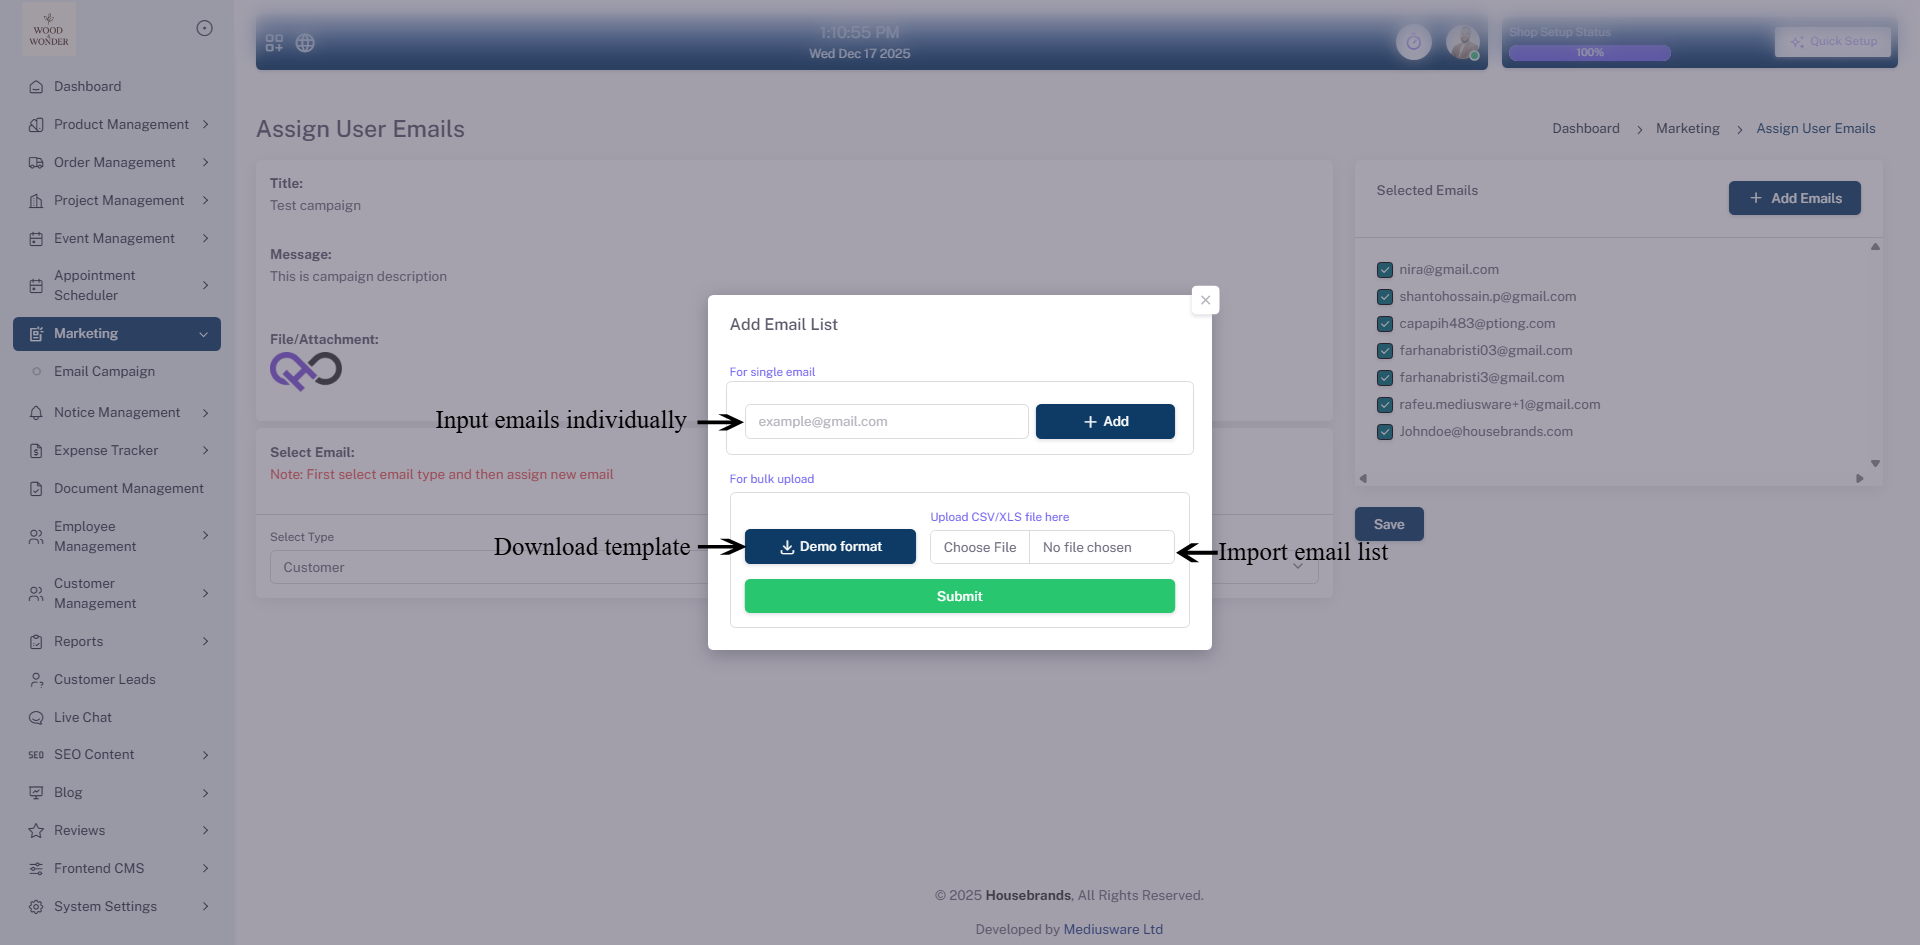
To assign recipients, users can add individual emails or bulk upload CSV/XLS files through the Assign User Emails pop-up. The interface displays a list of selected emails, and users can save the assignment with a single click. This design ensures a clean, intuitive workflow for managing email communications related to events, making it easy to organize, send, and track campaigns efficiently.
Notice Management
The Notice Management module provides a centralized and organized interface for managing all organizational notices, ensuring efficient communication and streamlined internal updates. It is designed to give administrators and authorized users comprehensive control over notice creation, categorization, and dissemination. The module is divided into three key sub-modules, each serving a specific purpose in the notice management workflow:
Notice Type
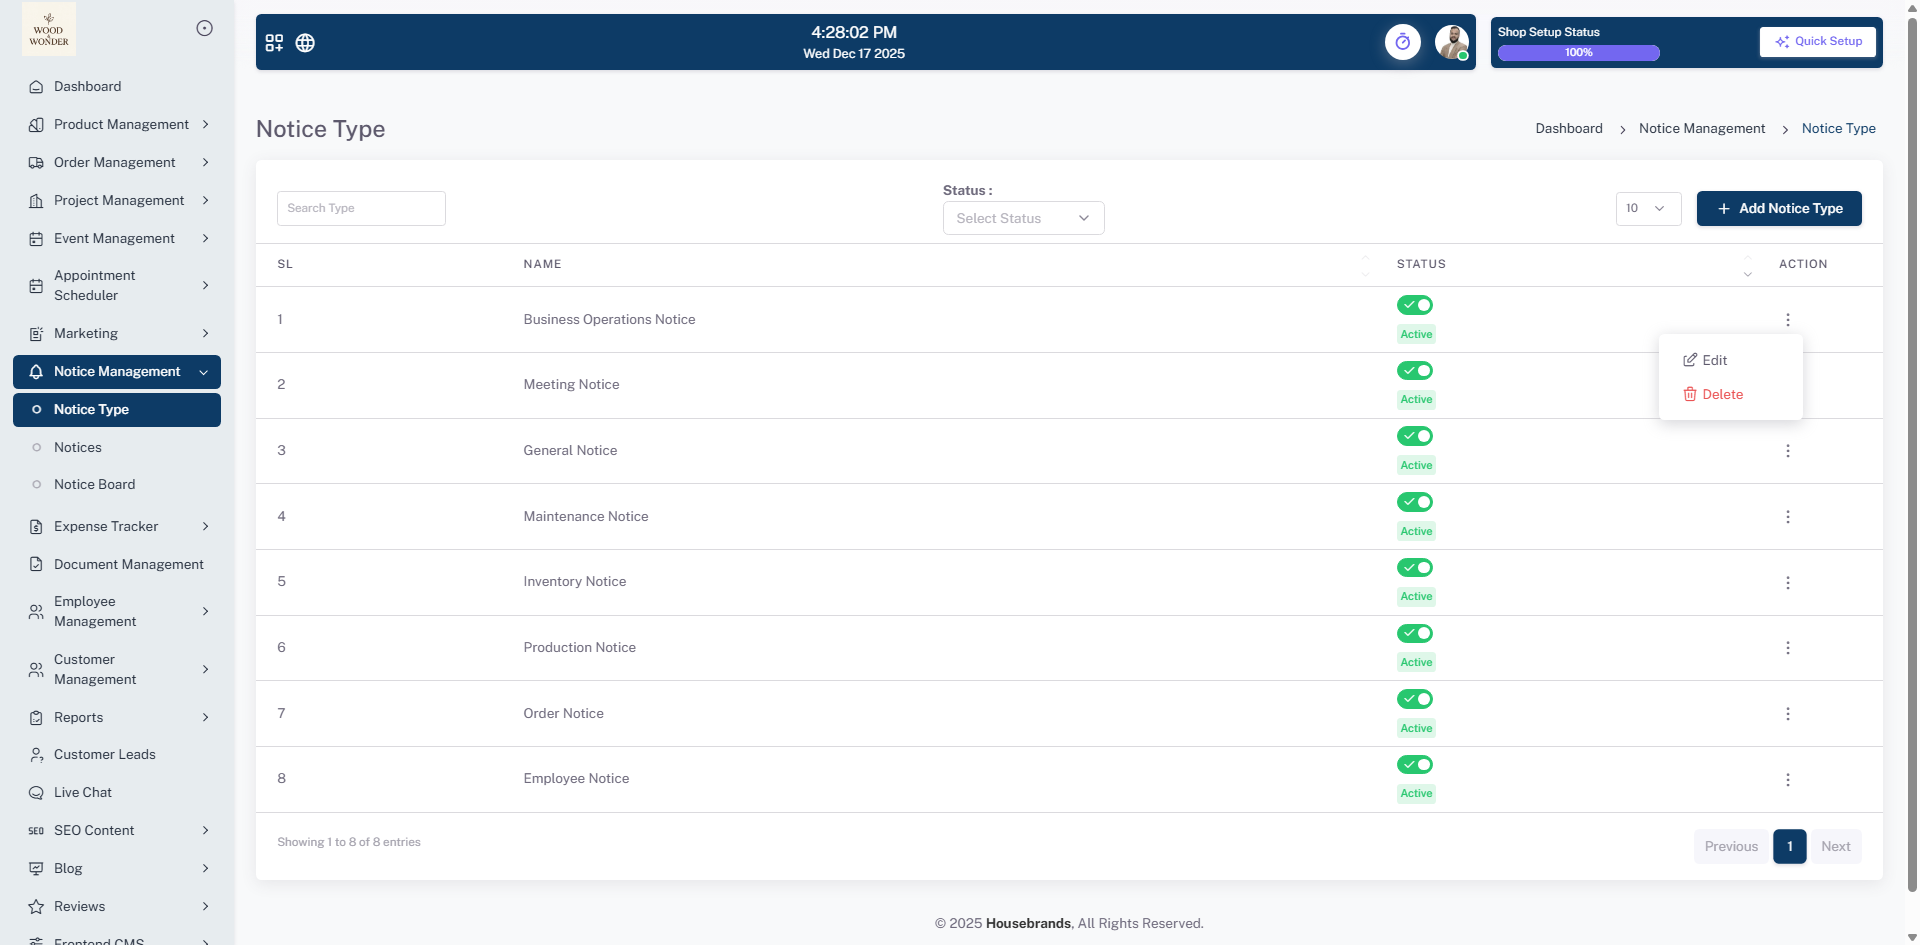
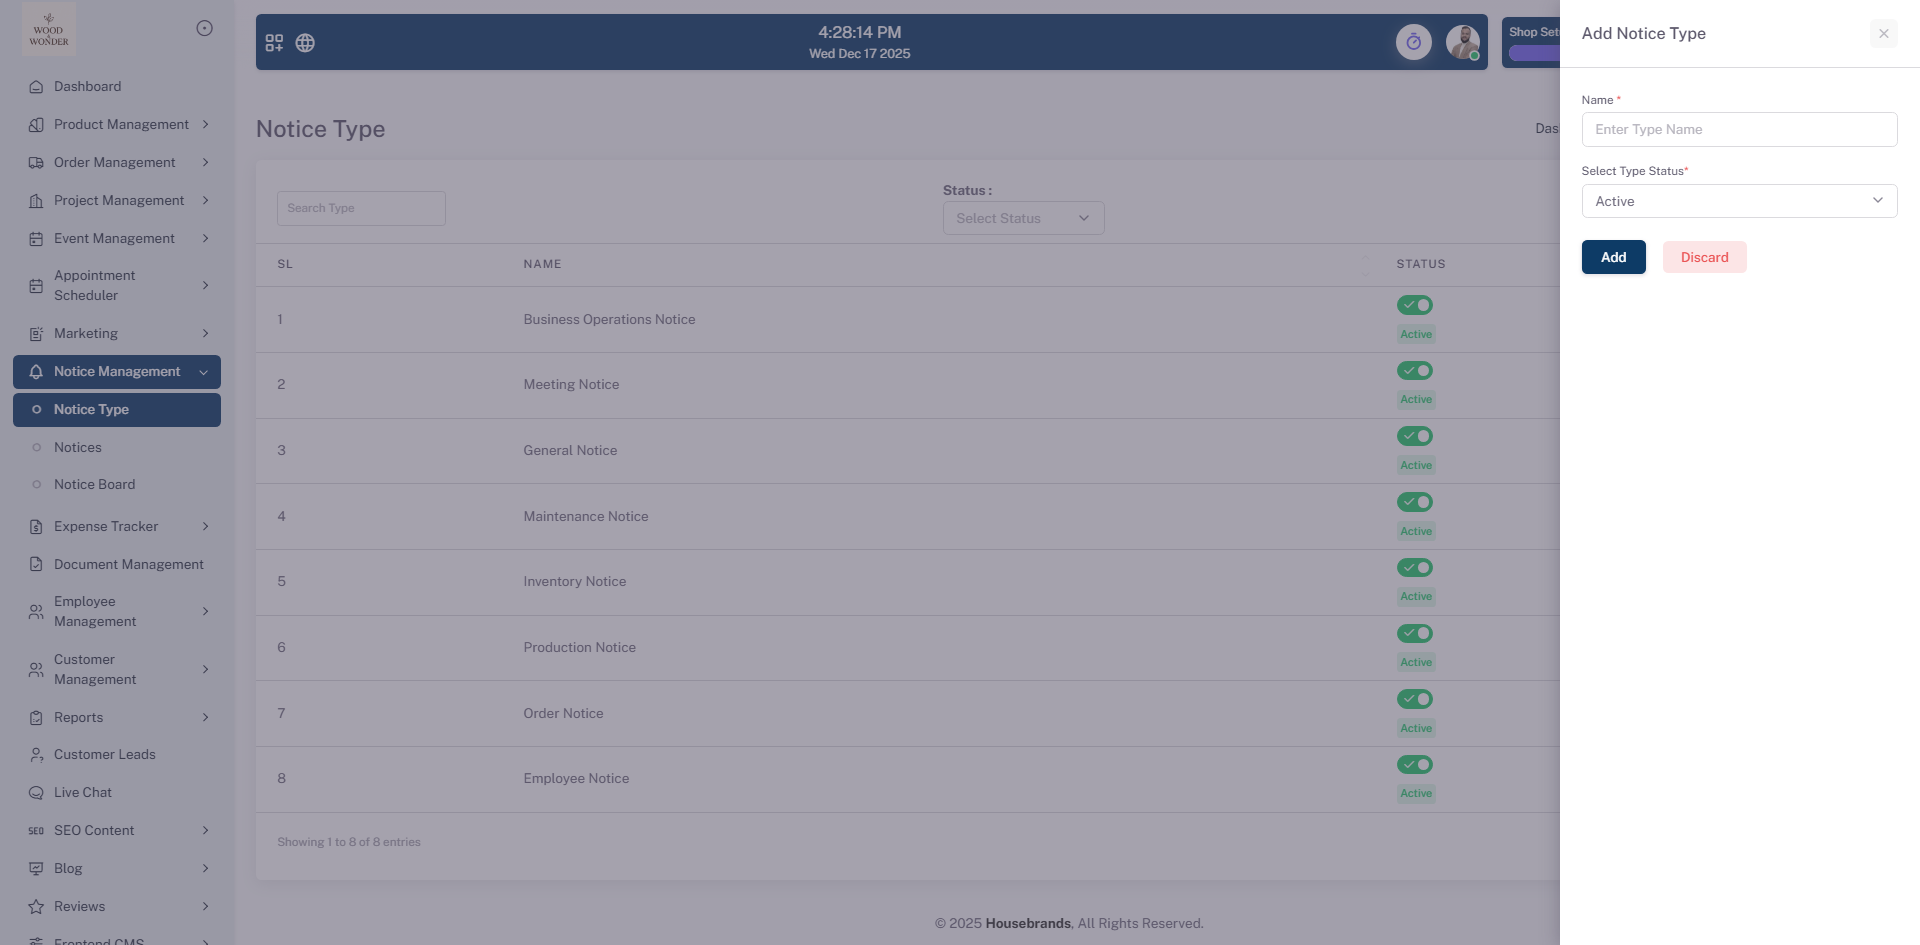
This sub-module allows users to define and manage various categories of notices, such as Business Operations, Meetings, General, Maintenance, Inventory, Production, Orders, and Employee-specific notices. Users can easily add new notice types using the + Add Notice Type button and maintain control over existing ones by activating, deactivating, or editing them via the action menu. The interface also supports search and filter functionality, enabling quick access to specific notice types and ensuring organized categorization.
Notices
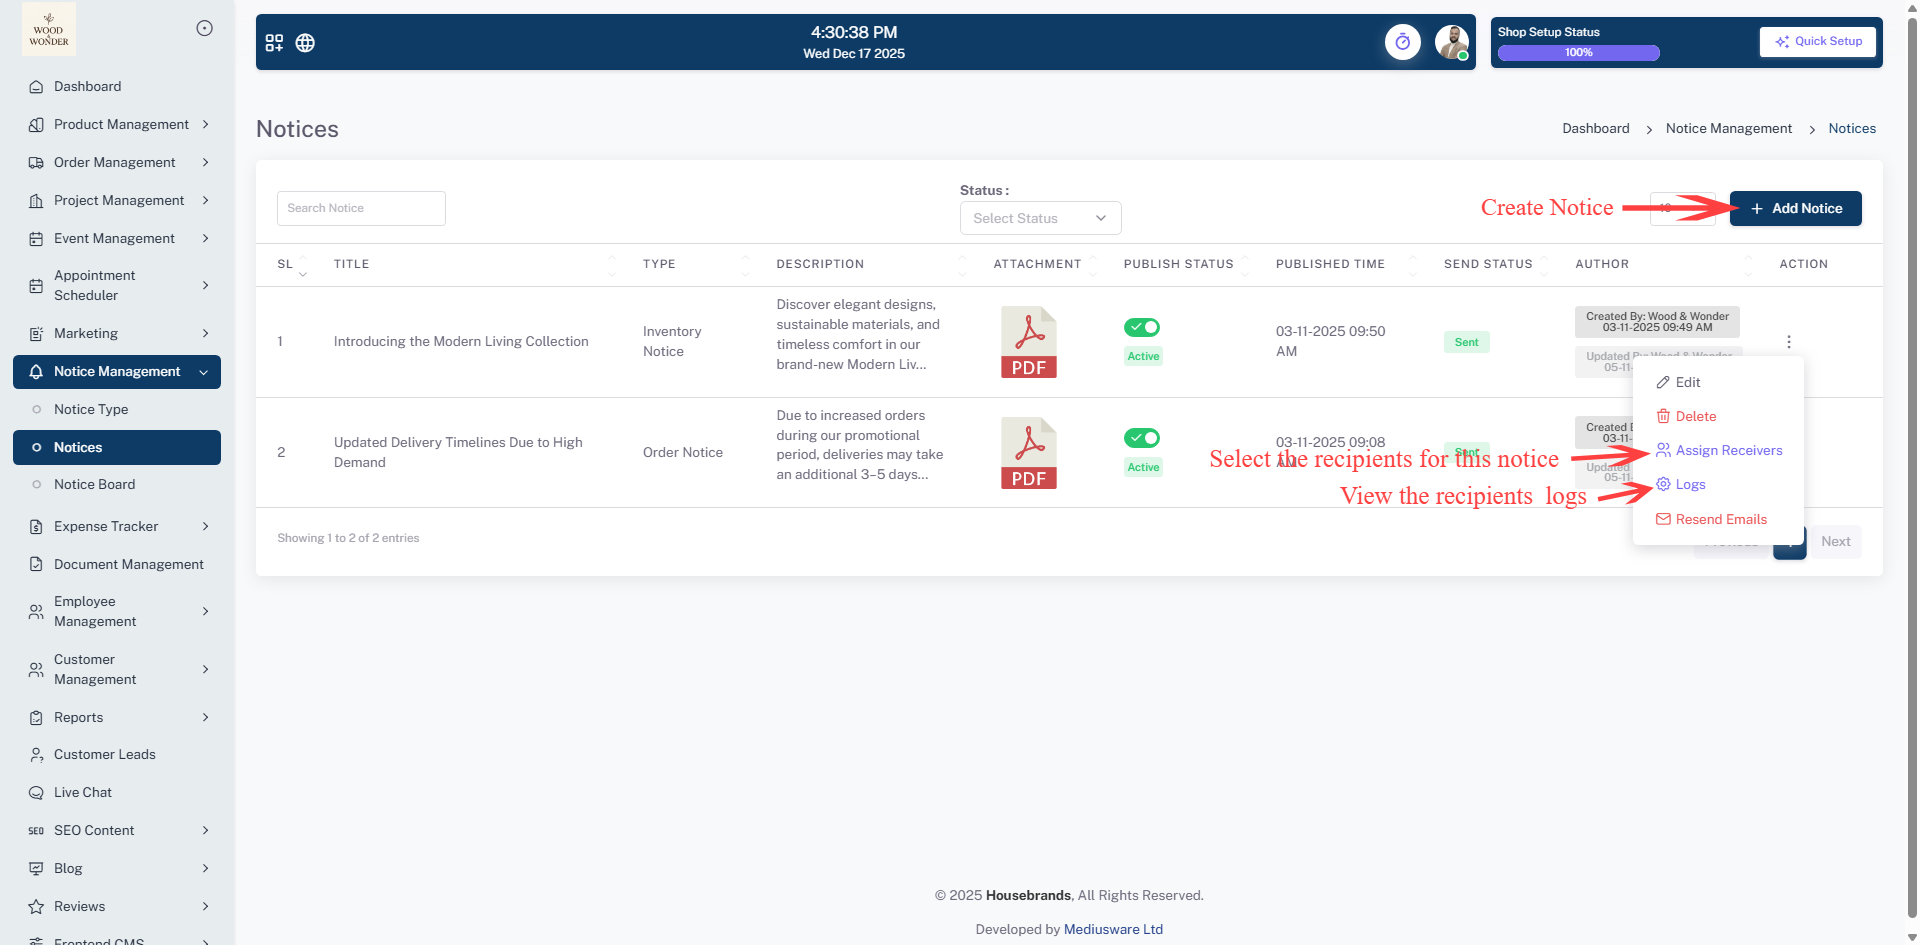
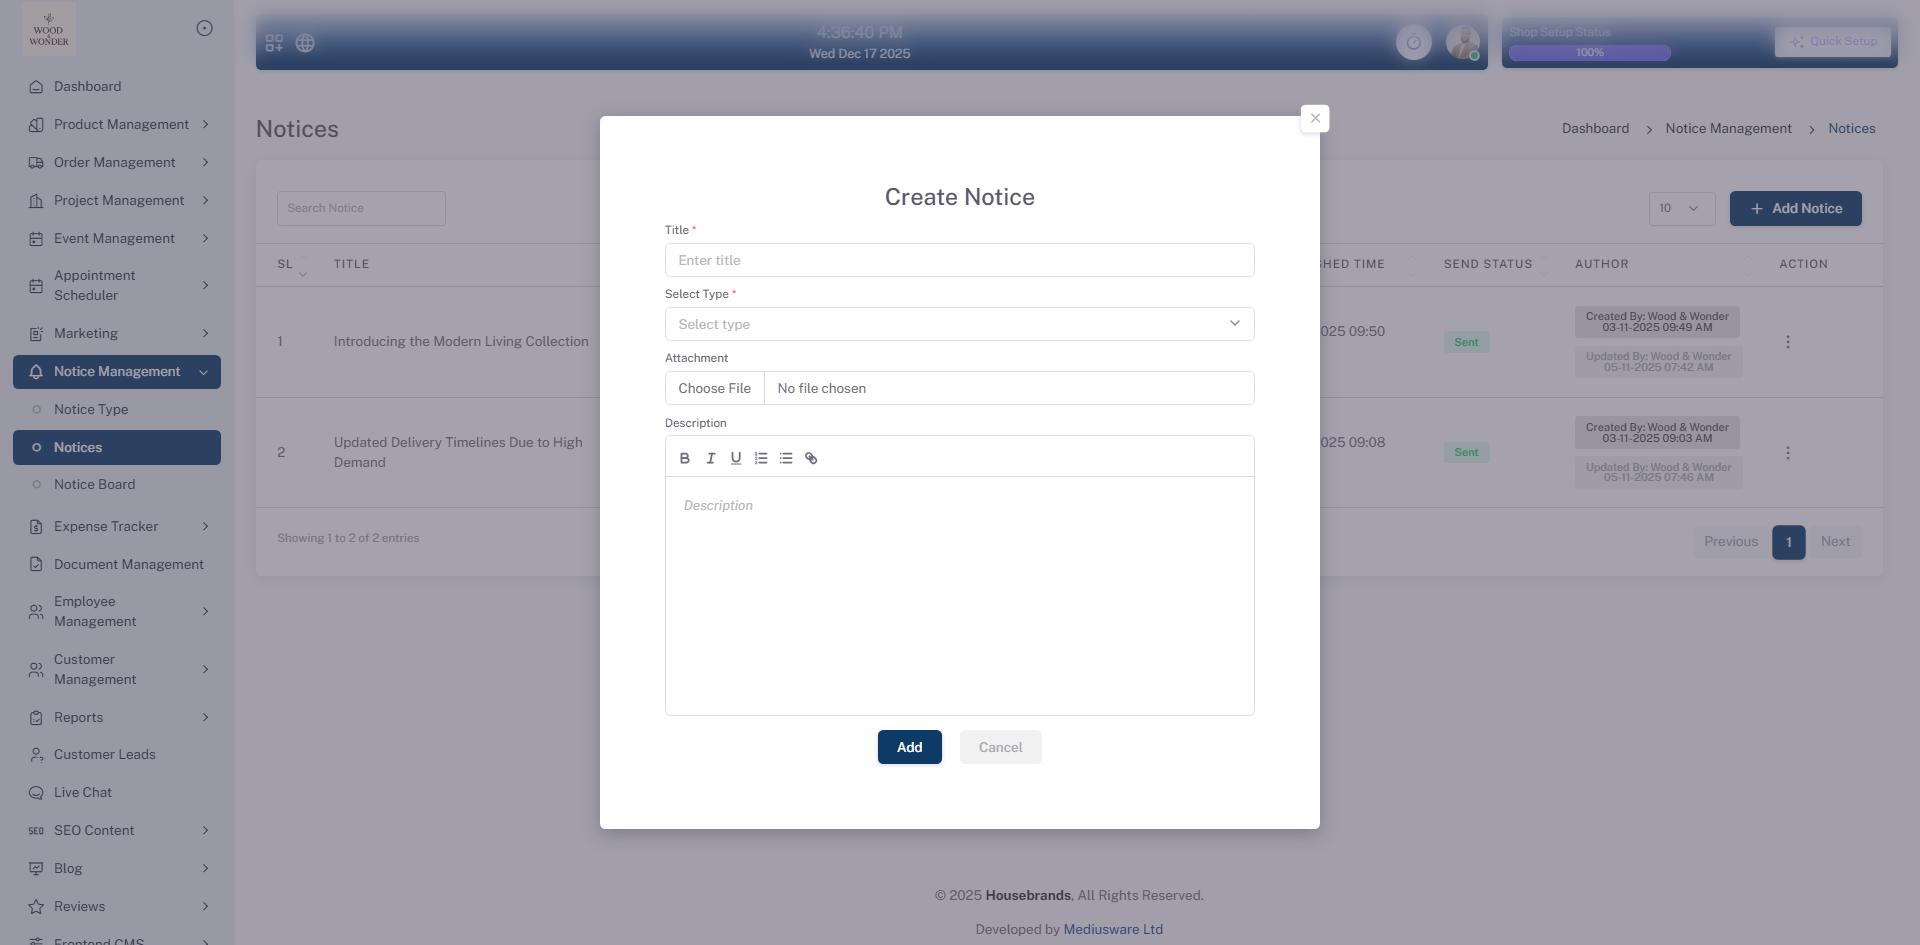
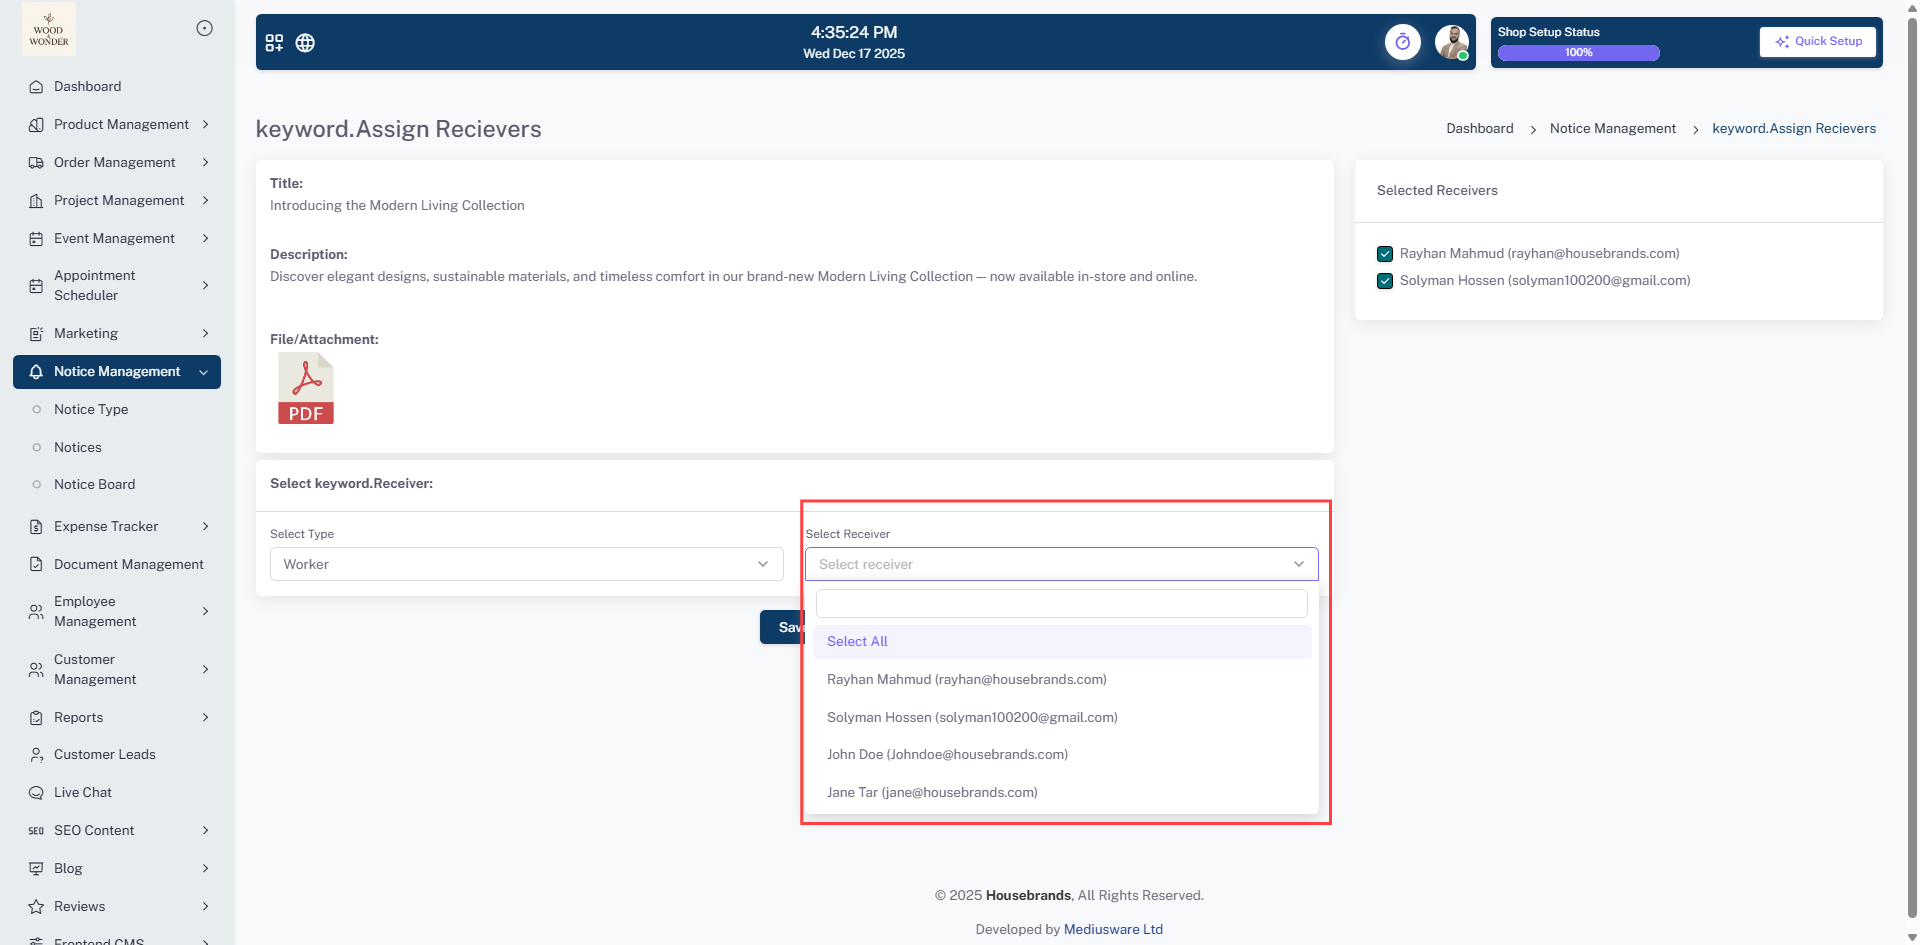
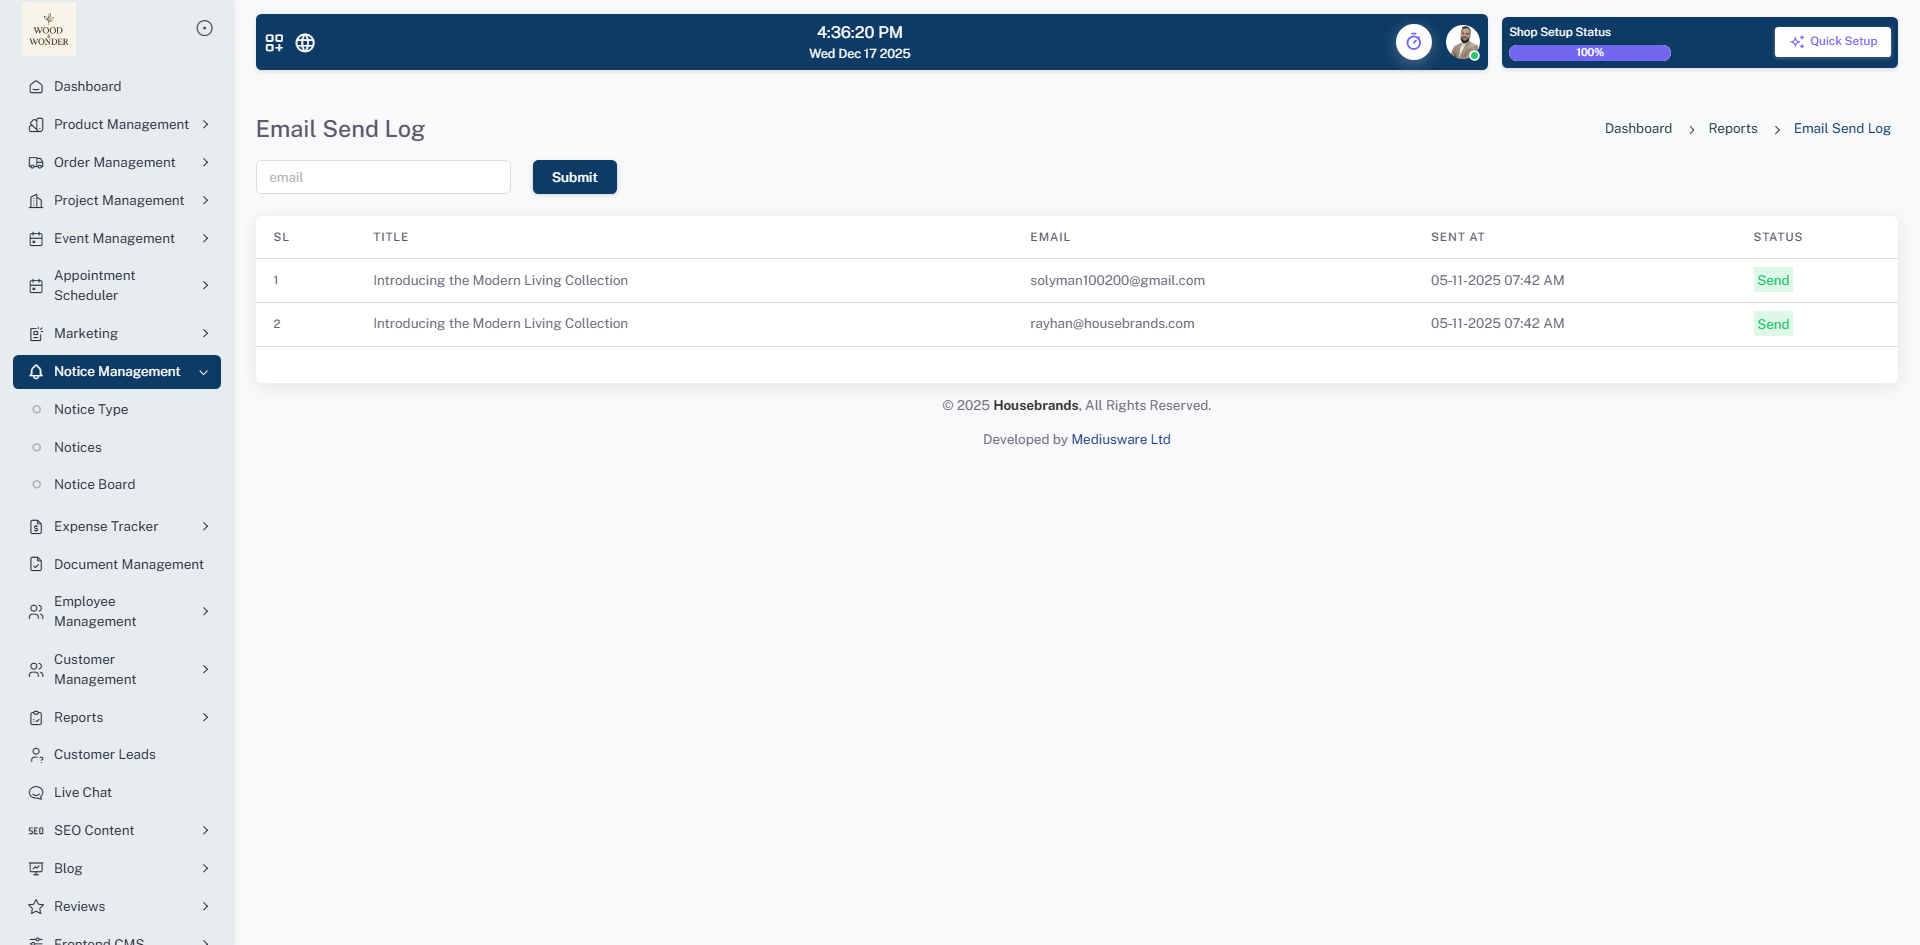
The Notices sub-module is the core area for creating and managing individual notices. Each notice captures comprehensive details, including the title, type, description, attachments, publish status, scheduled publication time, send status, and author information. Users can perform multiple actions such as Edit, Delete, Assign Receivers, View Logs, and Resend Emails directly from the action menu. The tabular layout provides a clear overview of all notices, simplifying monitoring and management of internal communications.
Notice Board
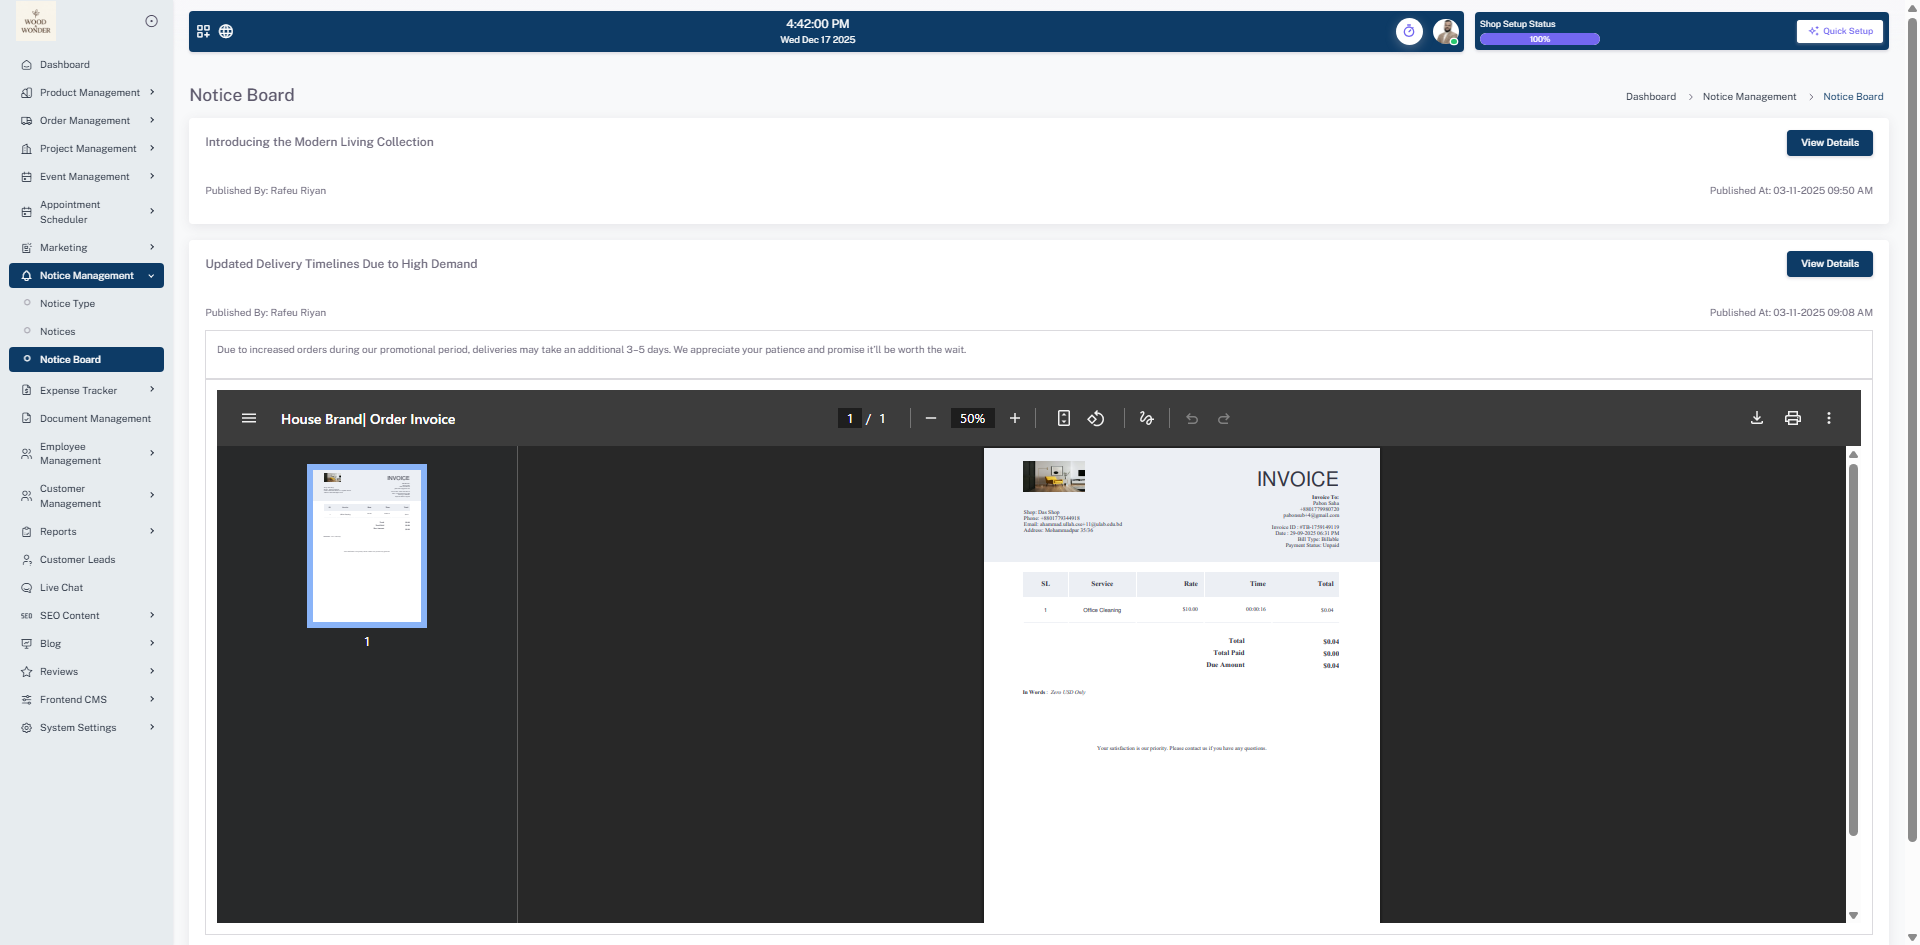
The Notice Board offers a visually intuitive interface displaying all published notices. It highlights essential information like the notice title, author, and publication time. Employees can view the full content of a notice by clicking the View Details button. This sub-module ensures that all important announcements are easily accessible, promoting transparency and effective internal communication across the organization.
Expense Tracker
The Expense Tracker module provides a centralized platform for managing all organizational expenses efficiently. It consists of two key submodules that allow users to categorize, record, and monitor expenditures in a structured and transparent manner:
Expense Type
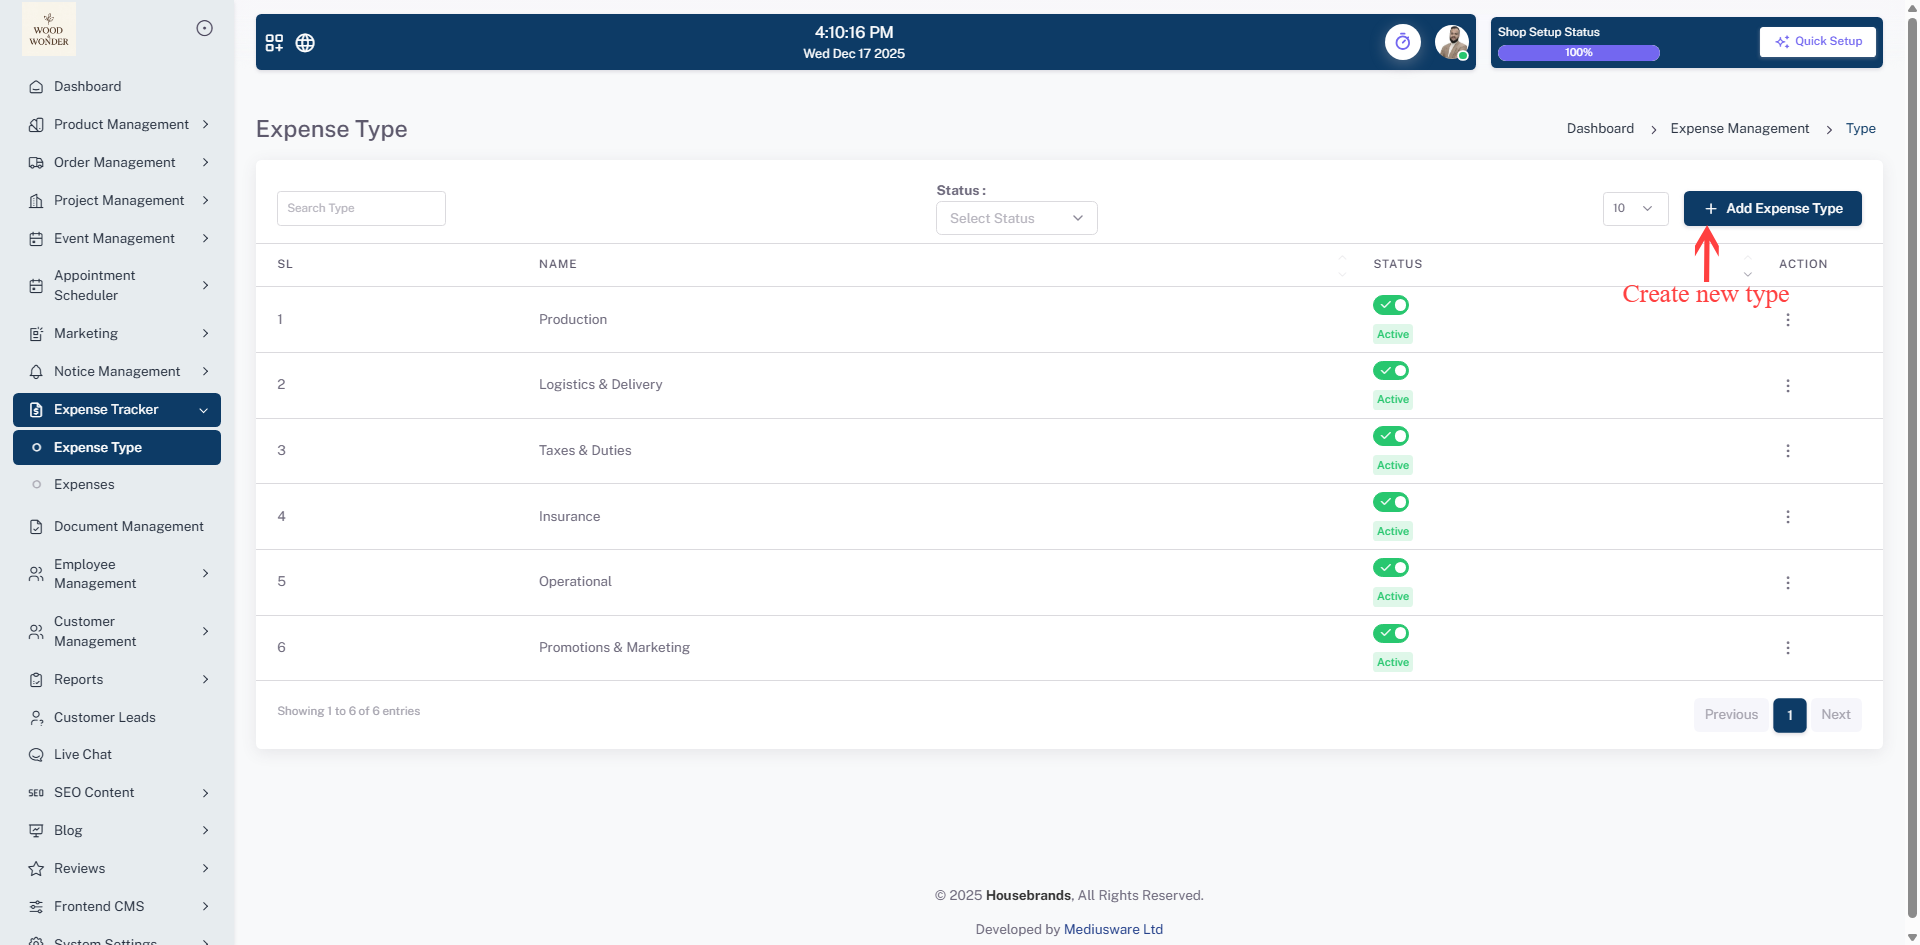
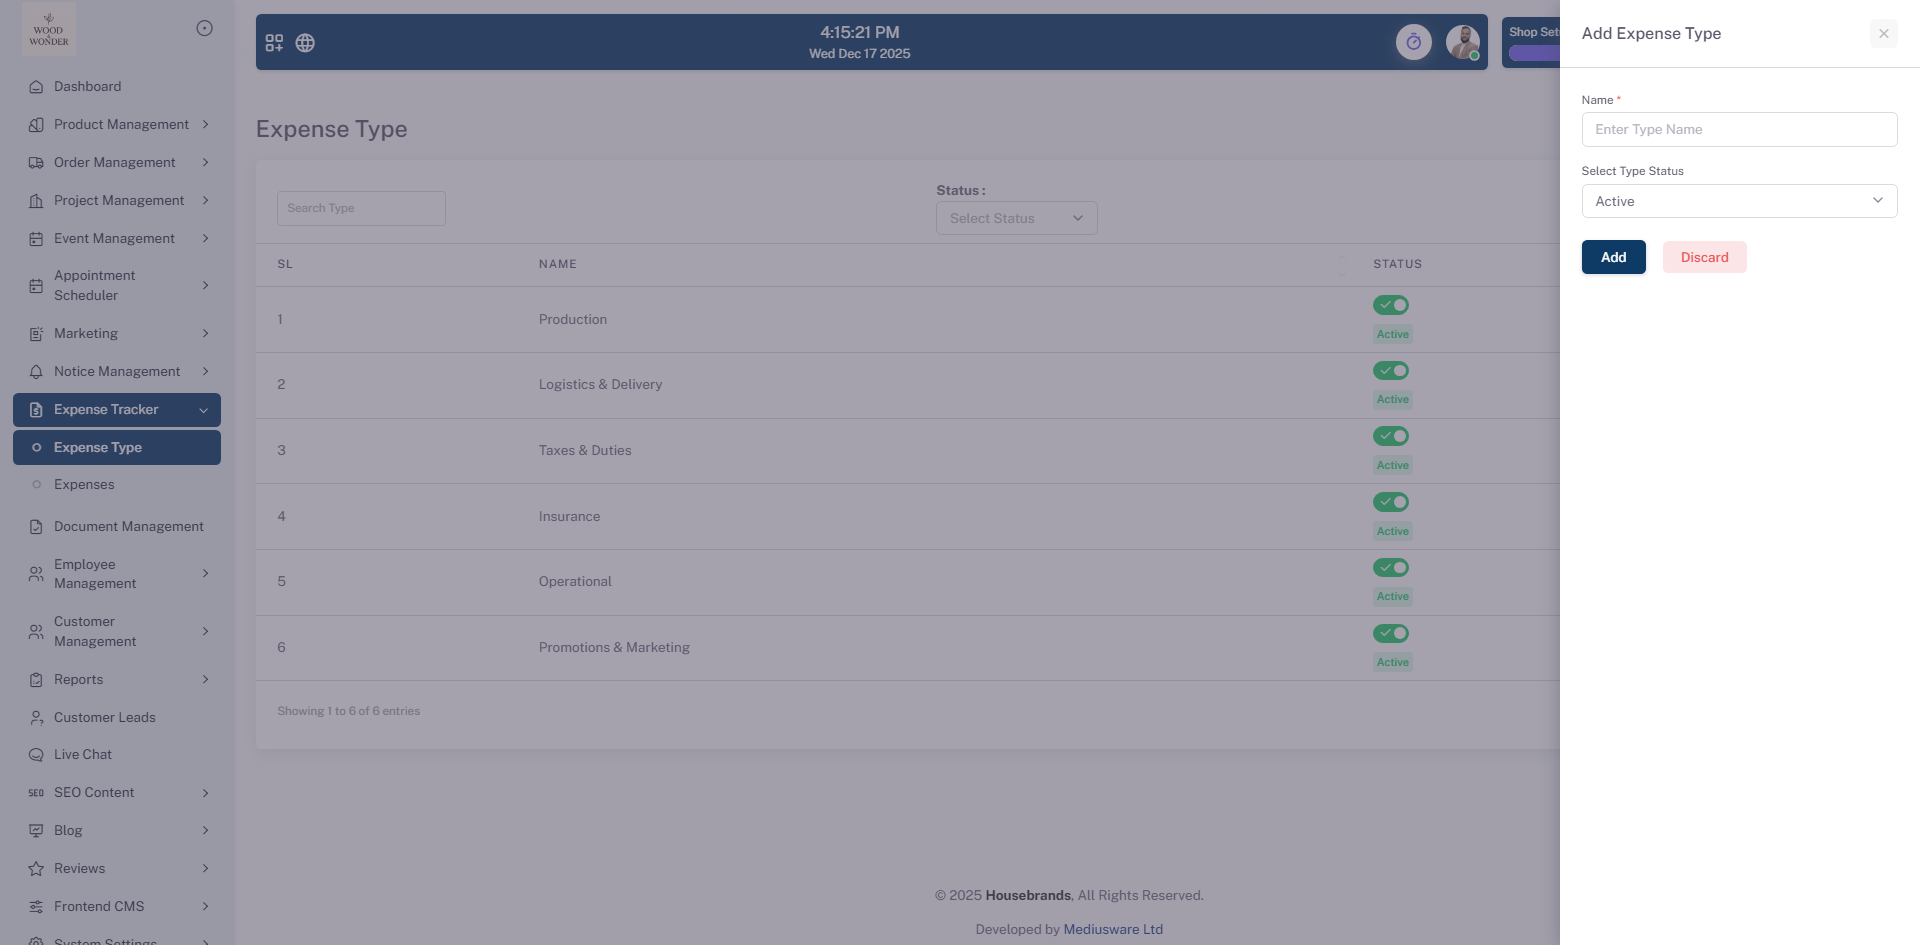
This sub-module enables users to define and manage different categories of expenses, such as Production, Logistics & Delivery, Taxes & Duties, Insurance, Operational, and Promotions & Marketing. Users can easily add new expense types using the + Add Expense Type button. Existing types can be activated, deactivated, or edited via the action menu. The search and filter functionality allows users to quickly locate specific expense types and monitor their active or inactive status, ensuring organized categorization and streamlined expense management.
Expenses
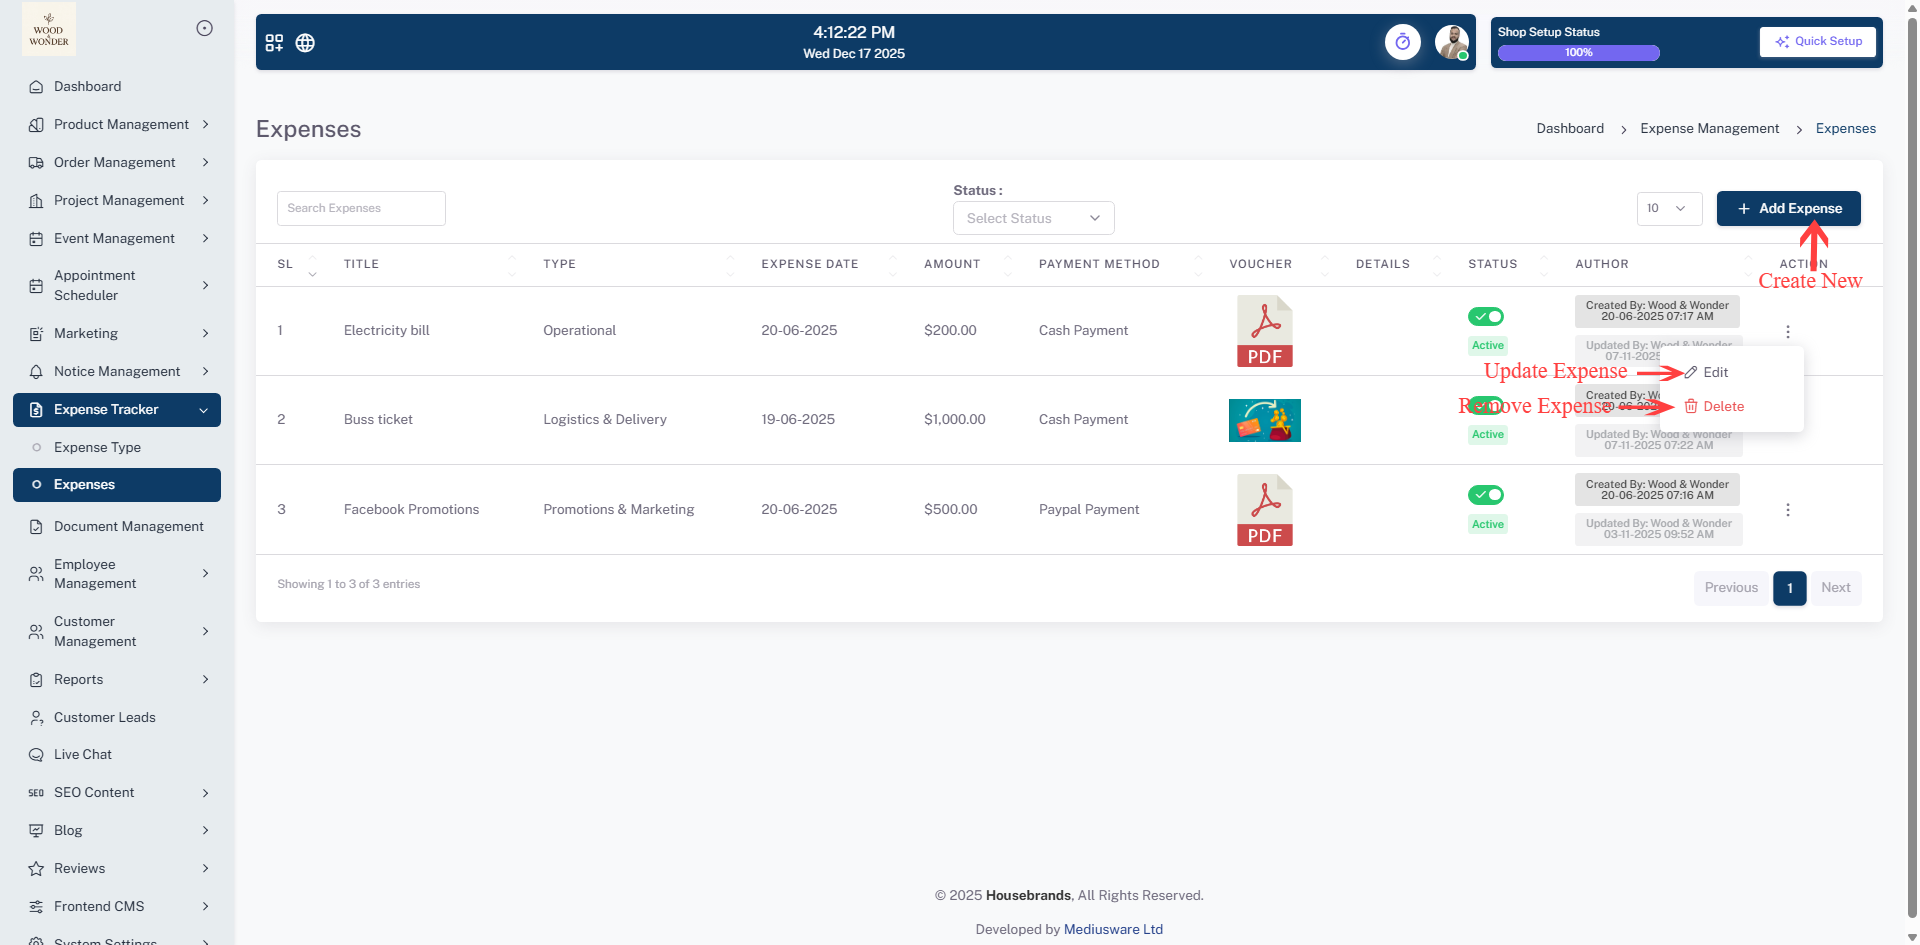
The Expenses sub-module allows users to create and manage individual expense records. Each record contains detailed information including the title, type, expense date, amount, payment method, attached voucher, status, and author details. Users can perform actions such as Edit, Delete, and update status directly from the action menu. The tabular view provides a clear and concise overview of all expenses, making it easy to track expenditures, verify payments, and maintain financial transparency across the organization.
Document Management
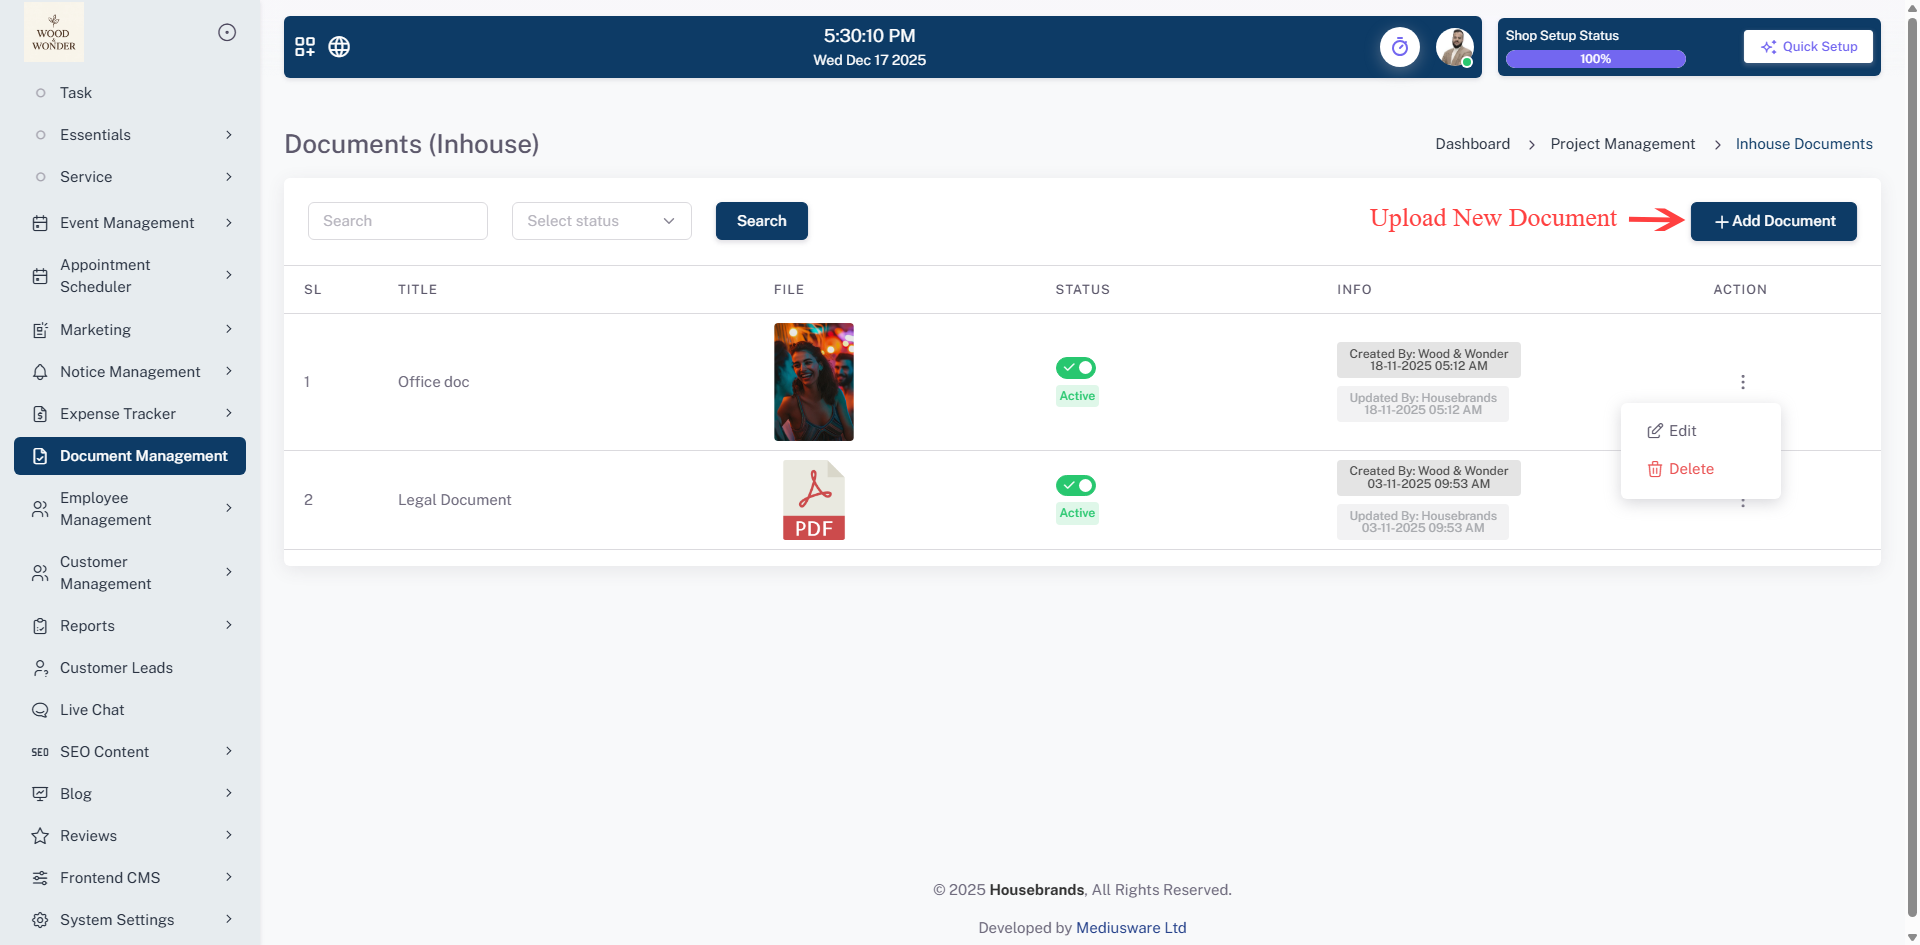
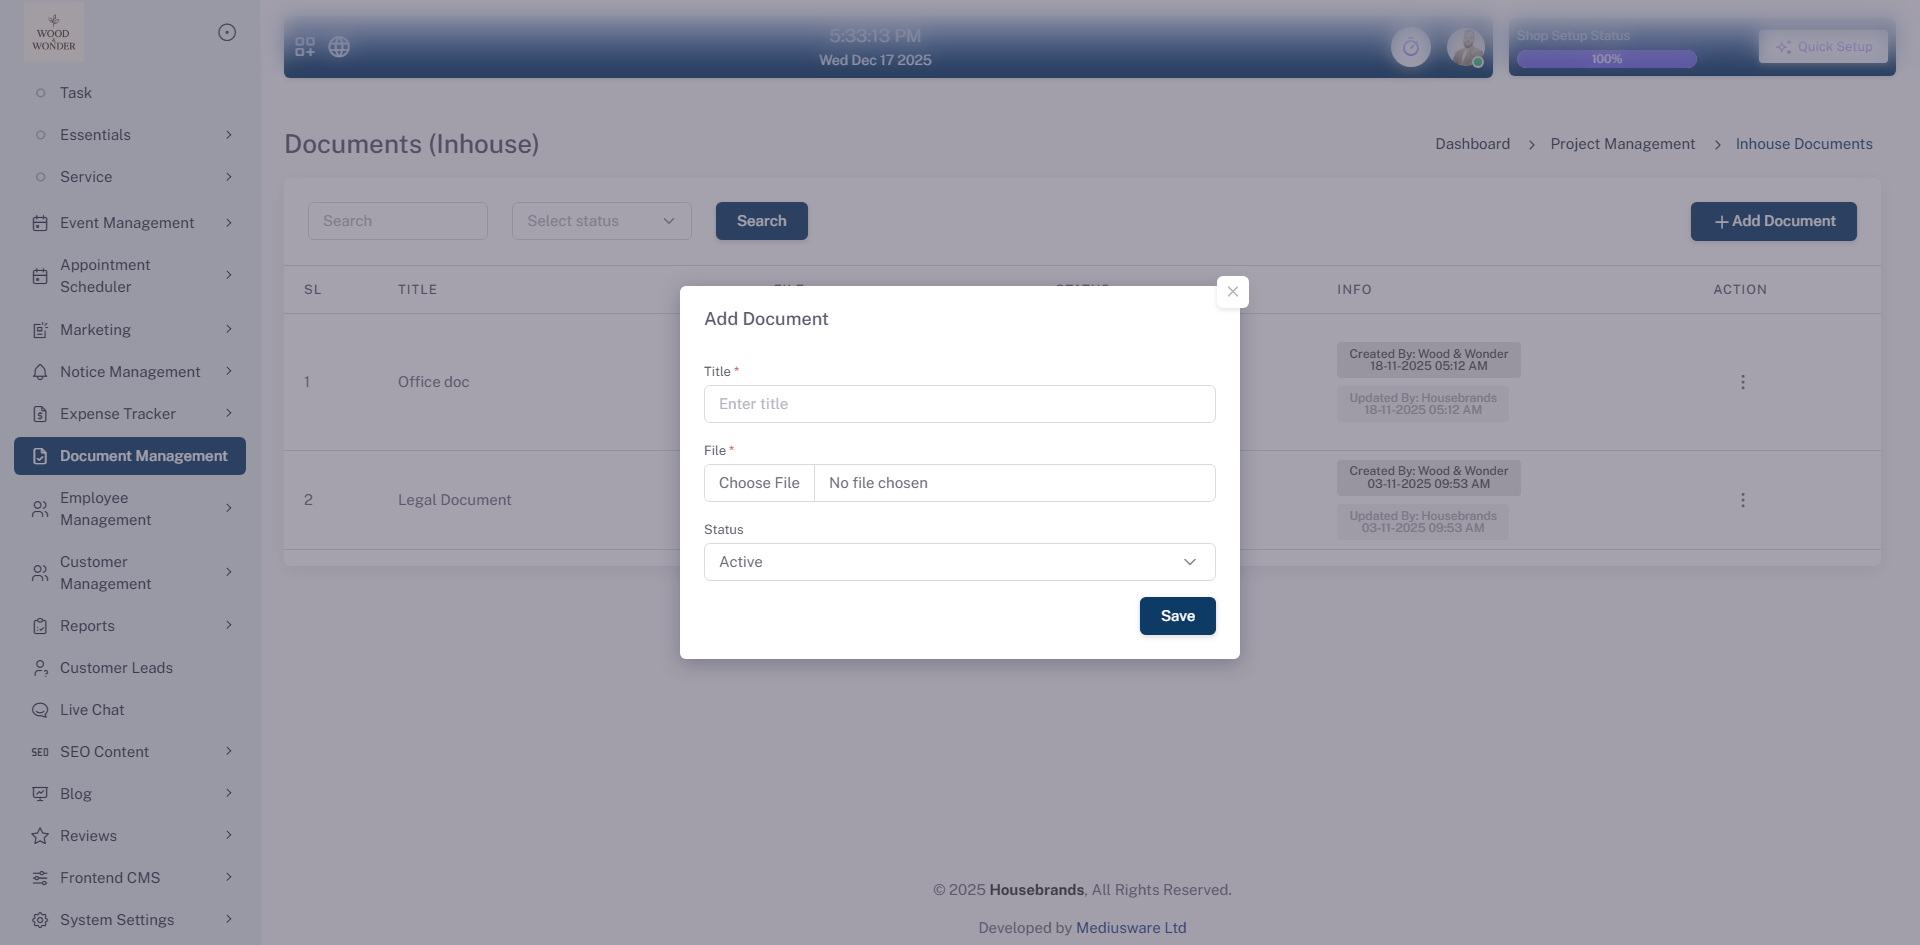
Inhouse Document Management module allows users to securely store, organize, and manage internal documents within the system. Users can upload new documents using the + Add Document button and assign relevant titles for easy identification. Each document displays its file preview, current status (Active/Inactive), and detailed information such as creator and last updated time. Documents can be activated, deactivated, or managed through the action menu for better control and compliance. The built-in search and status filter options help users quickly locate specific documents, ensuring efficient document tracking, streamlined internal operations, and centralized document handling.
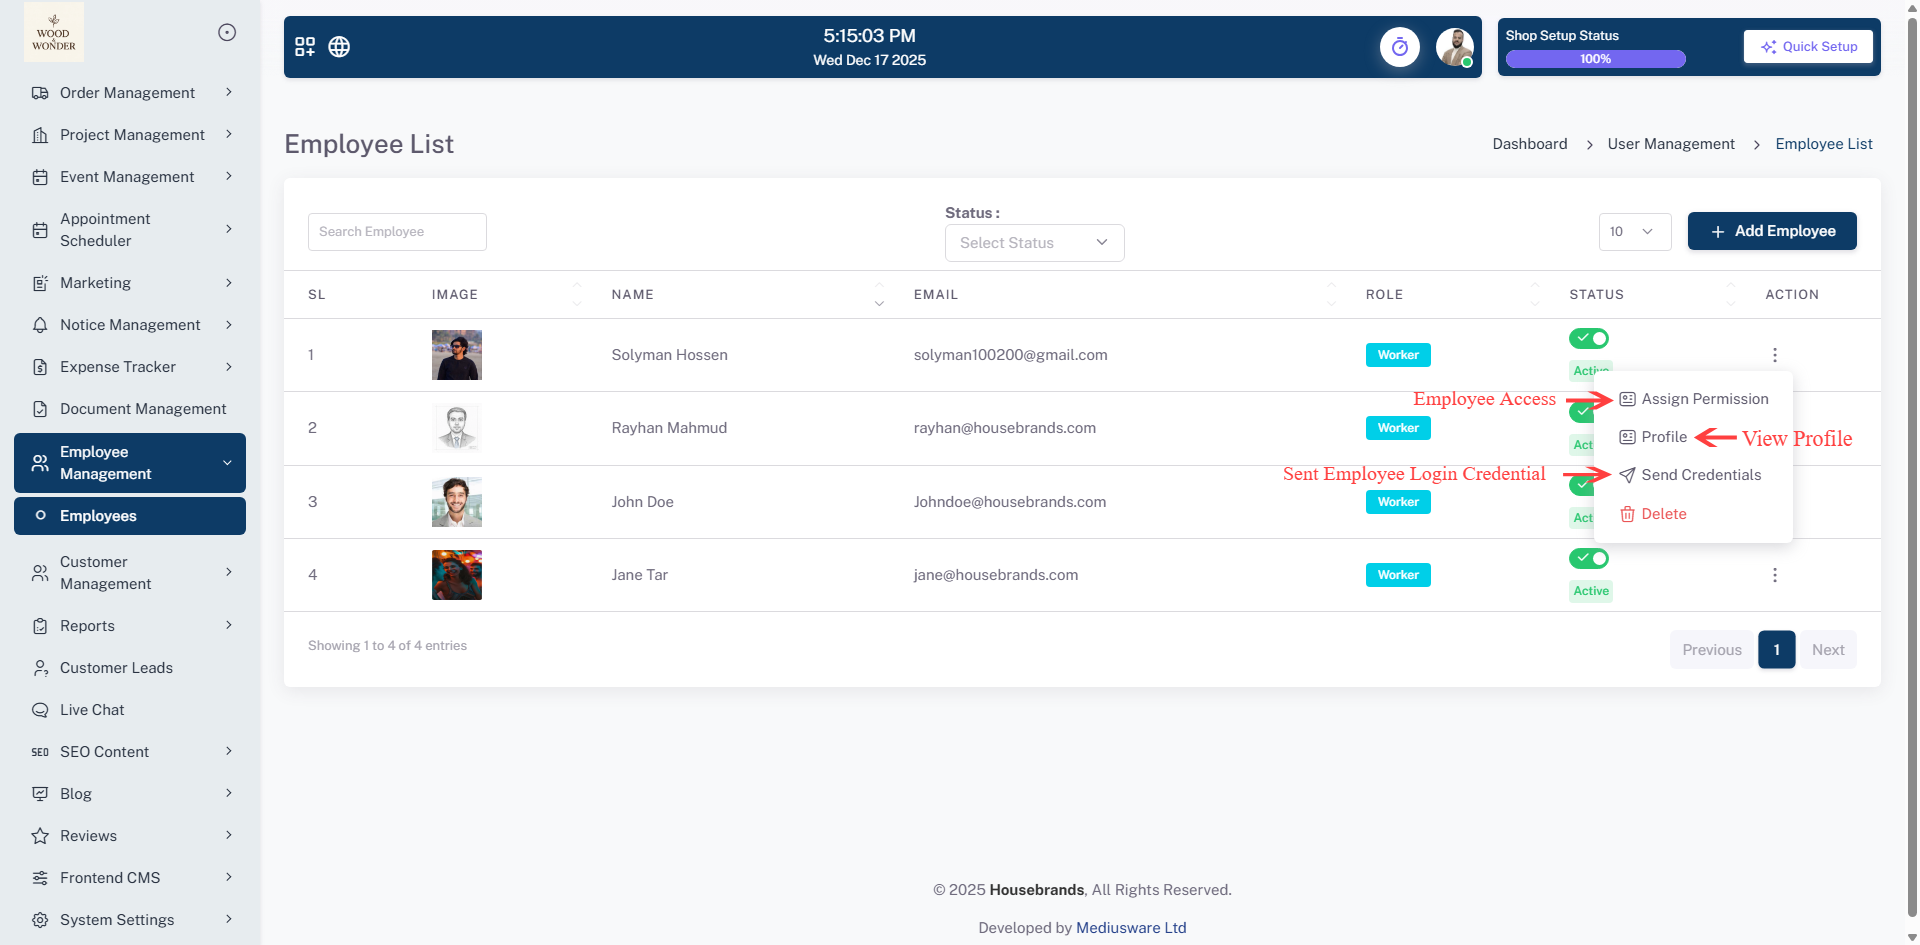
Employee Management
This Employee Management module enables administrators to efficiently manage employee accounts and
access within the system. The Employee List view displays essential details such as employee image,
name, email, role, and current status, providing a clear overview of all registered employees. Users
can quickly find specific employees using the search and status filter options, while pagination
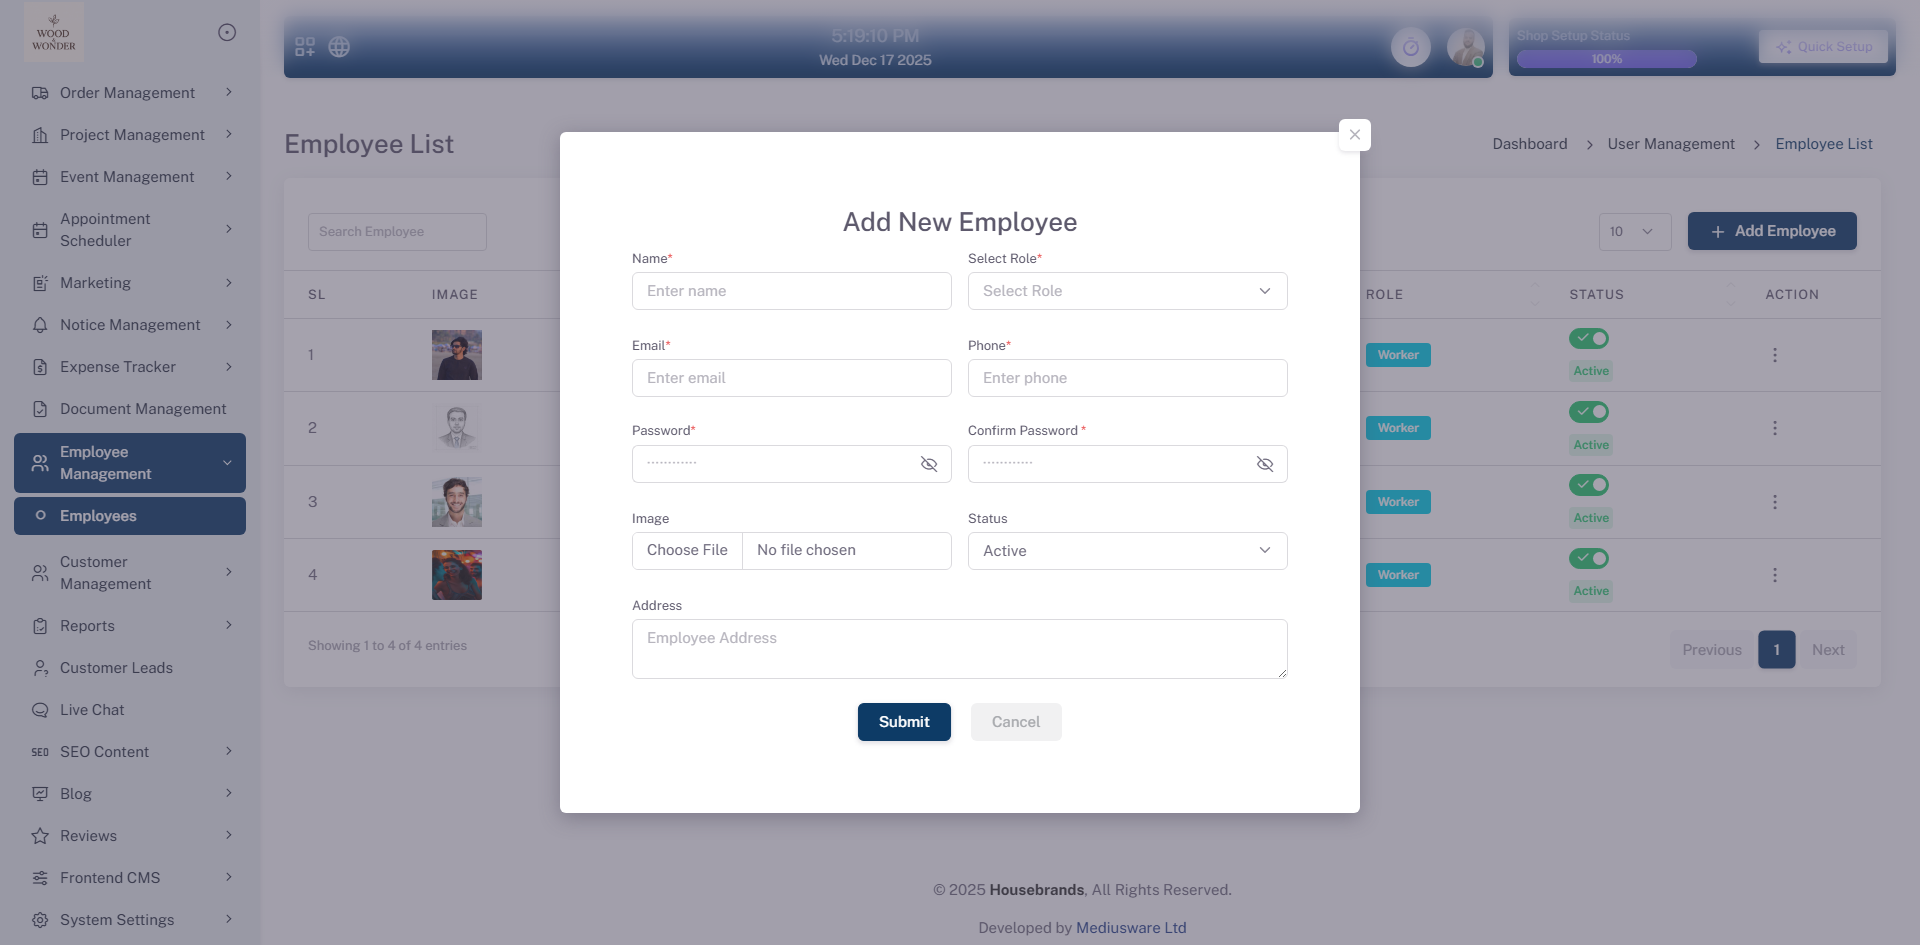
ensures smooth navigation for larger teams. New employees can be added easily using the + Add
Employee button, and existing employees can be activated, deactivated, or managed through the action
menu.
Additionally, the module includes a Send Credential feature that allows administrators to securely
send login credentials to employees via email. From the credential modal, admins can customize the
email subject and message content before sending, ensuring clear communication and smooth
onboarding.
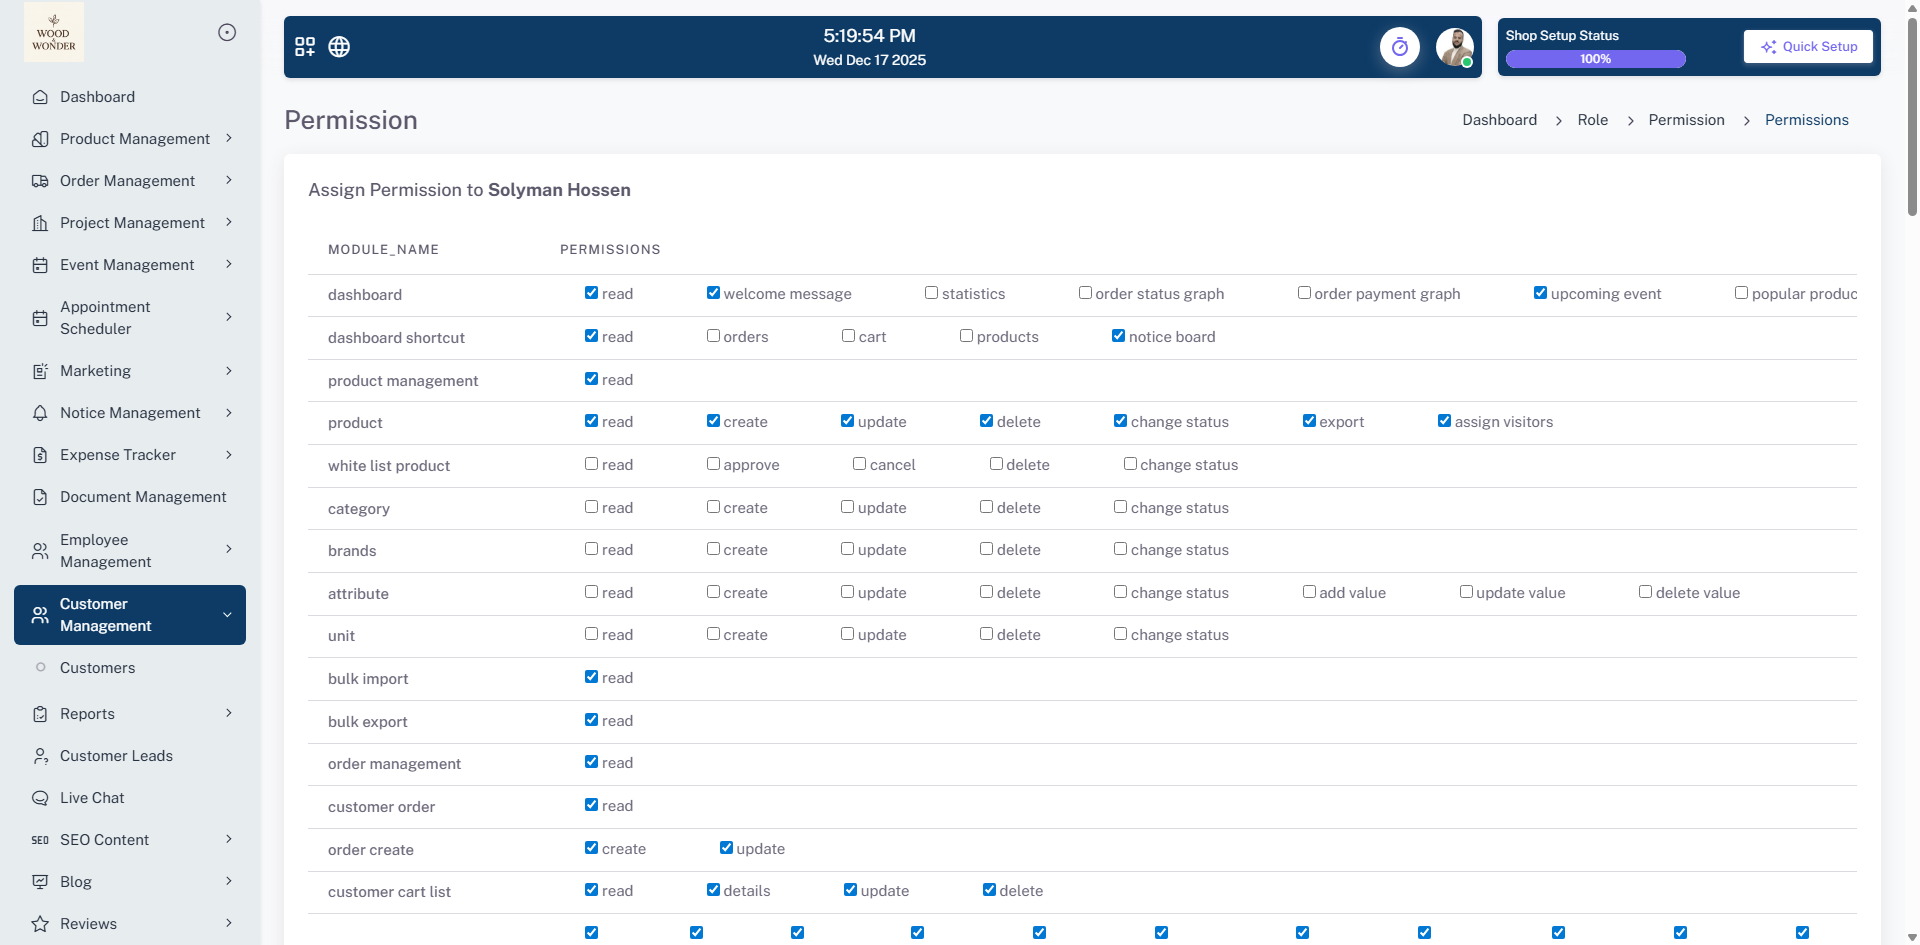
Furthermore, the module features a Permission screen that allows administrators to define precise
access levels for each employee across all system modules, such as Dashboard, Product Management,
and Customer Management. From the permission table, admins can toggle specific actions including
read, create, update, delete, and export, ensuring high-level security by limiting sensitive data
access to only authorized personnel.
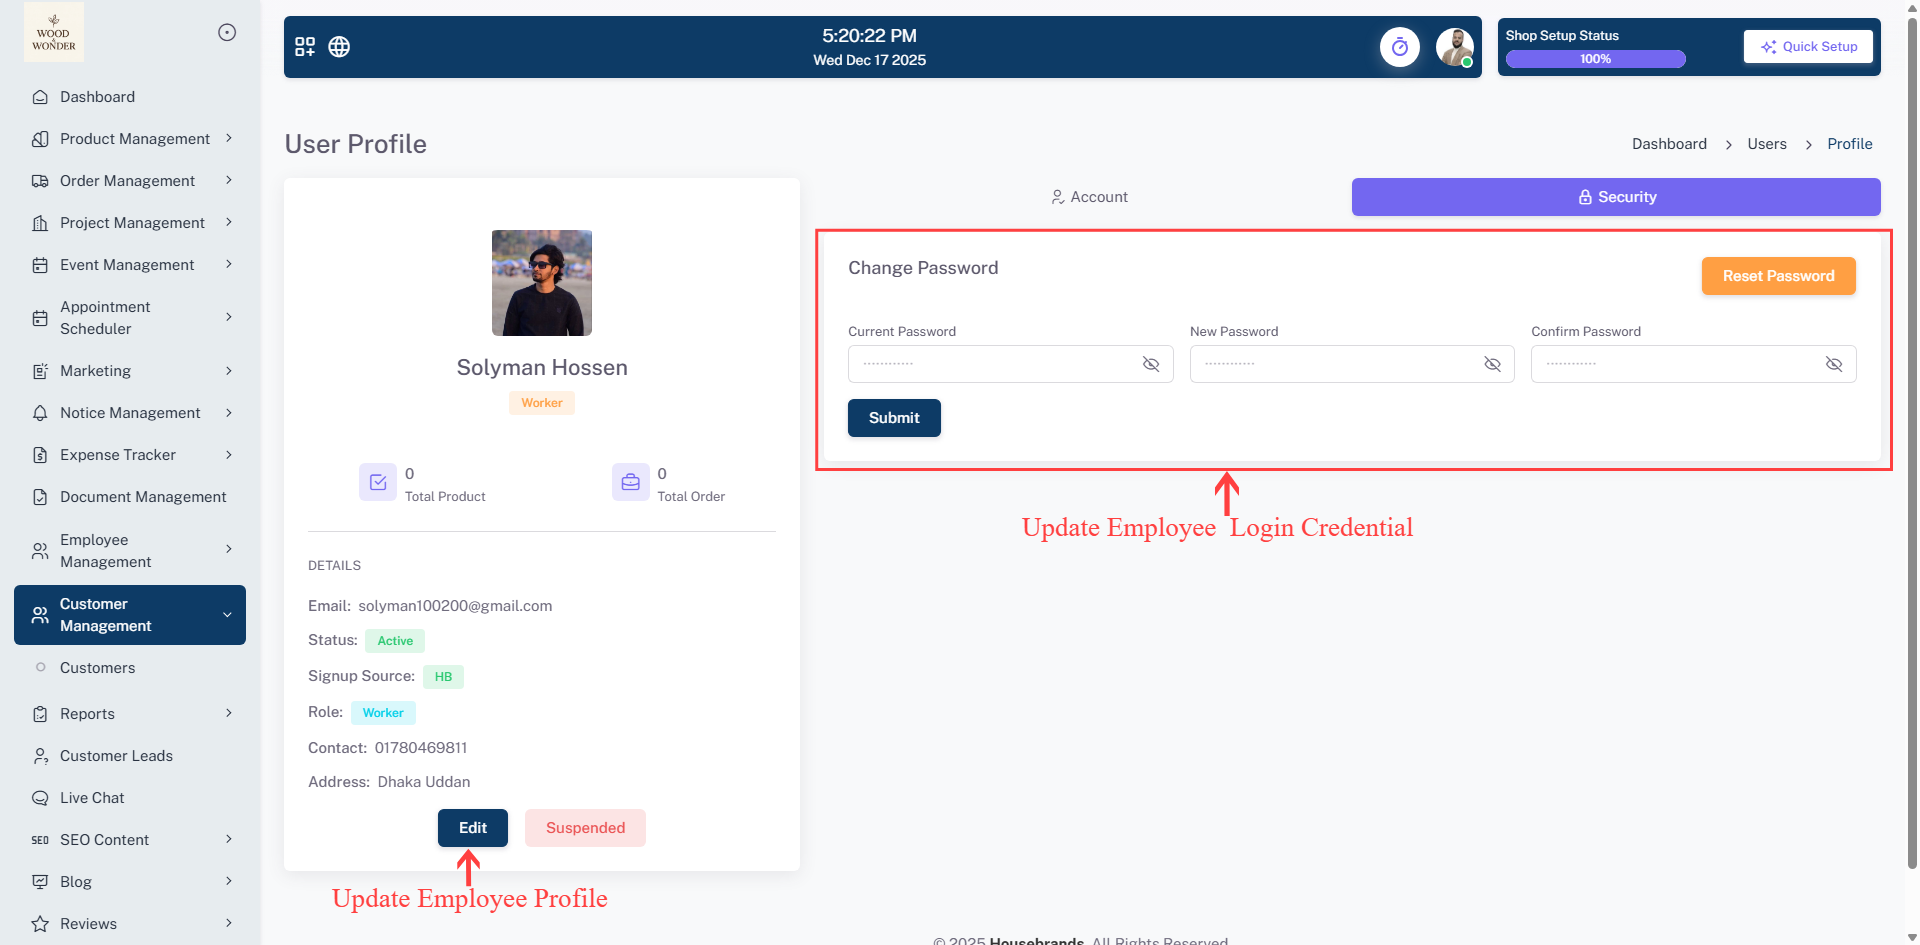
The module also provides a User Profile section that serves as a centralized hub for individual
employee data and account security management. From this view, administrators can monitor contact
details and performance metrics while using the security tab to reset passwords or the status
buttons to edit or suspend accounts, allowing for rapid response to personnel changes.
Customer Management
The Customer Management module is designed to provide administrators with a centralized system for organizing and overseeing client relationships. The Customer List view serves as the primary dashboard, displaying comprehensive Customer Info such as full name, phone number, email, and exact signup date and time. This interface also tracks Designer Info, linking each customer to a specific shop and designer for better accountability and service tracking. To manage large databases effectively, the module includes a Search User field and filters for Active Status and Date Range, allowing for quick data retrieval.
New clients can be added to the system using the + Customer button, while existing accounts can be managed through a quick-action toggle to switch their status between active and inactive. Additionally, the module includes a streamlined Action Menu for each entry that allows administrators to: View Profile: Send Credentials: Delete: Remove customer records from the system when they are no longer needed.
Reports
The Reports Module provides a robust analytics suite designed to give administrators clear visibility into financial performance, operational spending, and product inventory. Divided into three specialized sub-modules—Order Report, Expense Report, and Product Report—this section enables data-driven decision-making through detailed transaction lists and visual data representations.
Order Report
The Order Report focuses on sales tracking and financial accountability. The list view provides a comprehensive breakdown of transactions, including Order Code, Seller, Customer, Order Status, and Payment Status. Administrators can utilize filters for payment status and date ranges to isolate specific records and monitor the "Sales Overview" to track quarterly growth.
Key Reporting Features: The View Graph feature uses interactive donut and pie charts to visualize payment distribution and claims, helping spot trends at a glance. Summary Cards act as a real-time KPI hub for tracking Total, Paid, and Due amounts without manual scrolling. For official use, Data Export & Filtering allows users to refine results by date and export reports to PDF for audits.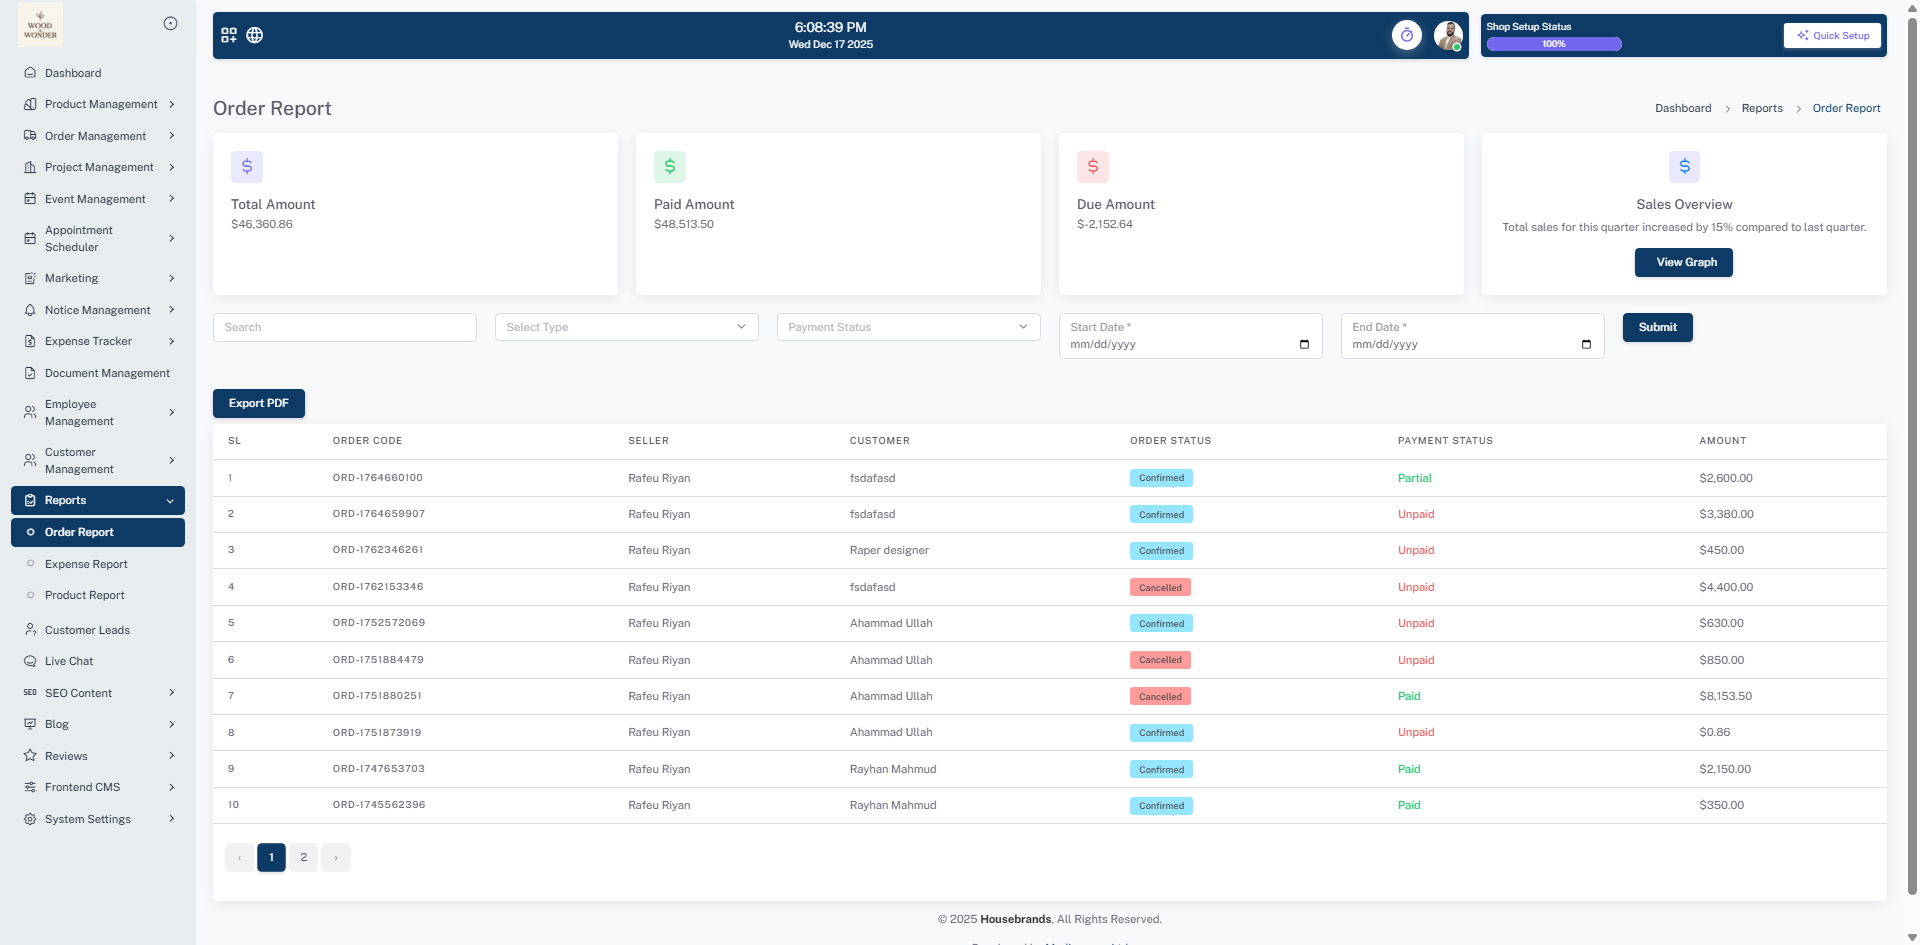
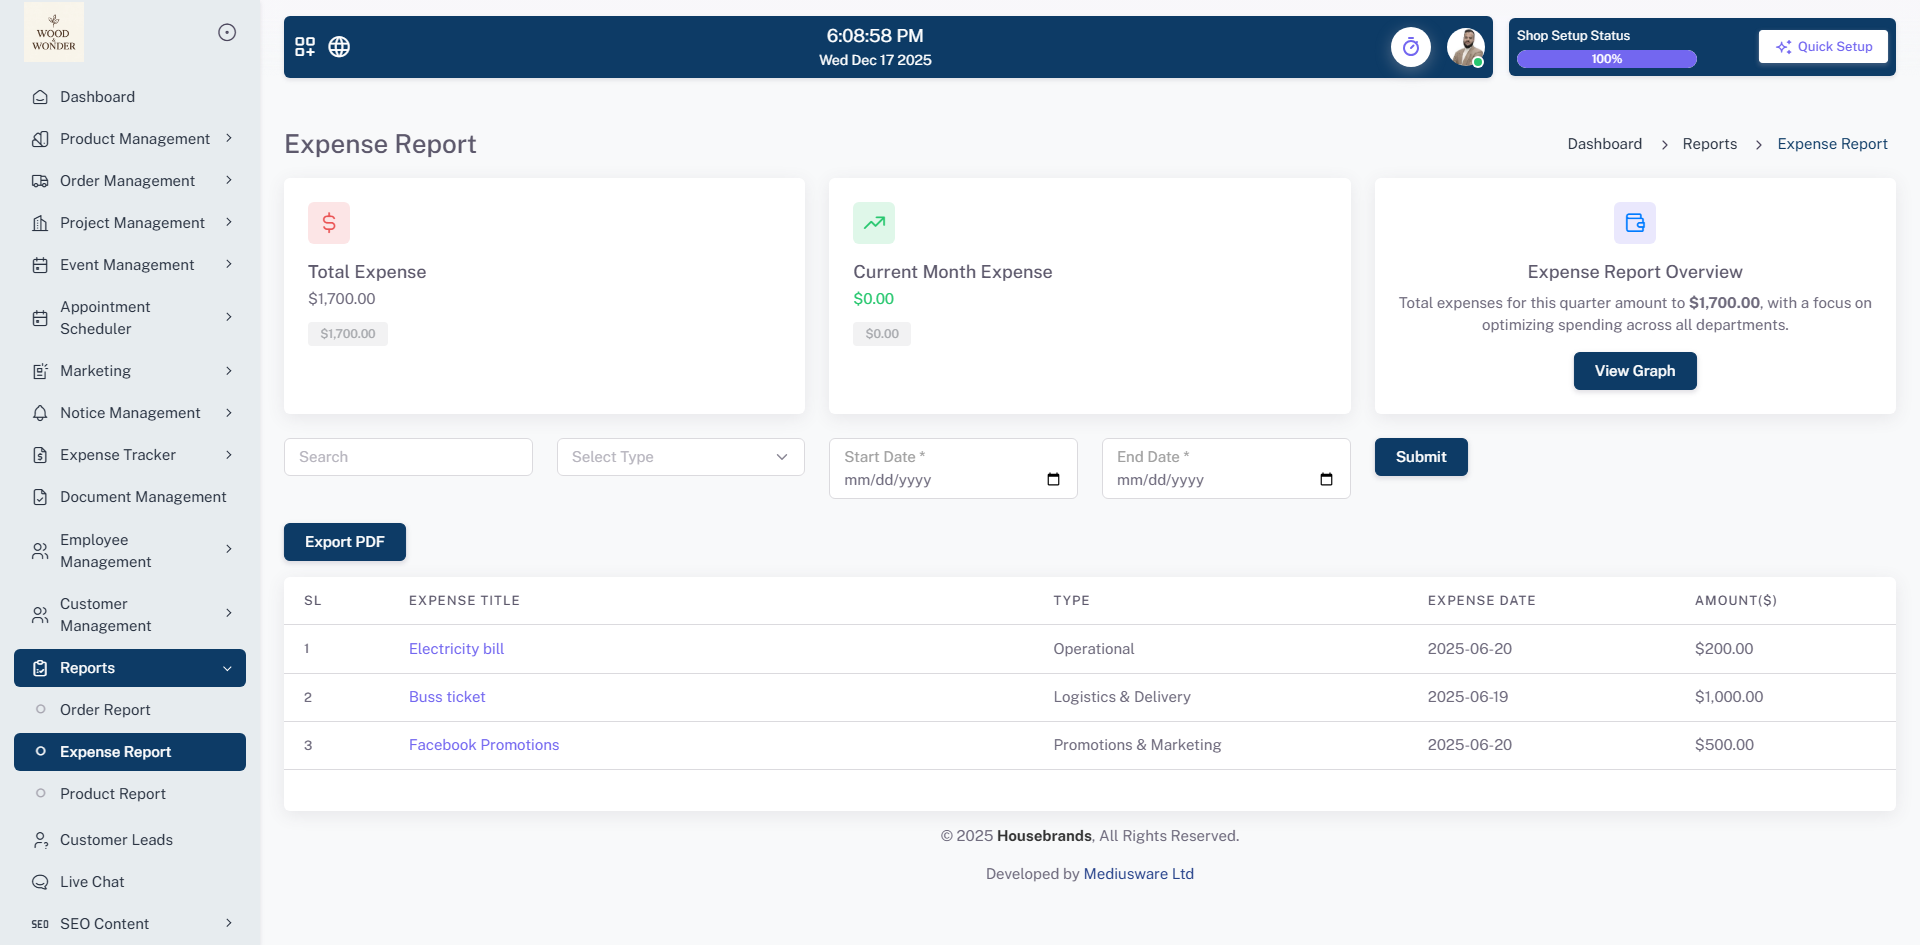
Expense Report
The Expense Report provides a detailed history of company spending. It categorizes costs by Expense Title, Type (Operational, Logistics, Marketing), and Date. This allows administrators to monitor the "Total Expense" against the "Current Month Expense" to ensure departments stay within their allocated budgets.
Reporting Features: Administrators can use the View Graph to identify spending anomalies through interactive charts that highlight budget spikes. Summary Cards offer a centralized view of real-time spending totals, comparing monthly expenses against overall budgets. Additionally, Data Export & Filtering tools include a search field and PDF export button to generate precise financial summaries for meetings.
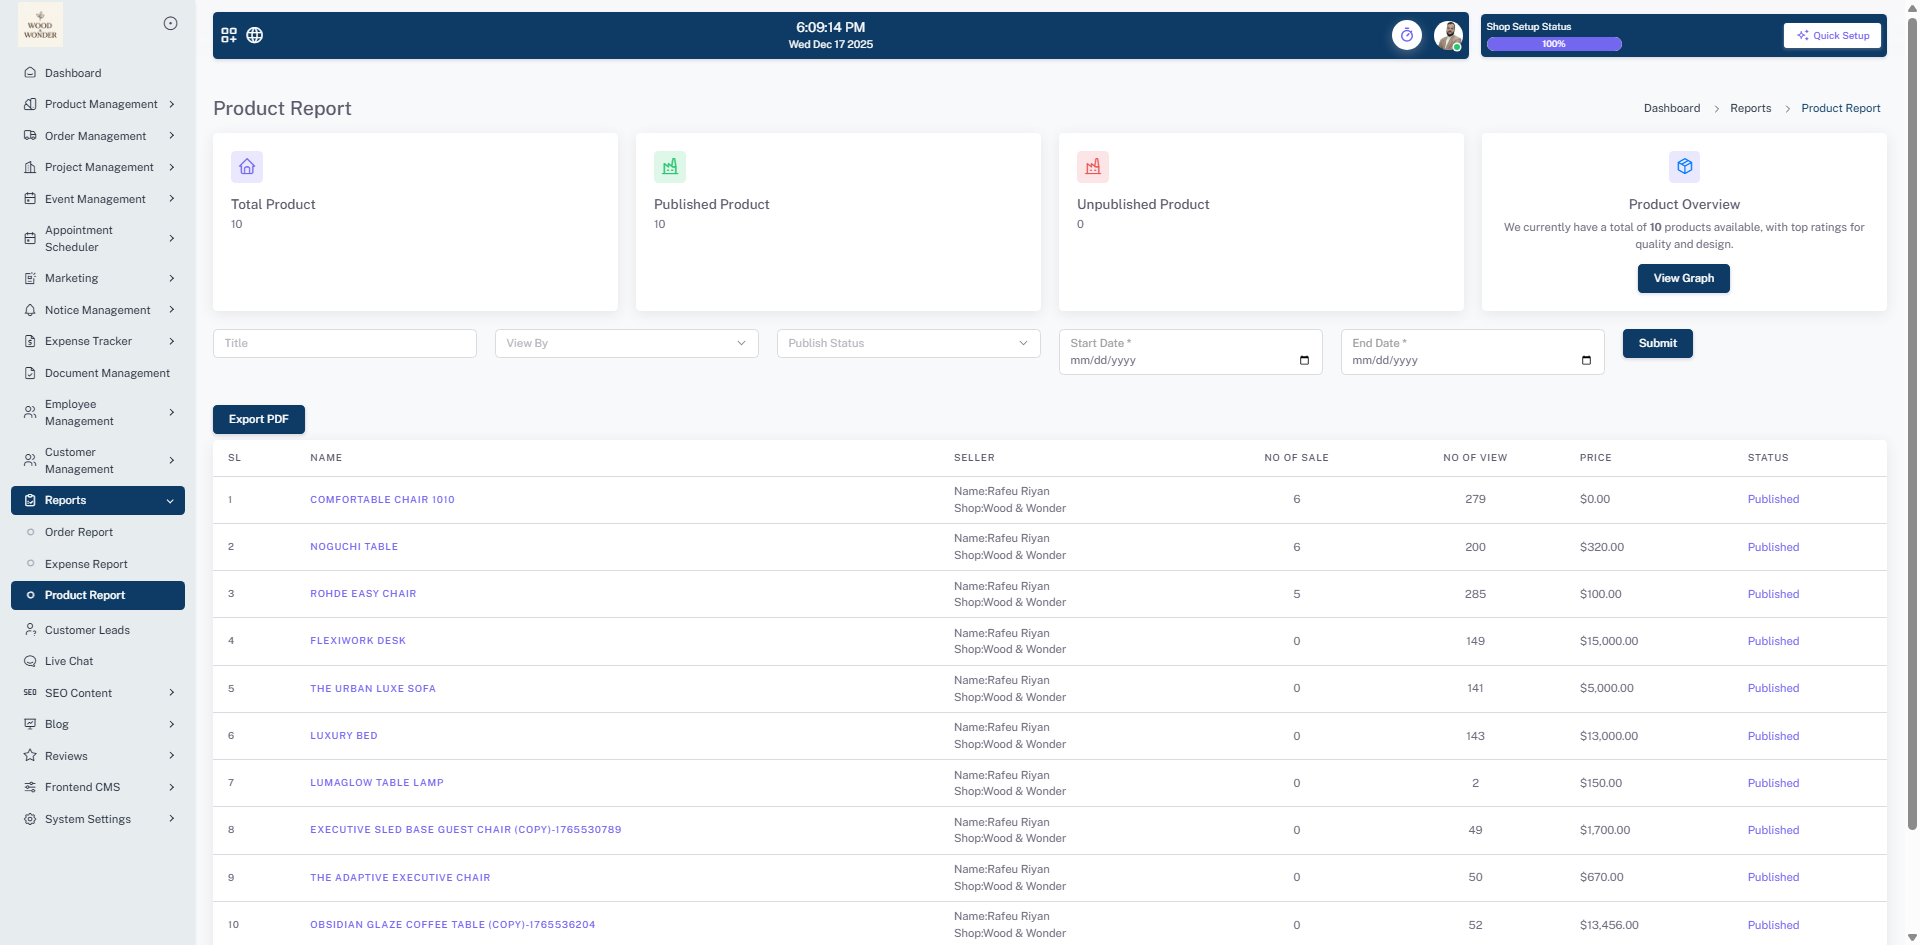
Product Report
The Product Report offers insights into inventory performance and market demand. Beyond basic product names and prices, it tracks the No of Sale and No of View for each item, helping identify top-performing assets. Administrators can filter by Publish Status and Seller to manage product availability and track vendor engagement.
Key Reporting Features: The View Graph utilizes interactive bar graphs to visualize product popularity and market demand instantly. Summary Cards serve as a quick KPI hub for real-time sales and view counts, providing an overview of item performance. For external sharing, Data Export & Filtering enables users to refine data by seller and use the Export PDF button for vendor review.
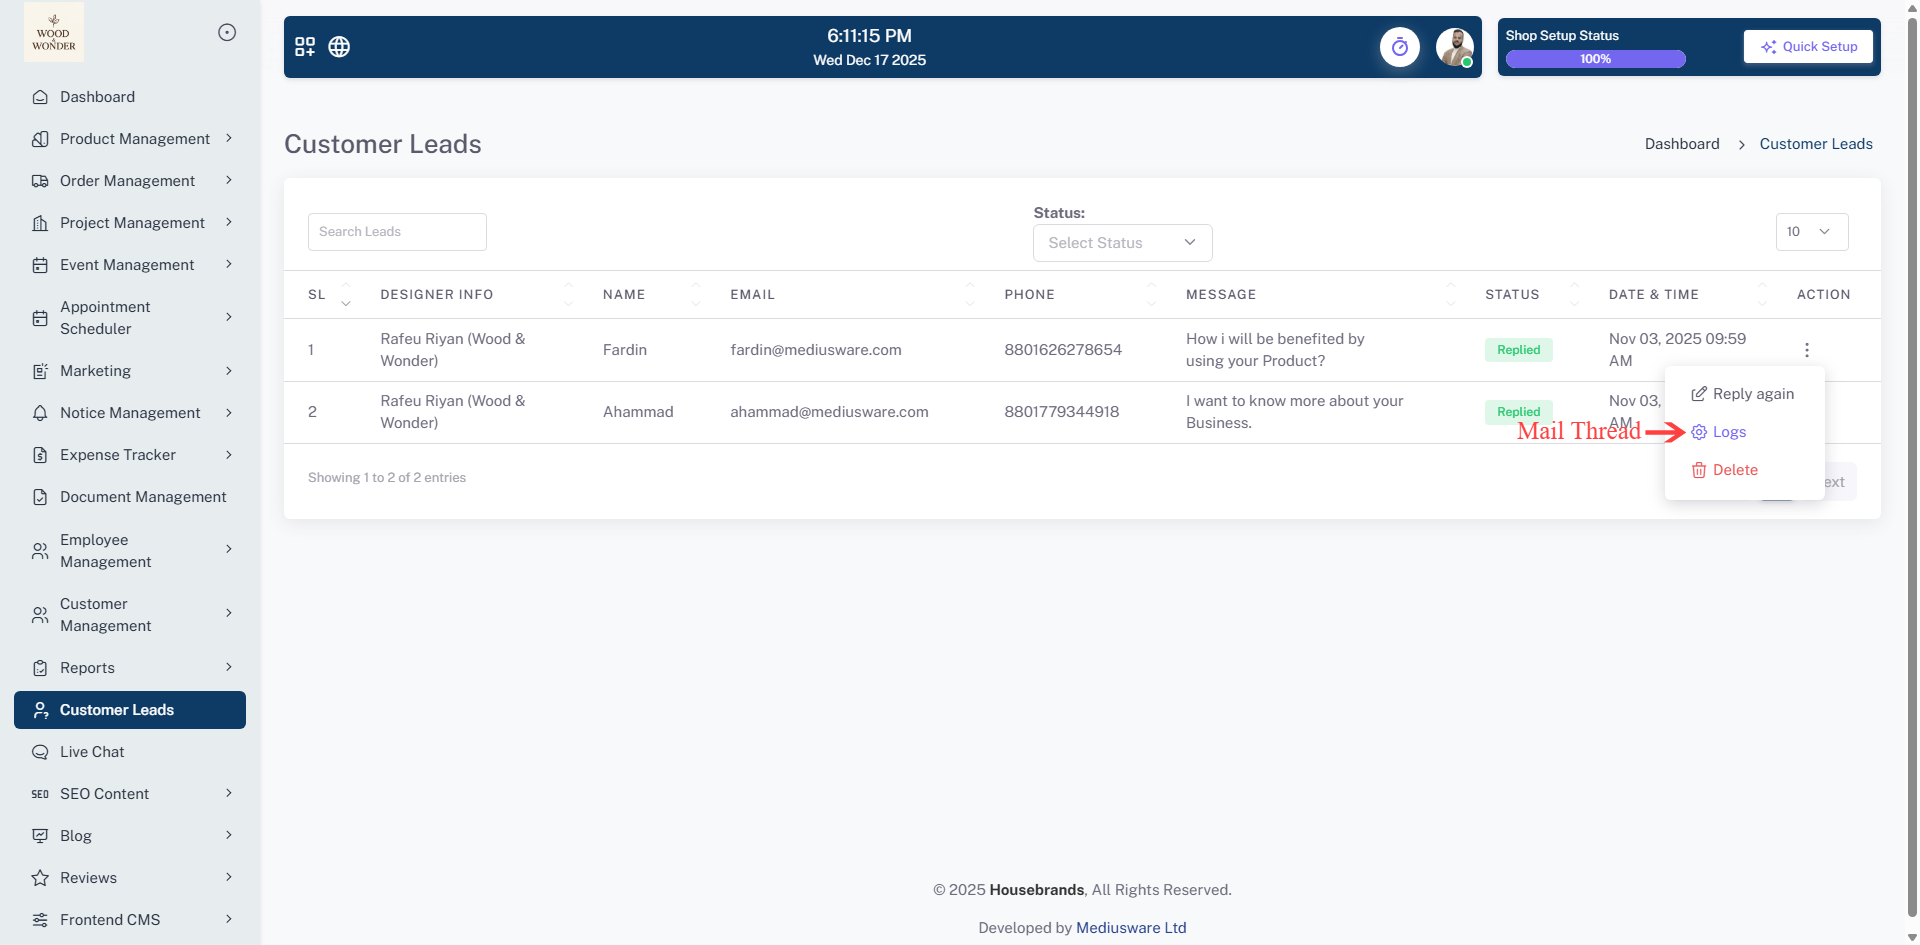
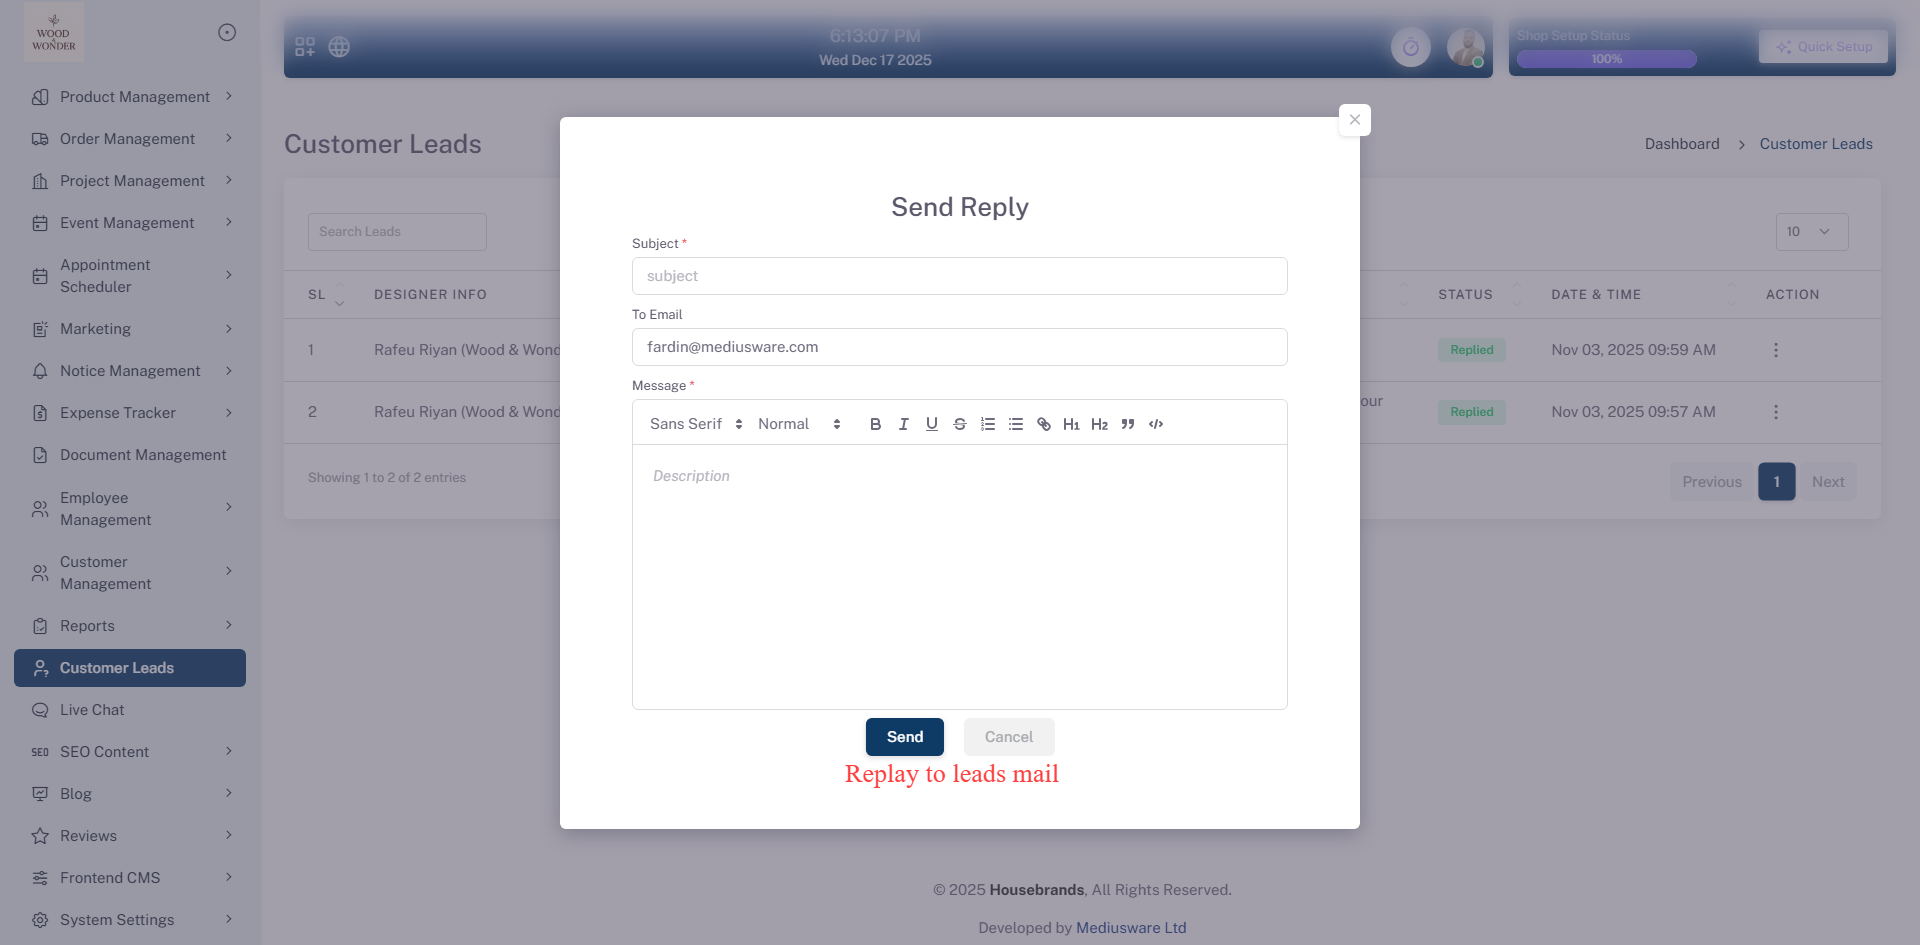
Customer Leads
This page is part of the Customer Leads module, displaying a list of messages exchanged with designers. The table includes columns for serial number, designer info, message content, status, and actions, with a search bar at the top for filtering contacts. Some messages have a "Pending" status while others are marked as "Replied." A pop-up window titled "Send Reply" is open, allowing users to respond to a selected message. The reply form includes fields for entering a subject, recipient email, and a message body with rich text formatting options. At the bottom, there are "Send" and "Cancel" buttons for submitting or discarding the response. The interface maintains a clean and structured design for effective communication management.
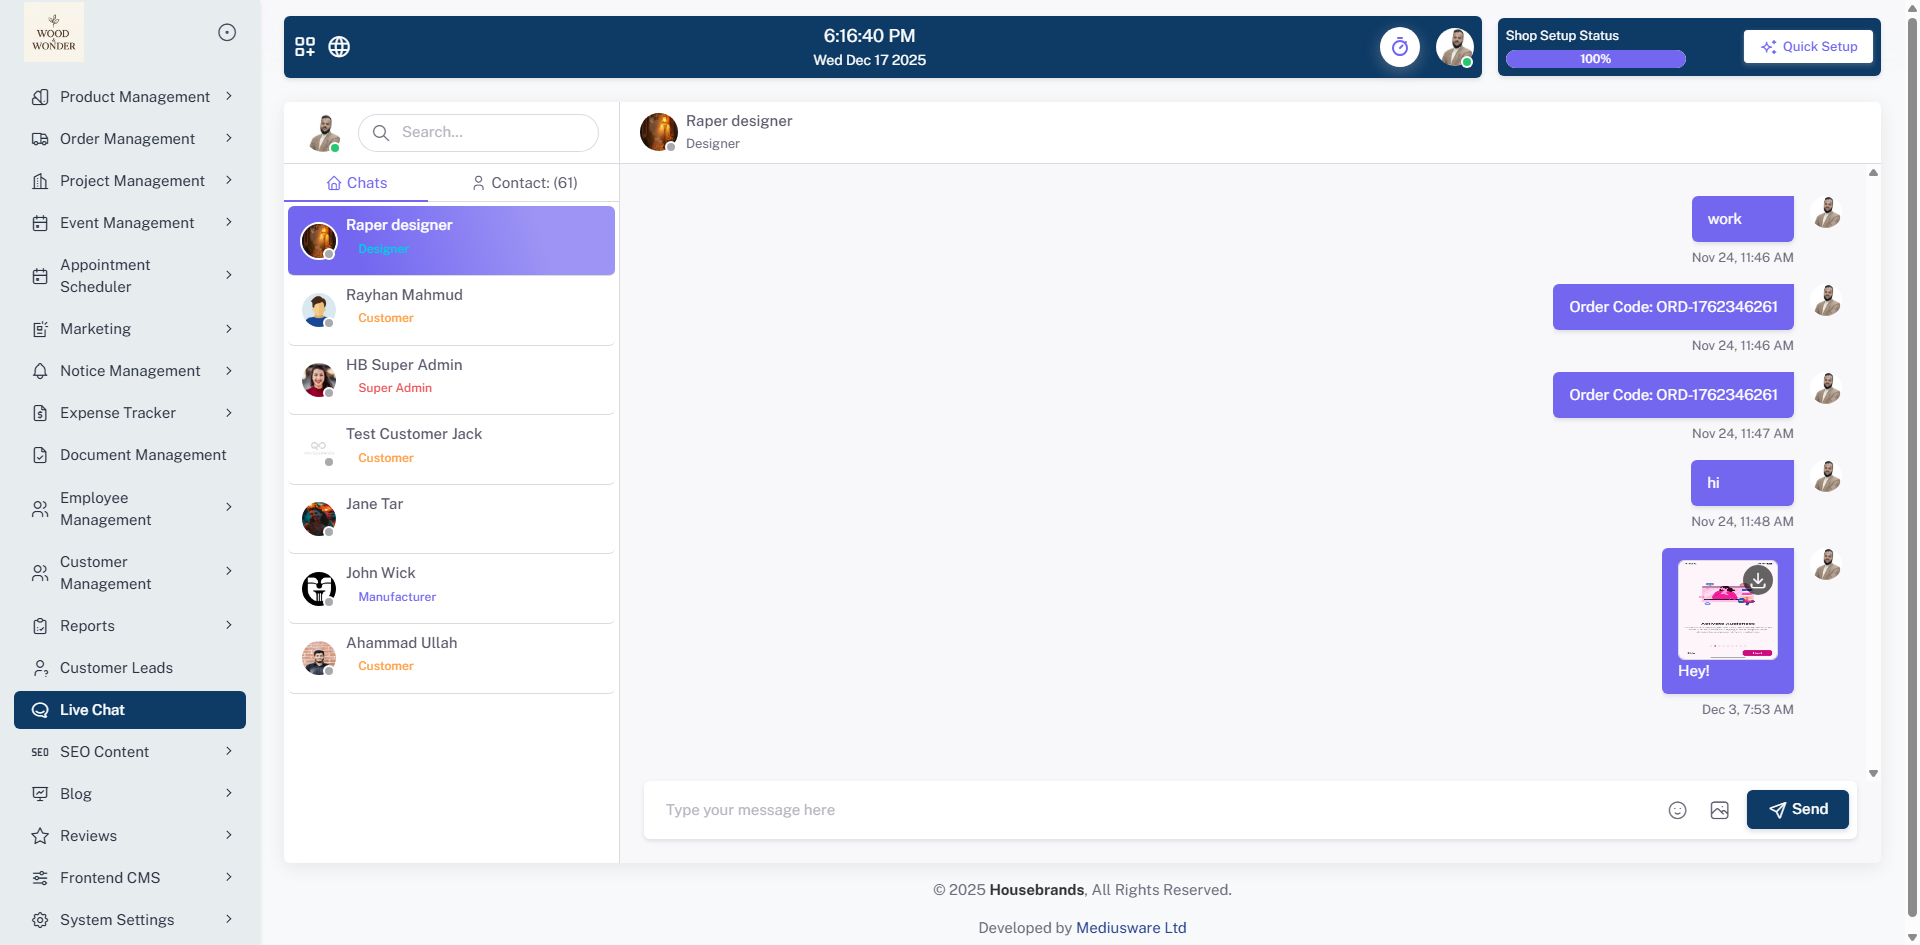
Live Chat
Live Chat enables you to stay seamlessly connected with other designers, manufacturers, and your customers in real time. Through this feature, you can engage in instant conversations, collaborate efficiently, and resolve queries without delays. It supports real-time messaging as well as file sharing, allowing you to exchange documents, images, and other resources directly within the chat. This ensures faster communication, improved coordination, and a more responsive experience for all participants.
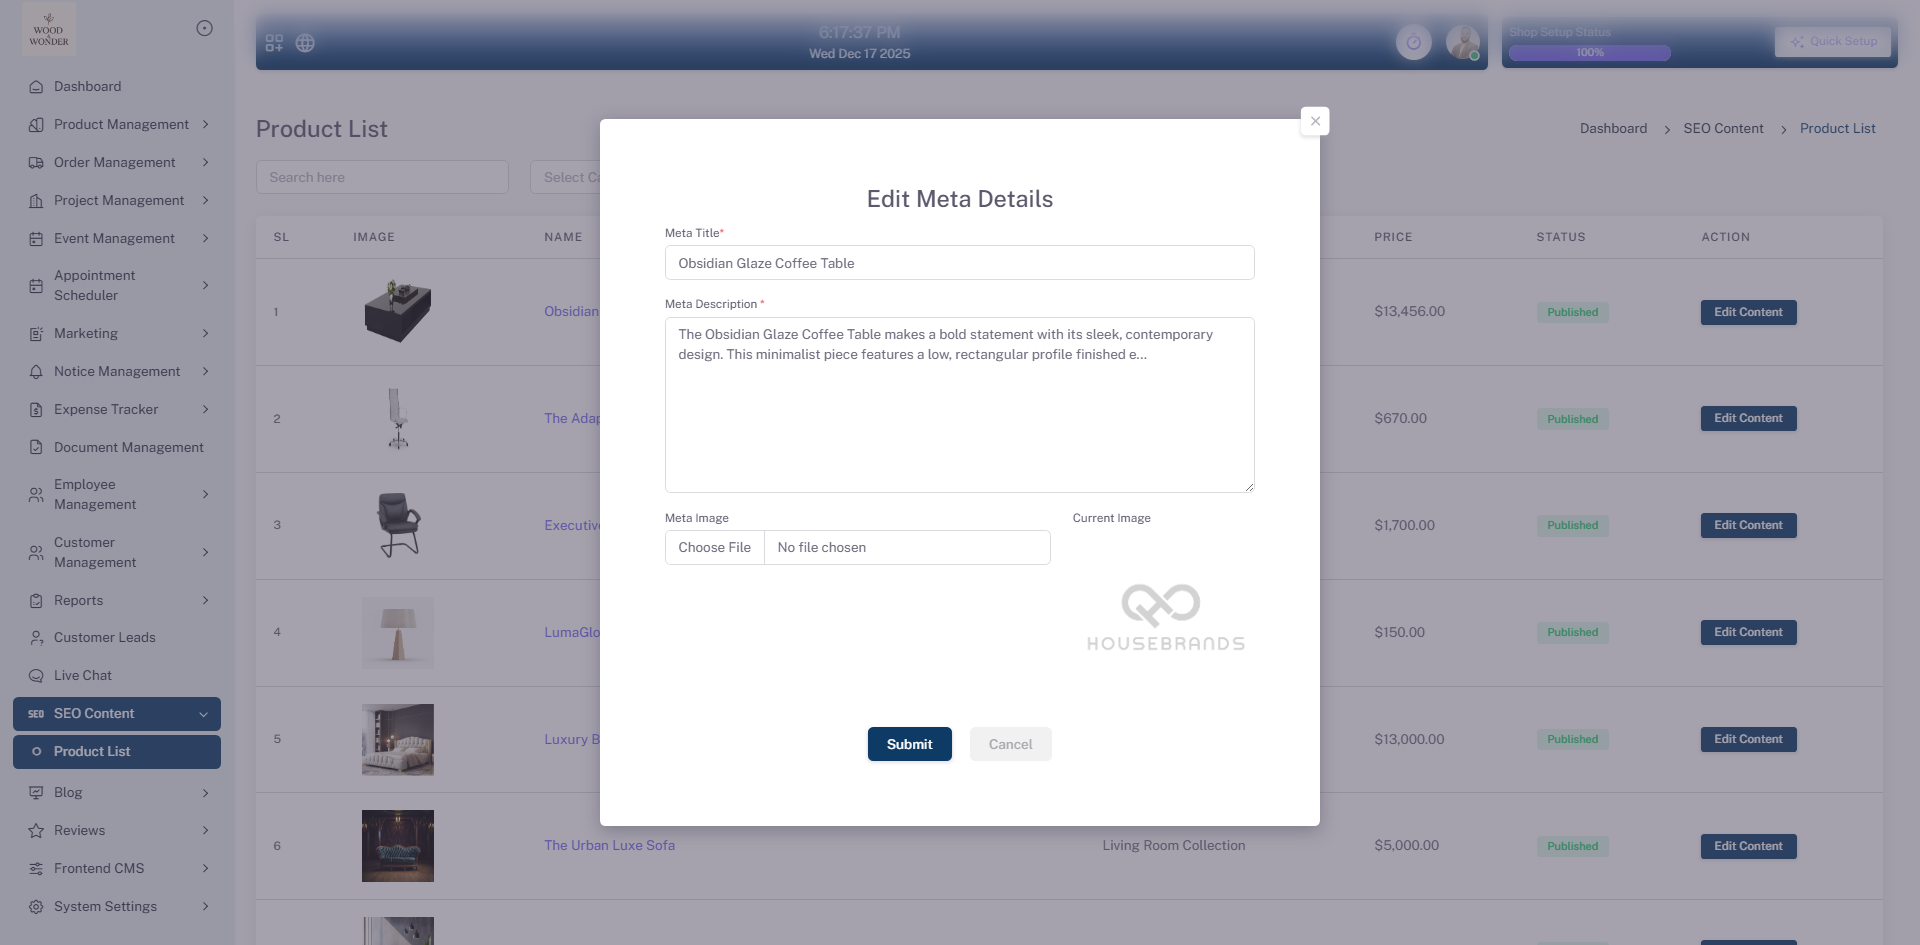
SEO Content
This page is part of the SEO content management system, specifically for editing the meta details of a product. The form allows users to modify the meta title, description, keywords, and image associated with a product for search engine optimization. The meta title and description fields are mandatory, ensuring that essential SEO elements are always provided. The description field supports HTML formatting for structured content. Users can also upload a meta image to enhance visibility in search results. On the left, the navigation menu provides access to other SEO content management features, product lists, and additional site settings. The interface includes options to submit changes or cancel edits, giving users control over the modifications they make to the product’s metadata.
Product List
This documentation section explains the purpose and proper usage of product meta titles and meta descriptions within the system. It covers recommended character limits, content structure, and SEO best practices to ensure accurate representation of products in search engine results. Properly configured metadata improves search visibility, increases click-through rates, and maintains consistency and professionalism across all product pages.

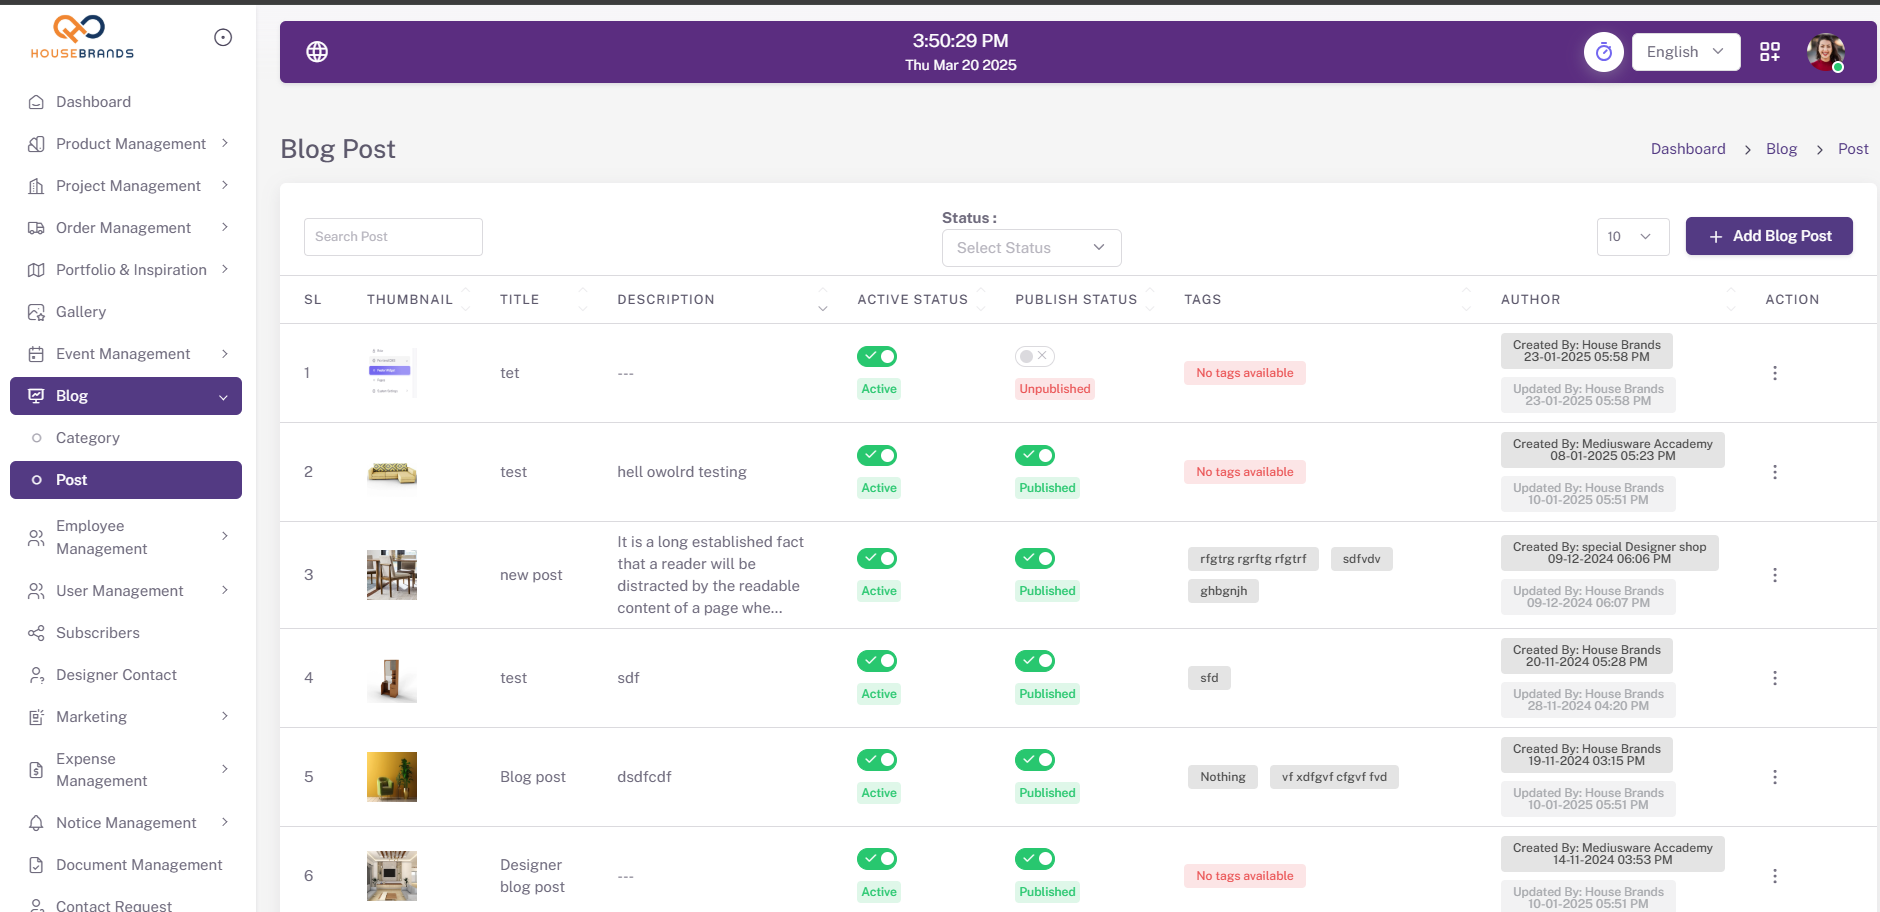
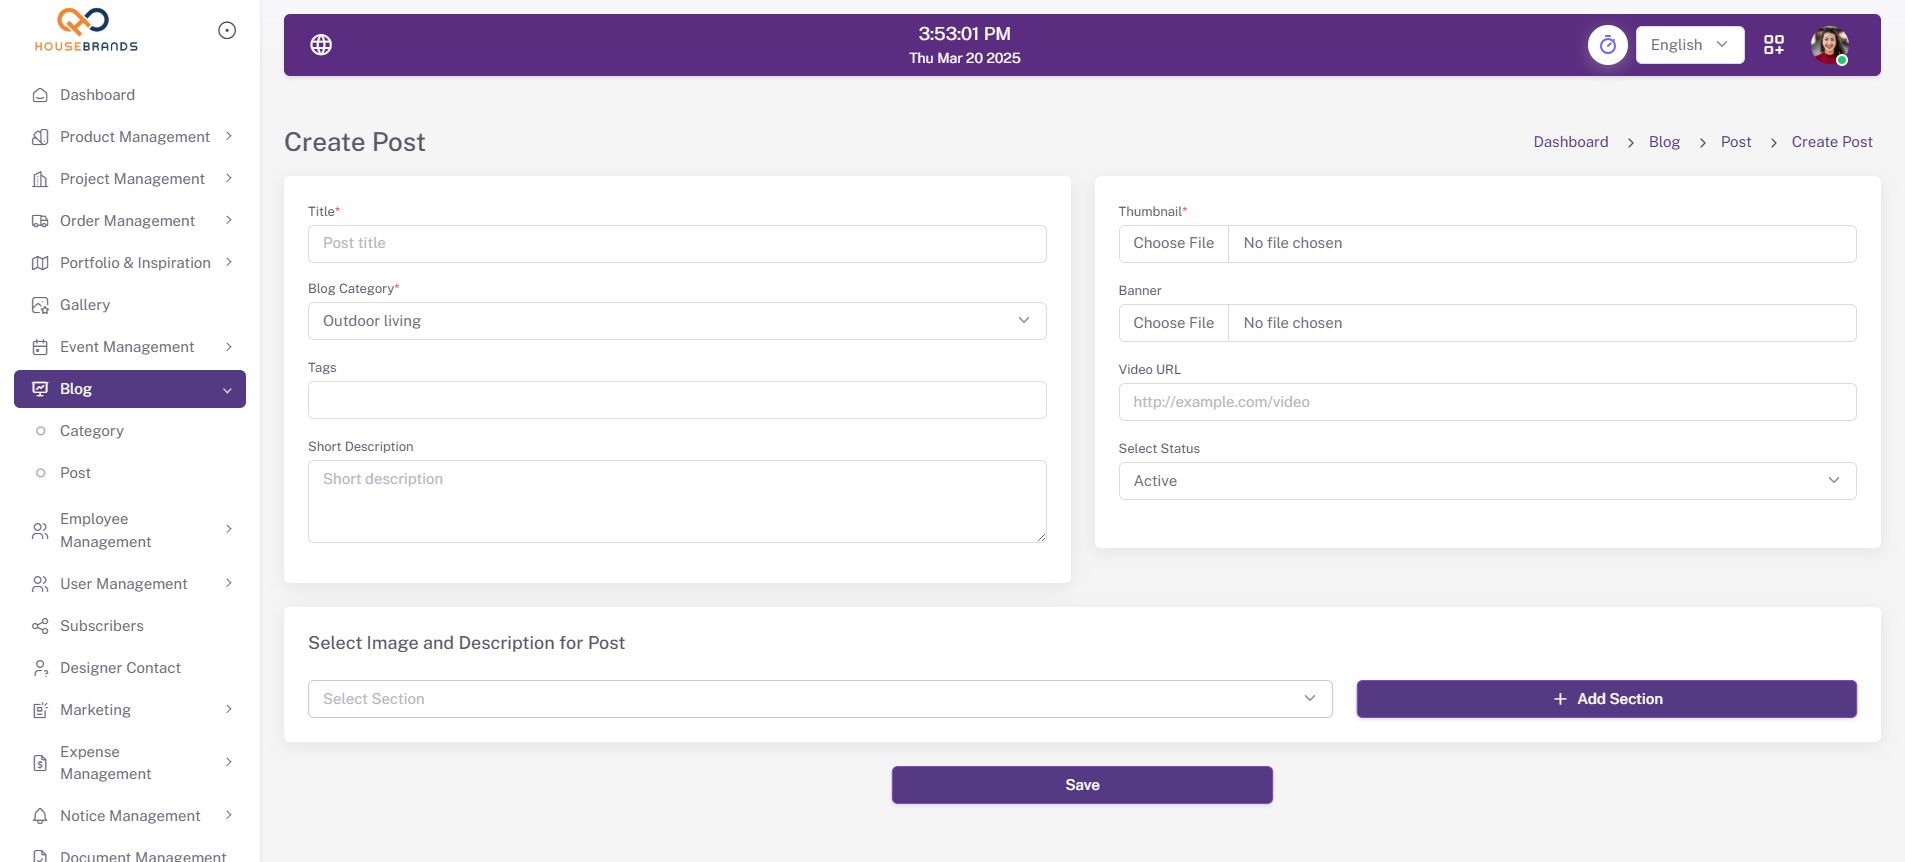
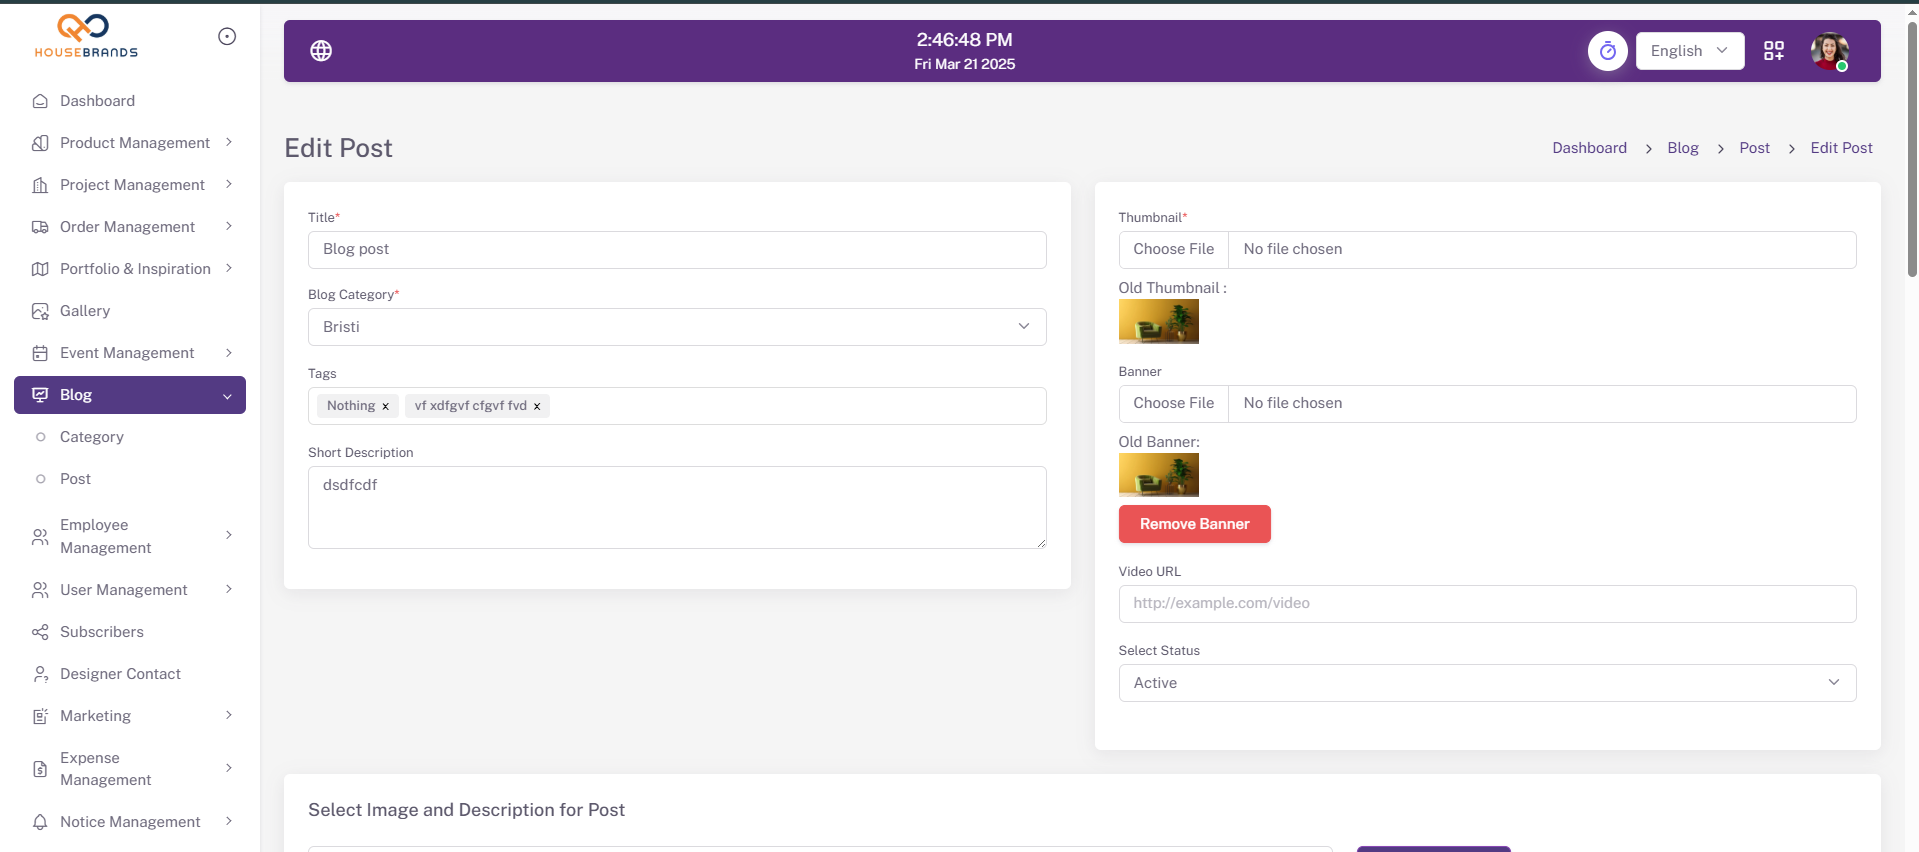
Blog
Welcome to the blog section, where users can publish their thoughts, ideas, and stories with complete creative freedom. Whether you want to share your personal experiences, industry insights, tutorials, or creative writing, this platform allows you to do so in a fully customizable way. From formatting text with bold and italics to embedding images, videos, and code snippets, you have the flexibility to craft your content exactly as you envision it. Engage with readers through comments, categorize your posts for easy navigation, and build a personalized blogging space that truly reflects your unique voice.
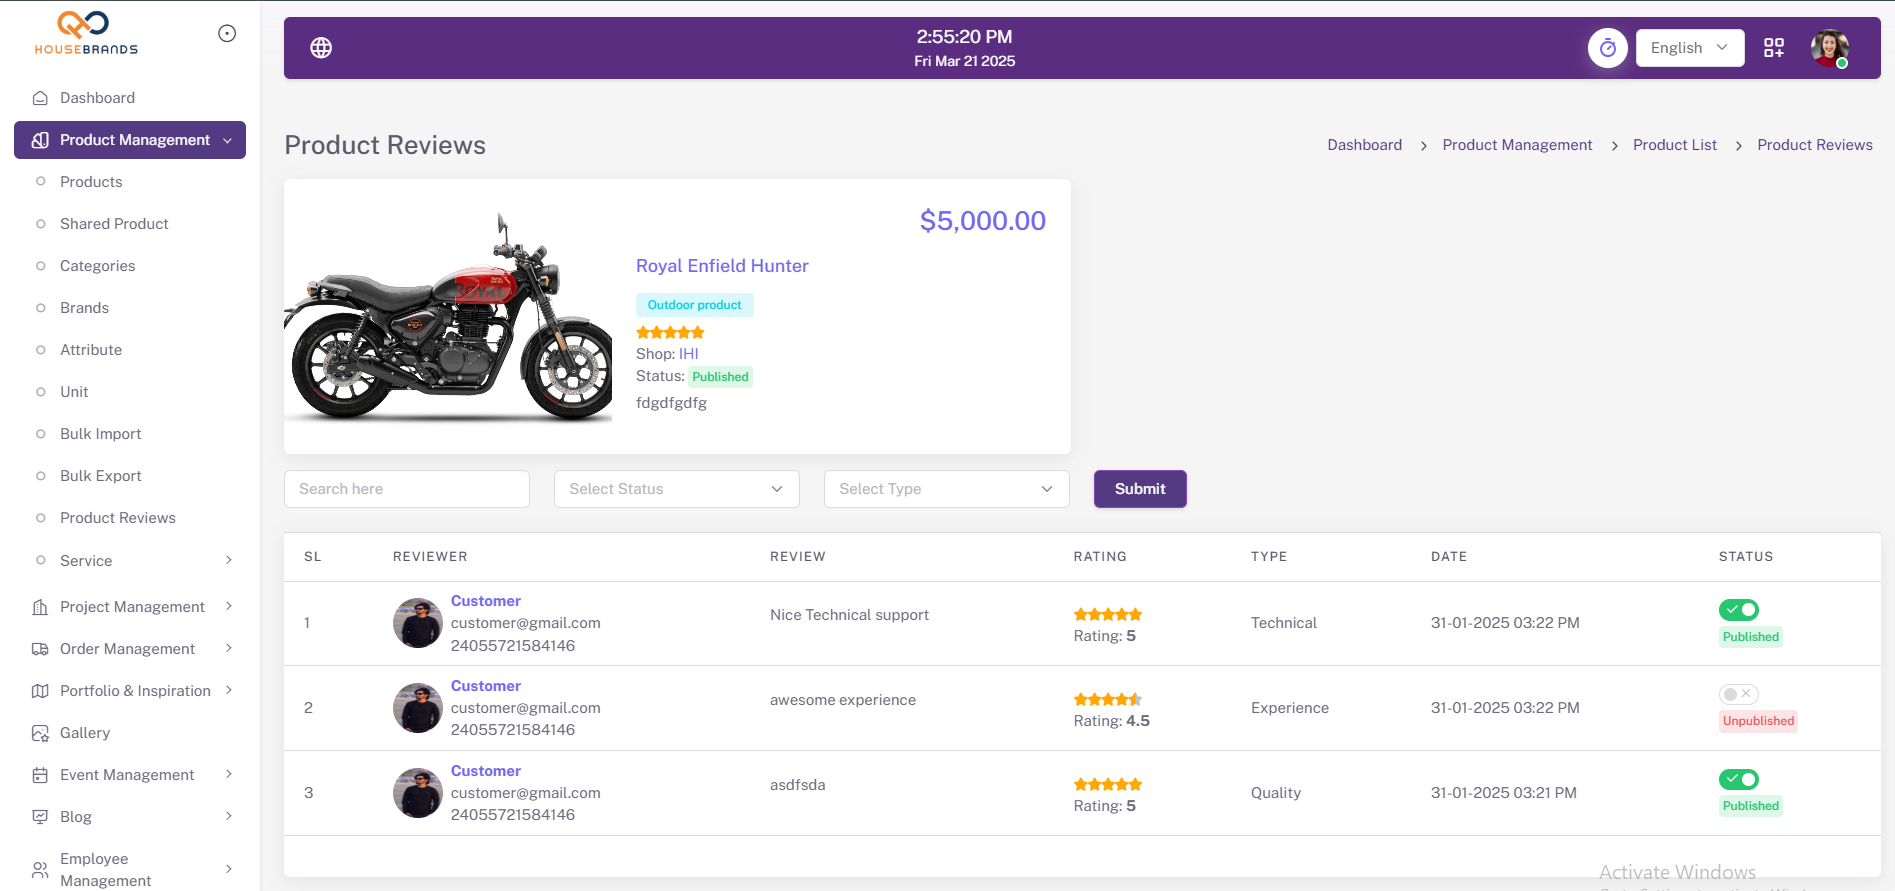
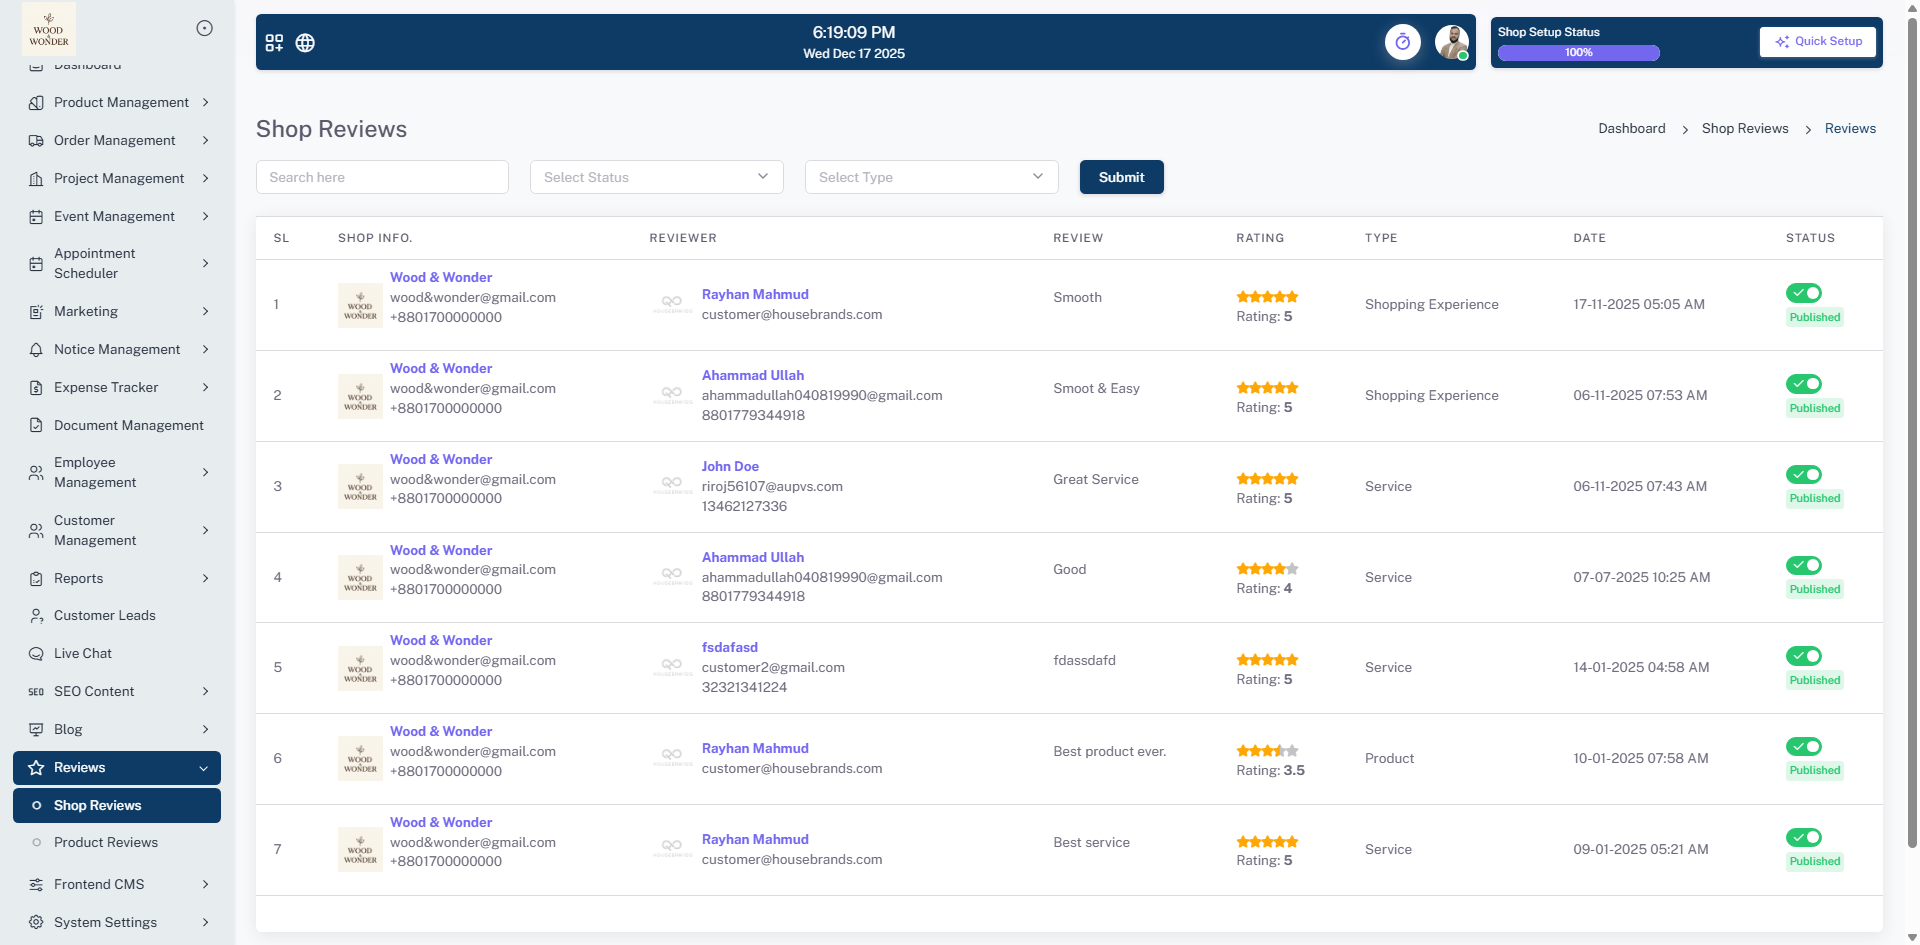
Reviews
This section outlines how product and shop reviews are managed within the platform. Reviews allow customers to share feedback on product quality, service experience, and overall satisfaction, helping other users make informed purchasing decisions. The documentation explains how reviews are submitted, displayed, and moderated, as well as how ratings contribute to product credibility, shop reputation, and continuous improvement of products and services.
Product Reviews
This section explains how product reviews are managed within the system. Administrators can update the review status to control visibility and ensure reviews comply with platform standards.
Shop Reviews
This section explains how shop reviews are managed for designer shops only. Administrators can update the review status to control visibility and maintain quality standards, ensuring that feedback accurately reflects the designer’s shop and services.
Frontend CMS
Portfolio & Inspiration
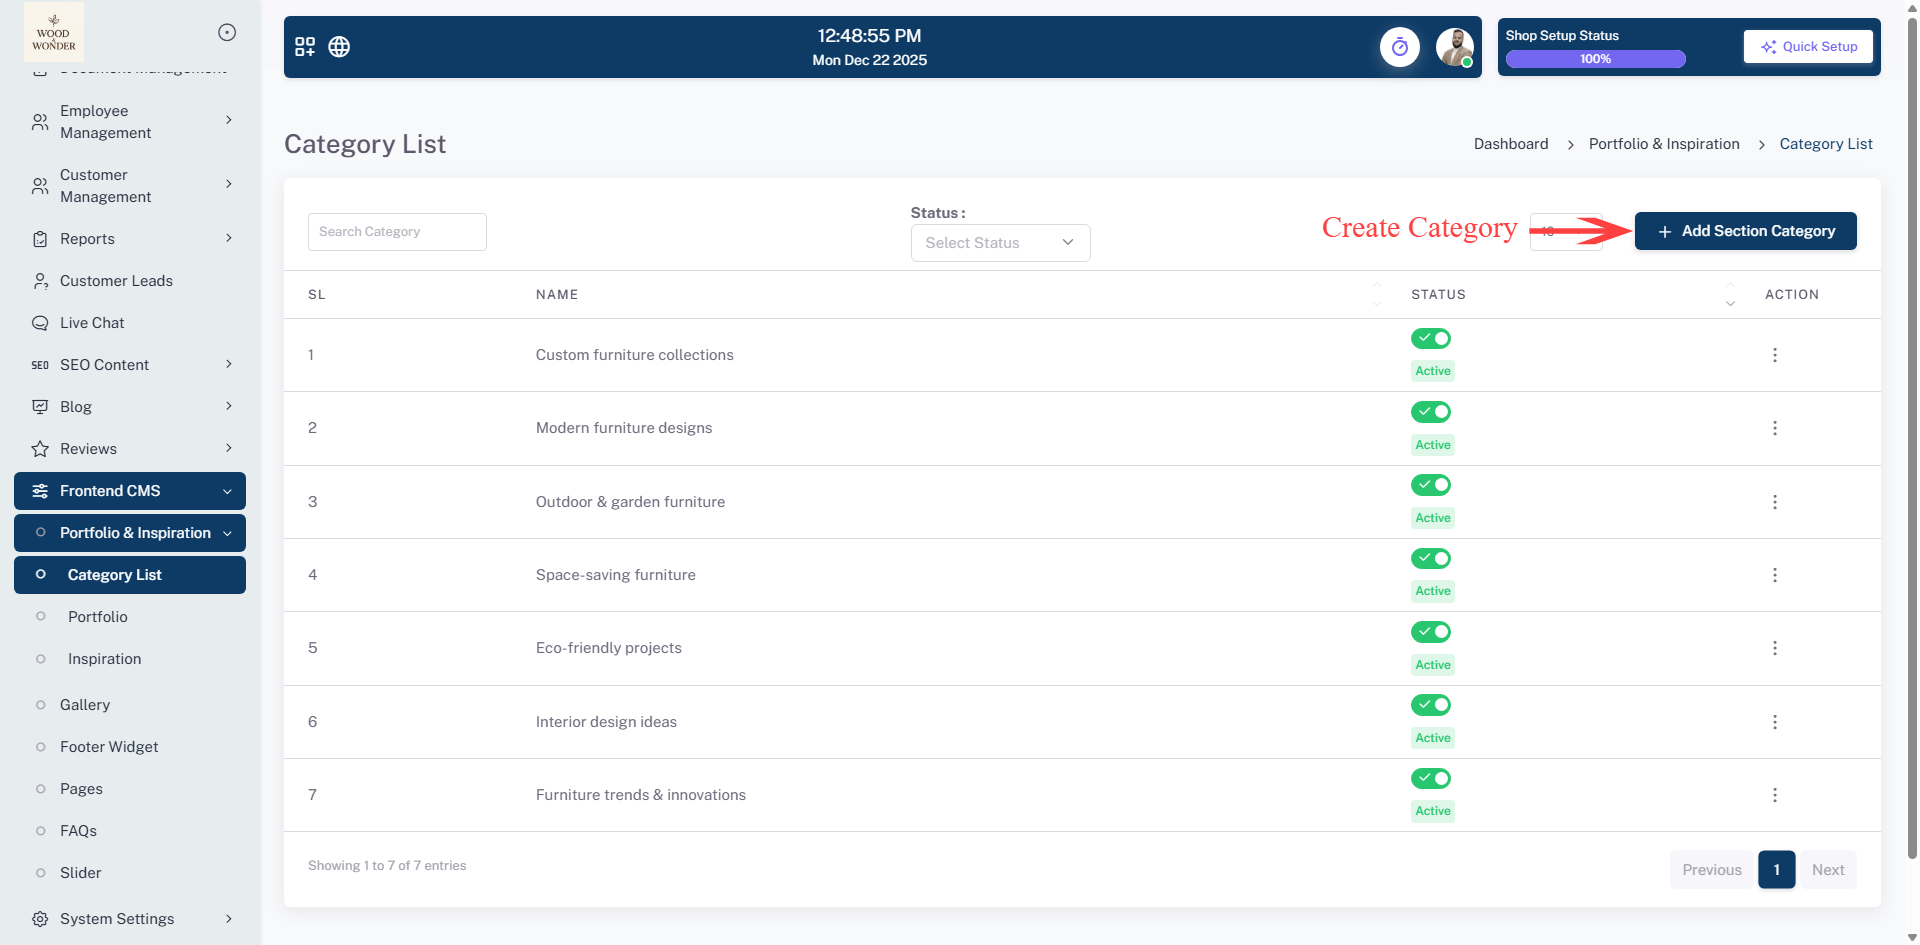
Category List
This category management system enables users to create and organize custom labels for both portfolio projects and inspiration boards, providing a centralized framework for structuring creative assets. By streamlining the classification process, the tool allows for efficient filtering and navigation of diverse work samples and visual references within a unified workflow.

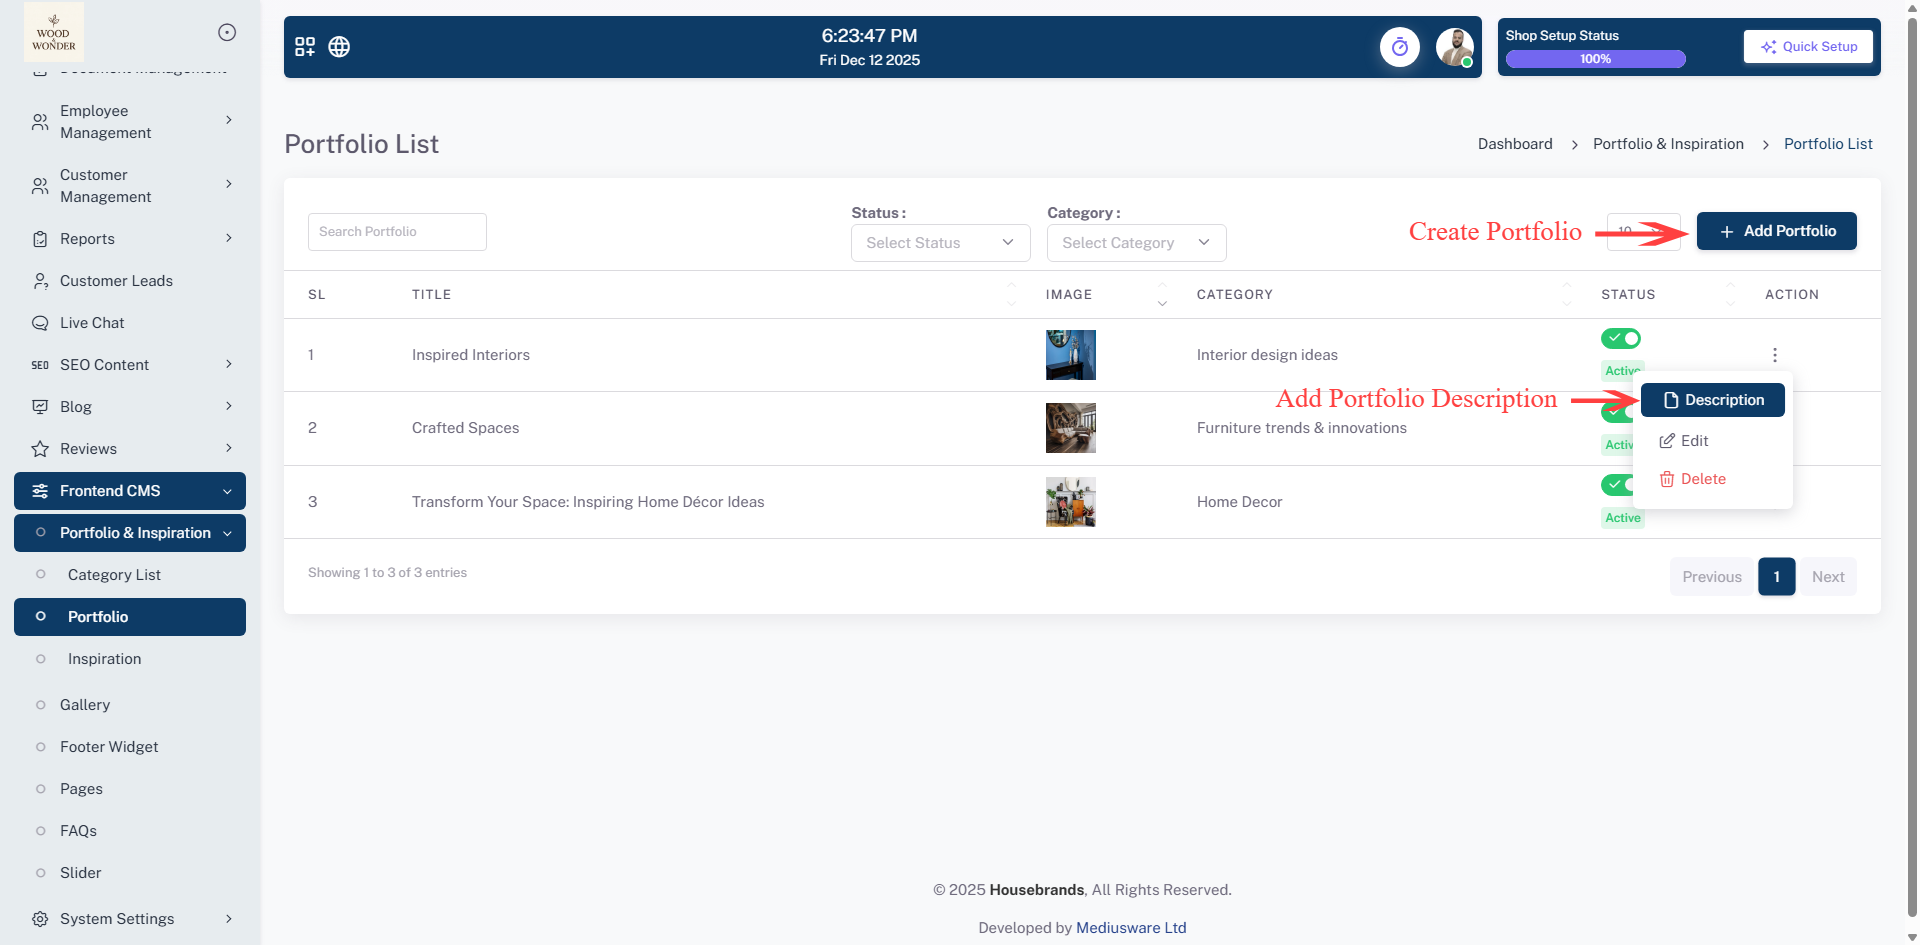
Portfolio
This page is for managing Inspirations under the Portfolio & Inspiration section. It displays a list of portfolios with their titles, images, categories, and search and filter options. On the right side, there is a form for adding new portfolios, allowing users to input a title, upload an image, select a category, and set the status. The interface is designed for easy management and organization of portfolio content.
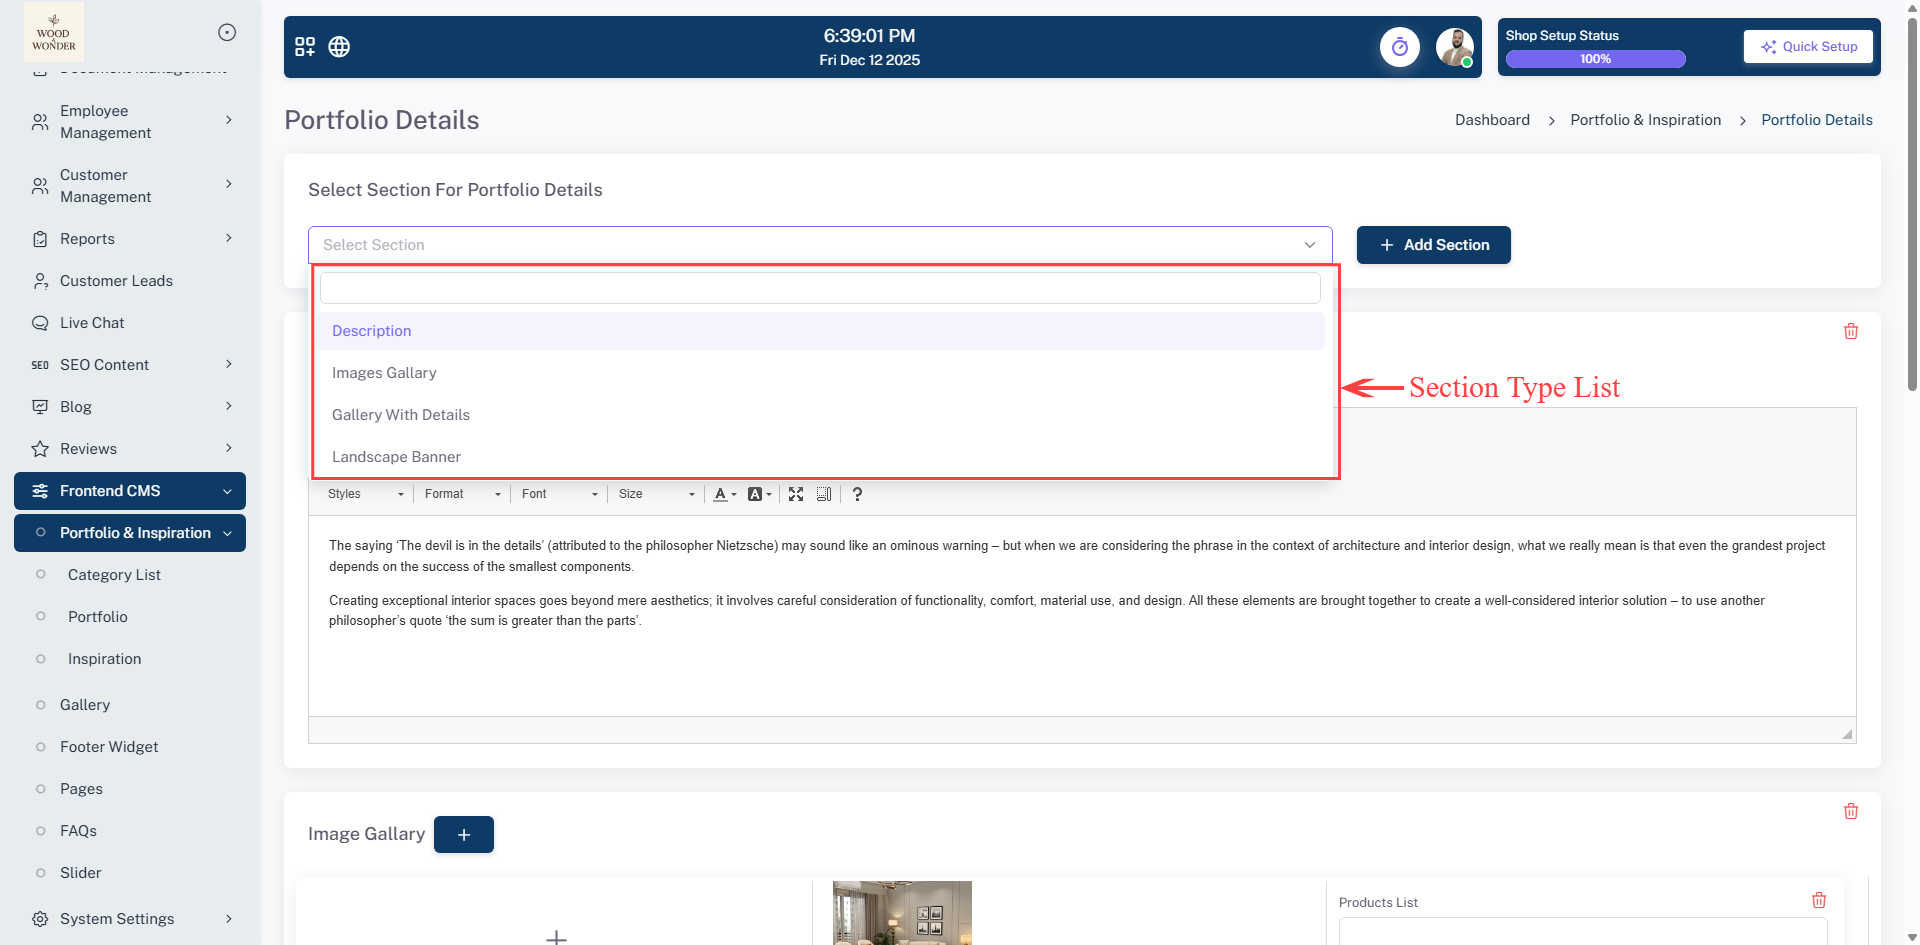
Portfolio details section
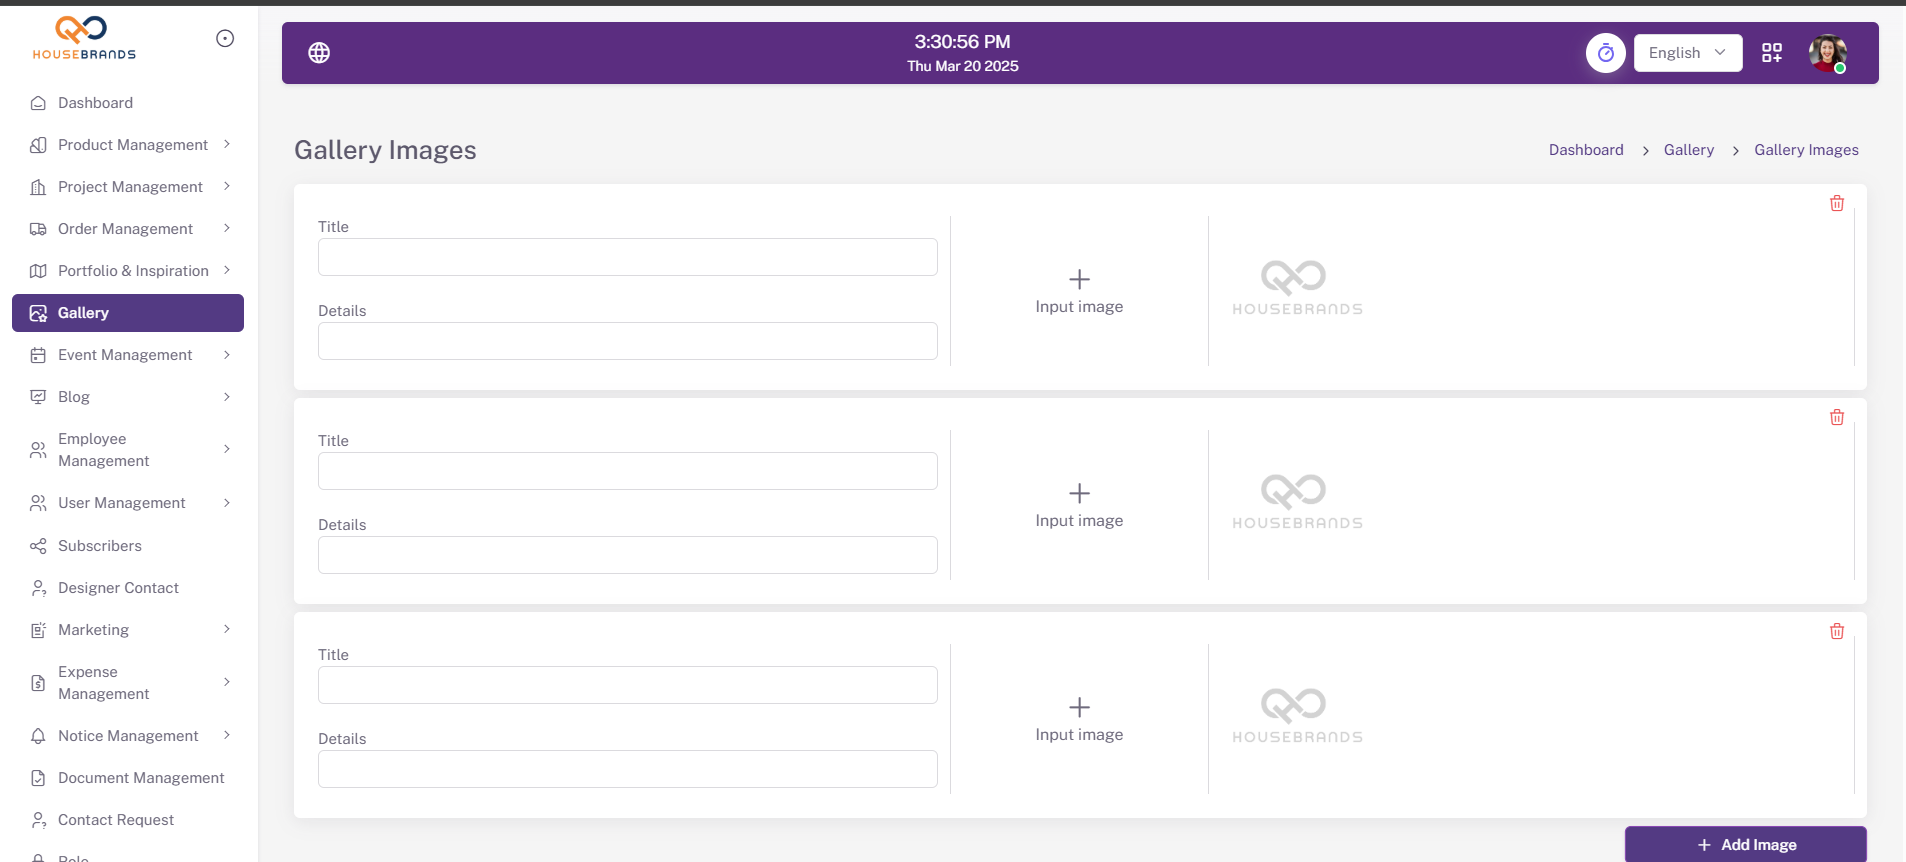
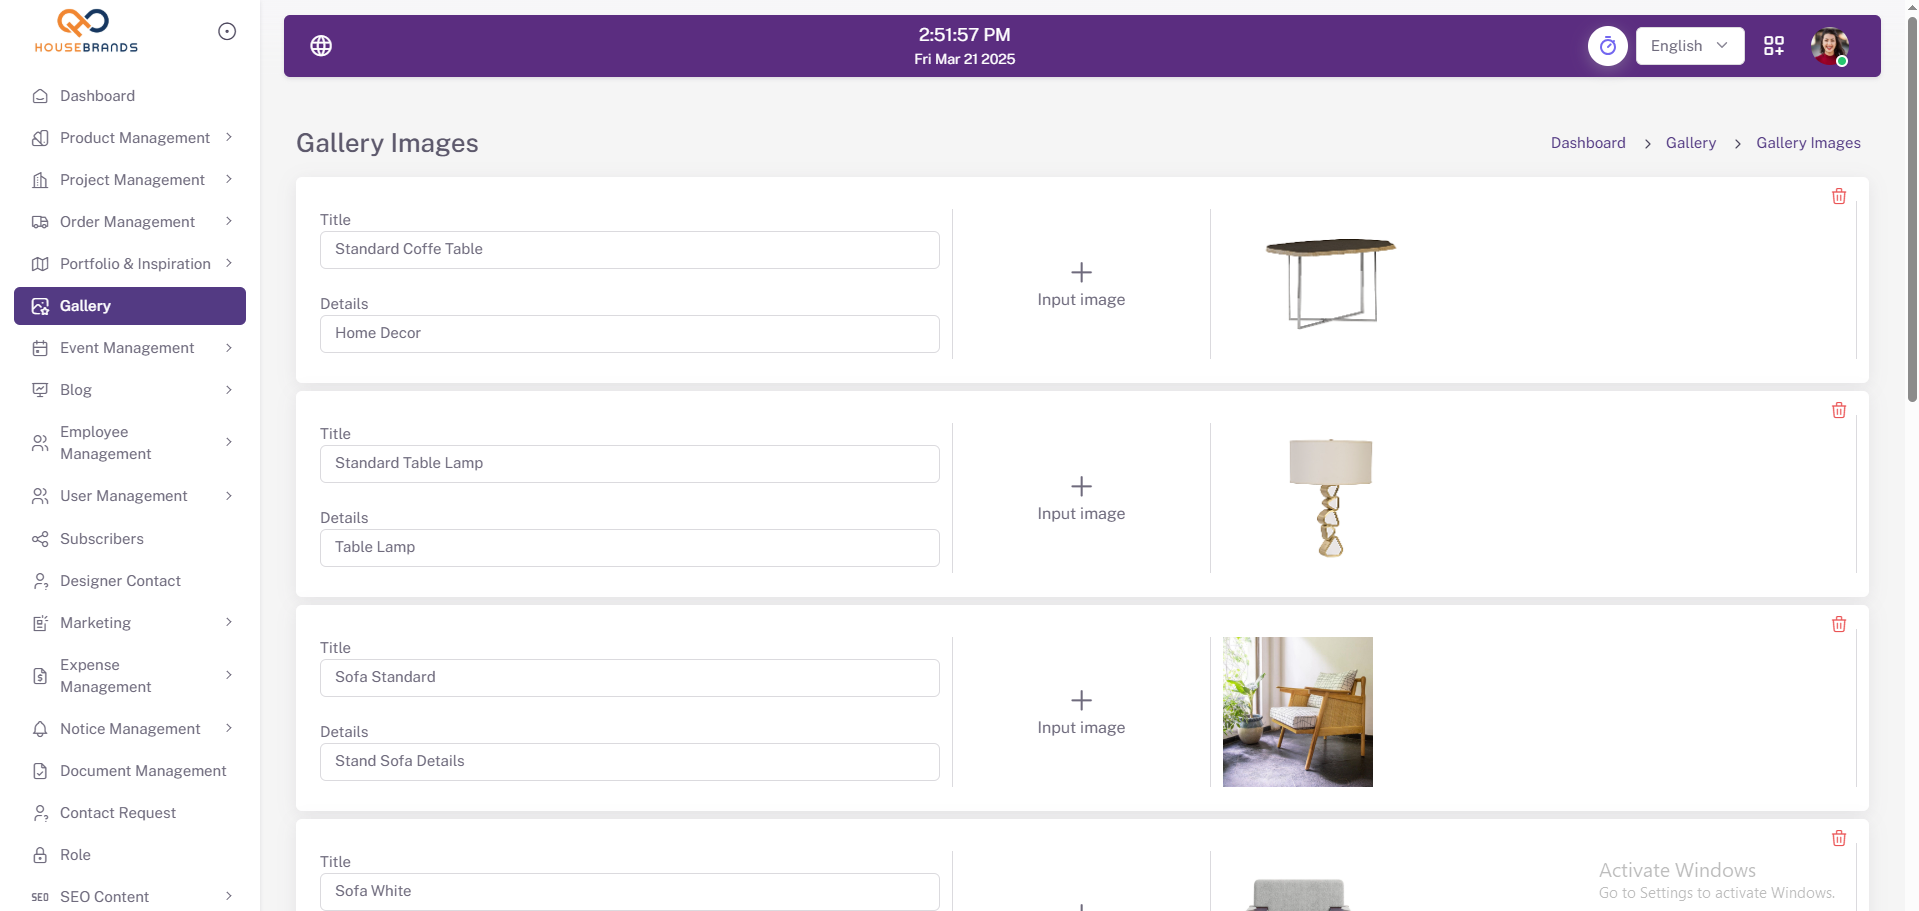
The Portfolio Details page under Portfolio & Inspiration enables users to add and manage detailed visual content linked to specific sections, offering a dropdown to select the target section (e.g., Description, Images Gallery, Gallery with Details, Landscape Banner) and a "+ Add Section" button to create new sections directly. It includes a rich text editor for descriptive content and an Image Gallery area where users can upload multiple images, dynamically add or remove images, and associate each image with product tags for visual product references, making it ideal for building engaging, informative portfolio sections. The Portfolio details Page acts as a centralized interface to create and organize galleries by name, cover image, and active/inactive status, displaying a searchable and filterable list of existing section with their names, cover images, and statuses for efficient review and management—supporting collections for Portfolio, and other visual showcases. The Portfolio Details Page on theis platform provides a clean, modern UI to add, edit, and manage gallery images, allowing users to enter a title and details for each image, upload or replace images, insert new entries with "+ Add Item" and save changes with the "Save" button, while the header displays the current time and date for context.
Inspiration
This page is for managing Inspirations under the Portfolio & Inspiration section. It displays a list of inspirations with their titles, images, categories, and search and filter options. On the right side, there is a form for adding new inspirations, allowing users to input a title, upload an image, select a category, and set the status. The interface is designed for easy management and organization of inspirational content.

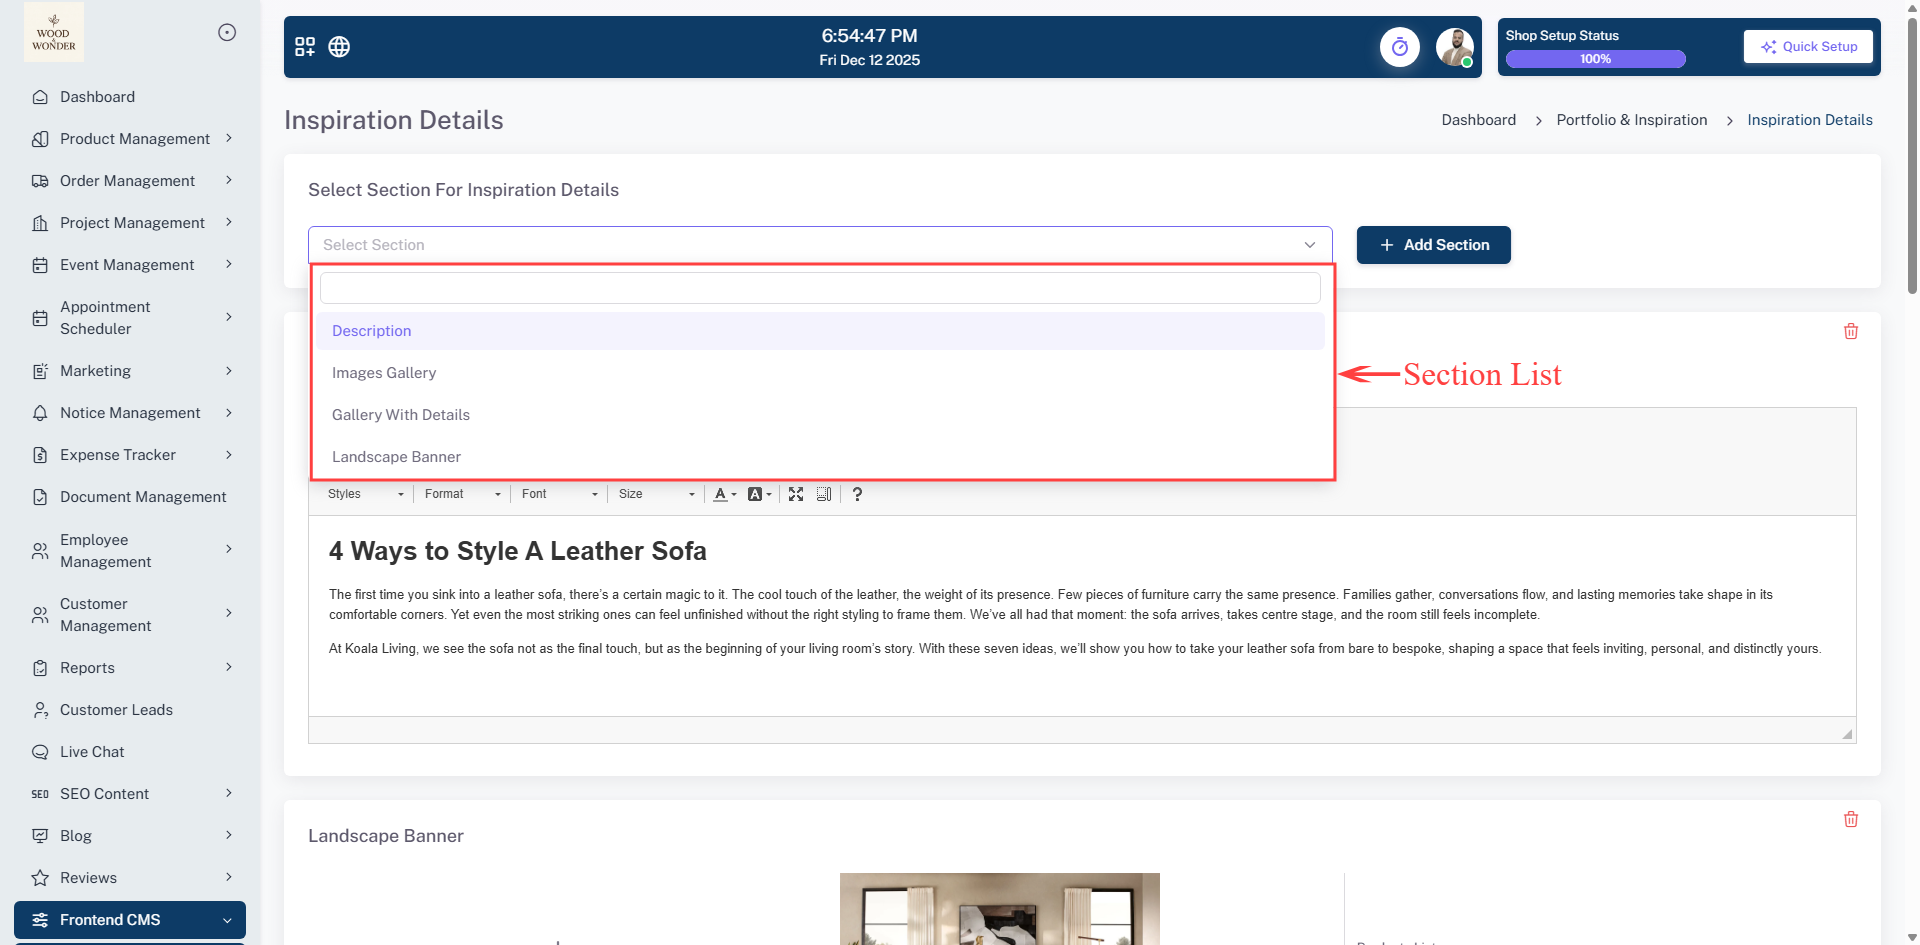
Inspiration details section
The Inspiration Details page under the Inspiration module enables users to add and manage detailed visual content linked to specific sections, offering a dropdown to select the target section (e.g., Description, Images Gallery, Gallery with Details, Landscape Banner) and a "+ Add Section" button to create new sections directly. It includes a rich text editor for descriptive content and an Image Gallery area where users can upload multiple images, dynamically add or remove images, and associate each image with product tags for visual product references, making it ideal for building engaging, informative inspiration sections. The Inspiration Details Page acts as a centralized interface to create and organize sections by name, cover image, and active/inactive status, displaying a searchable and filterable list of existing sections with their names, cover images, and statuses for efficient review and management—supporting collections for Inspiration and other visual showcases. The Inspiration Details Page on this platform provides a clean, modern UI to add, edit, and manage inspiration images, allowing users to enter a title and details for each image, upload or replace images, insert new entries with "+ Add Item," and save changes with the "Save" button, while the header displays the current time and date for context.
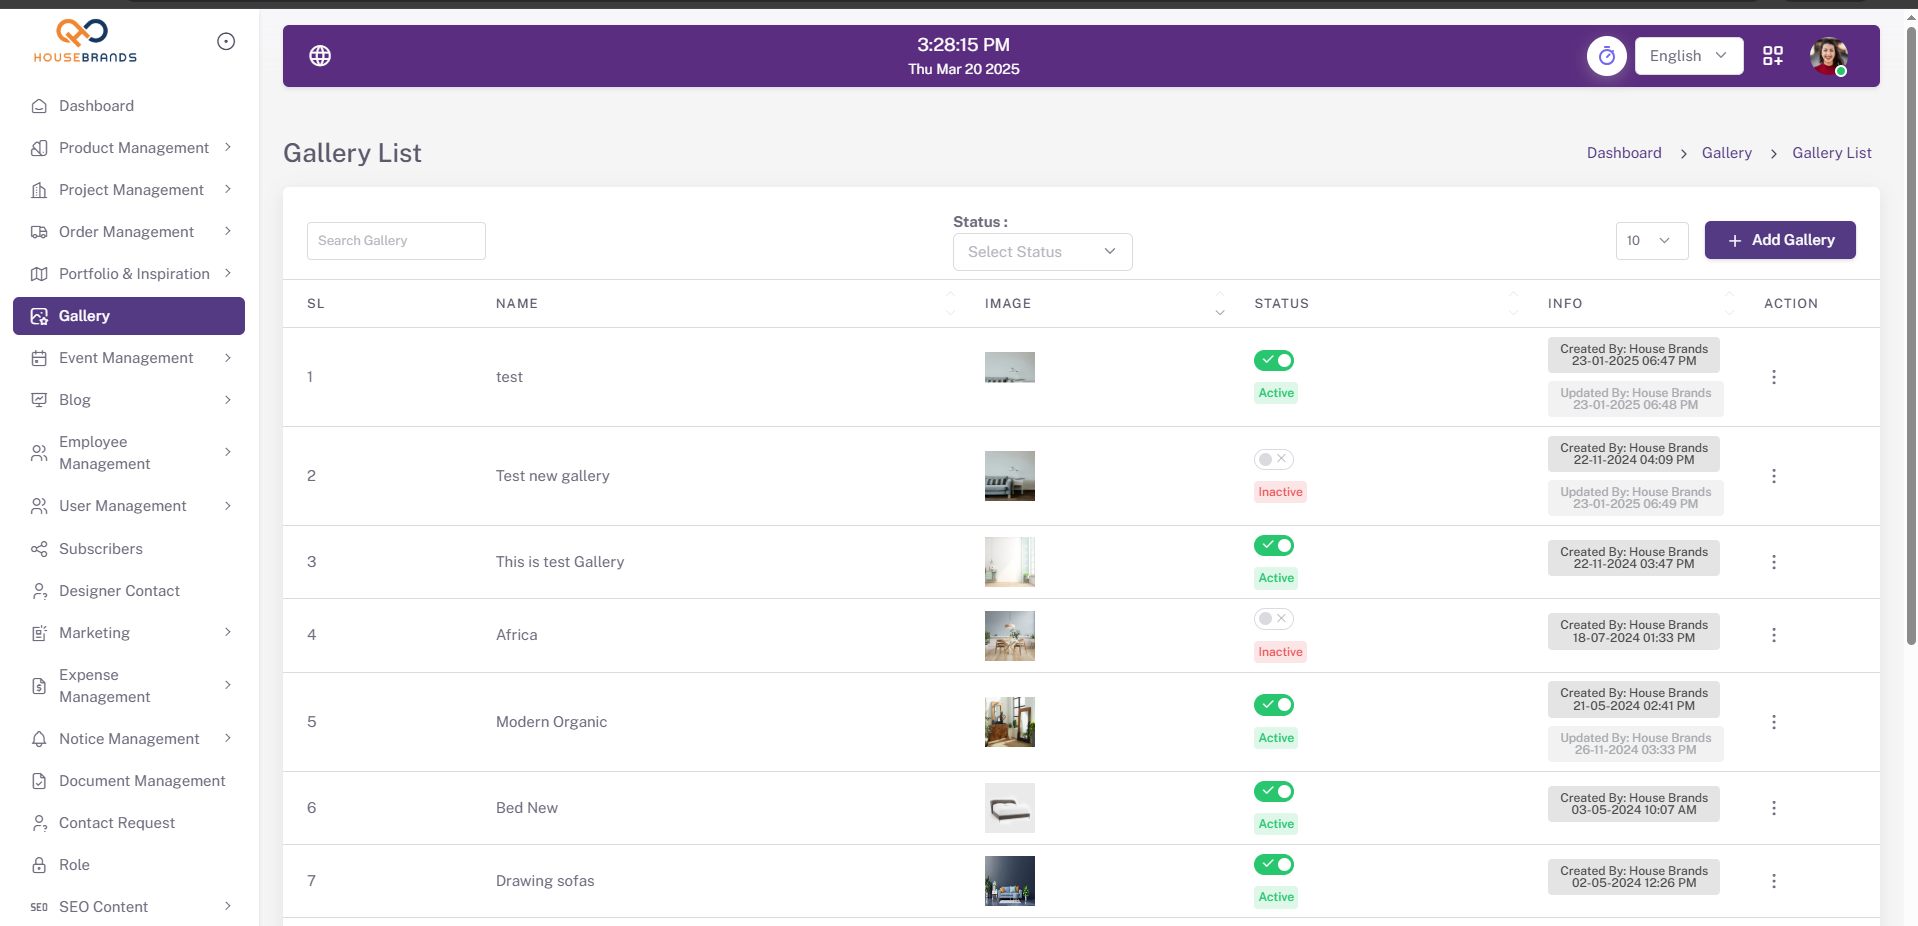
Gallery
Welcome to the gallery! Here, users can showcase their images, whether it's artwork, photos, or other visual creations. Explore the creative works shared by others, and feel free to add your own.
Footer Widget
This section allows you to customize and manage the shop footer according to your requirements. You can enable or disable the active status of footer components such as Company Information, Useful Links, and Client Support sections. Each category includes its own set of configurable sub-options, allowing you to control visibility, content structure, and navigation to ensure the footer aligns with your shop’s preferences and overall branding.


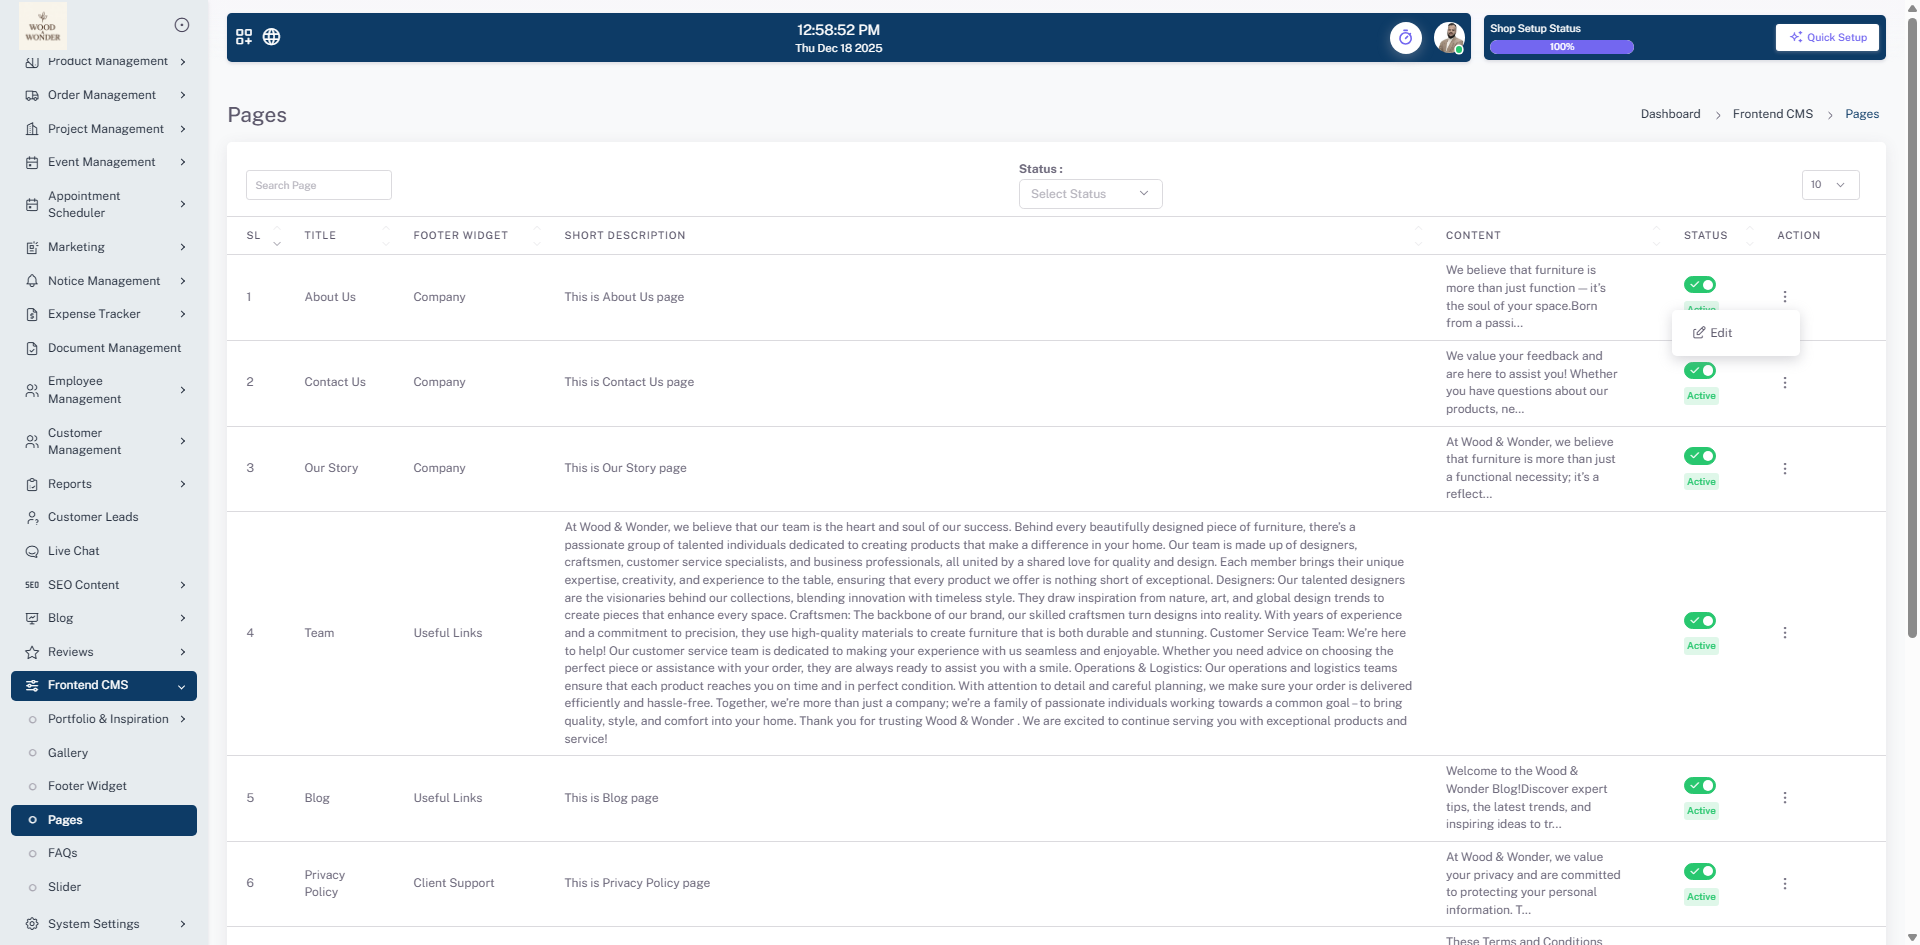
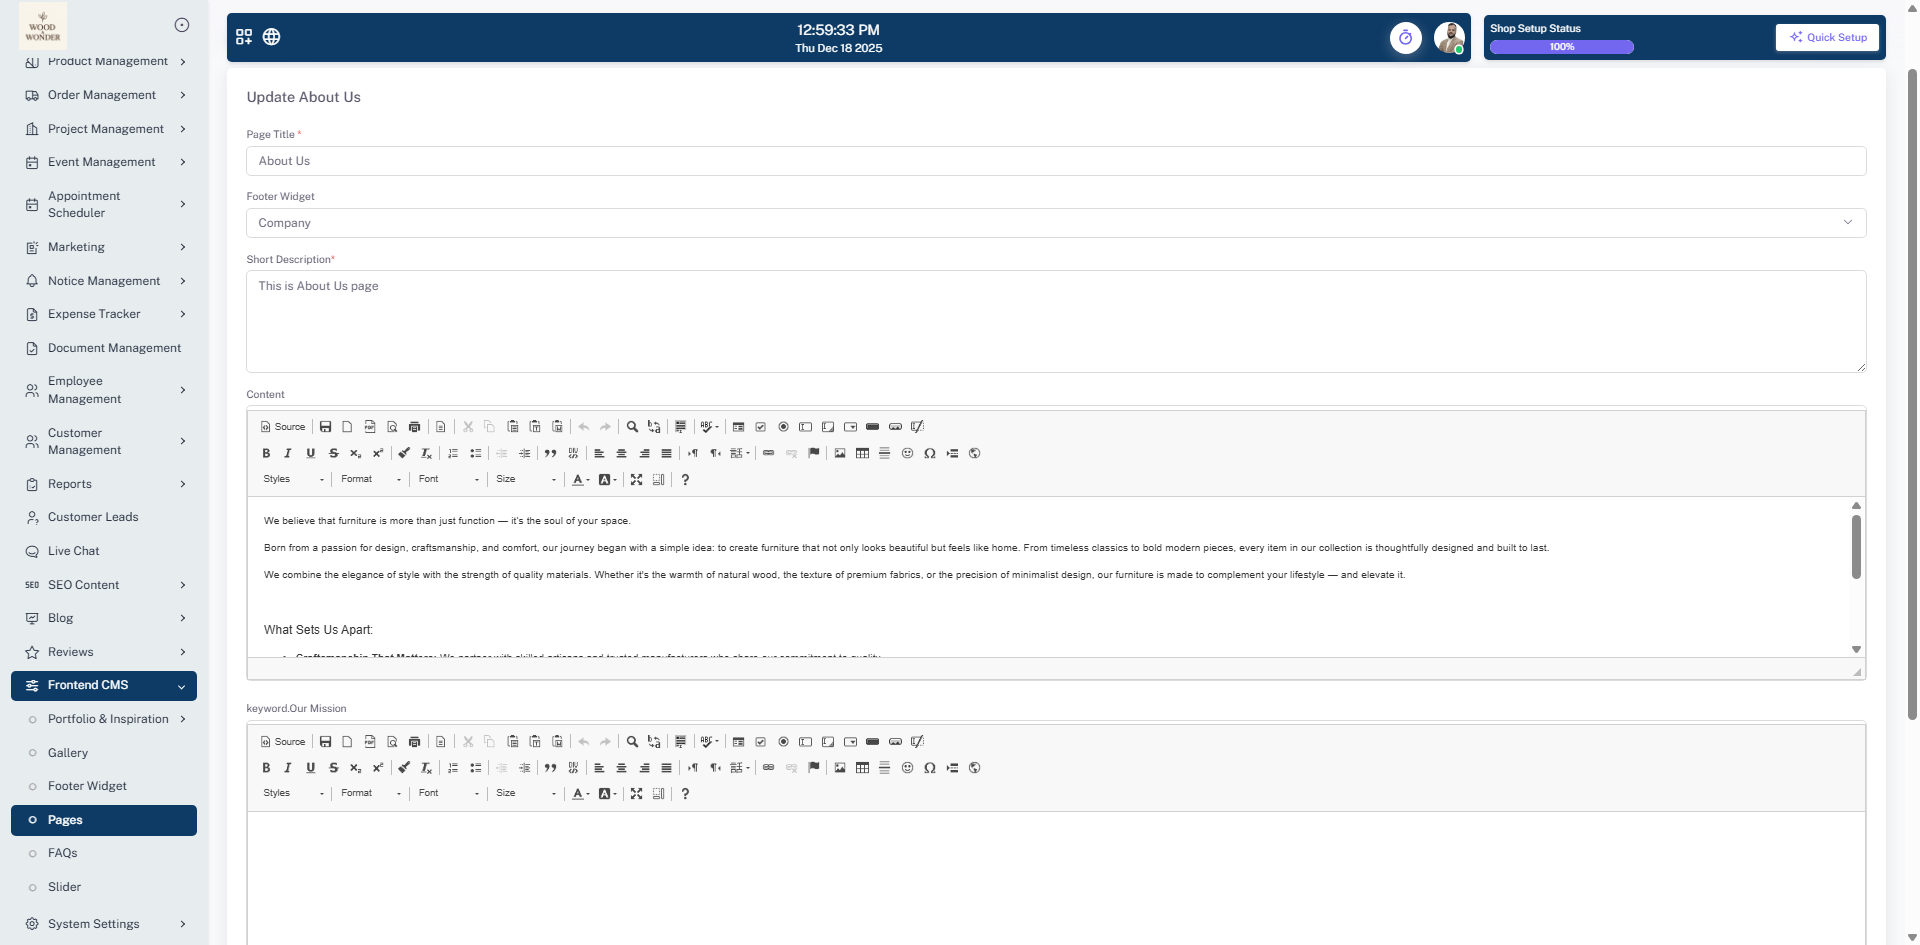
Pages
This page is part of the frontend CMS management system, specifically for managing website pages. It displays a list of pages with relevant details, including title, footer widget category, short description, content preview, status, and available actions. The header section includes a search bar and a status filter dropdown for easy navigation. Each row represents a different page, such as "About Us," "Contact Us," "Privacy Policy," and more, showing whether it is active. Users have the ability to edit the content of each page through the available action menu. The left-side navigation menu provides access to different CMS features, including FAQs, sliders, and other frontend customization options. The interface is structured to allow administrators to efficiently manage and update website pages.
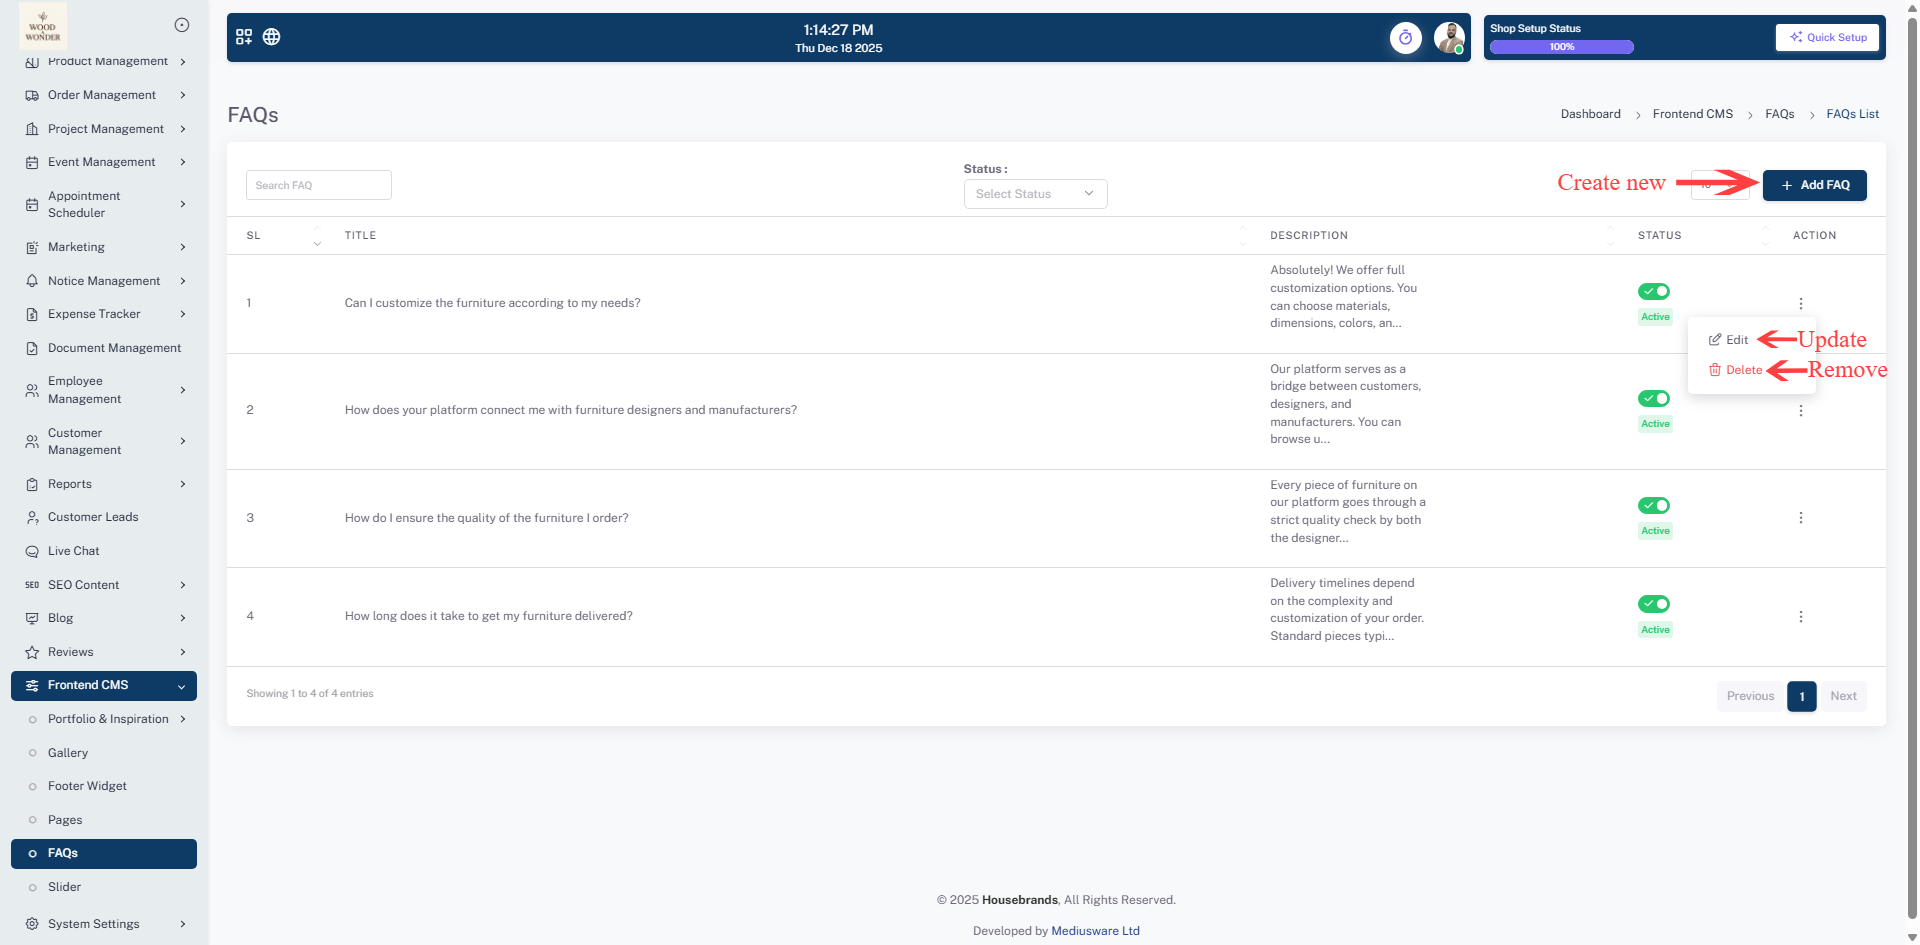
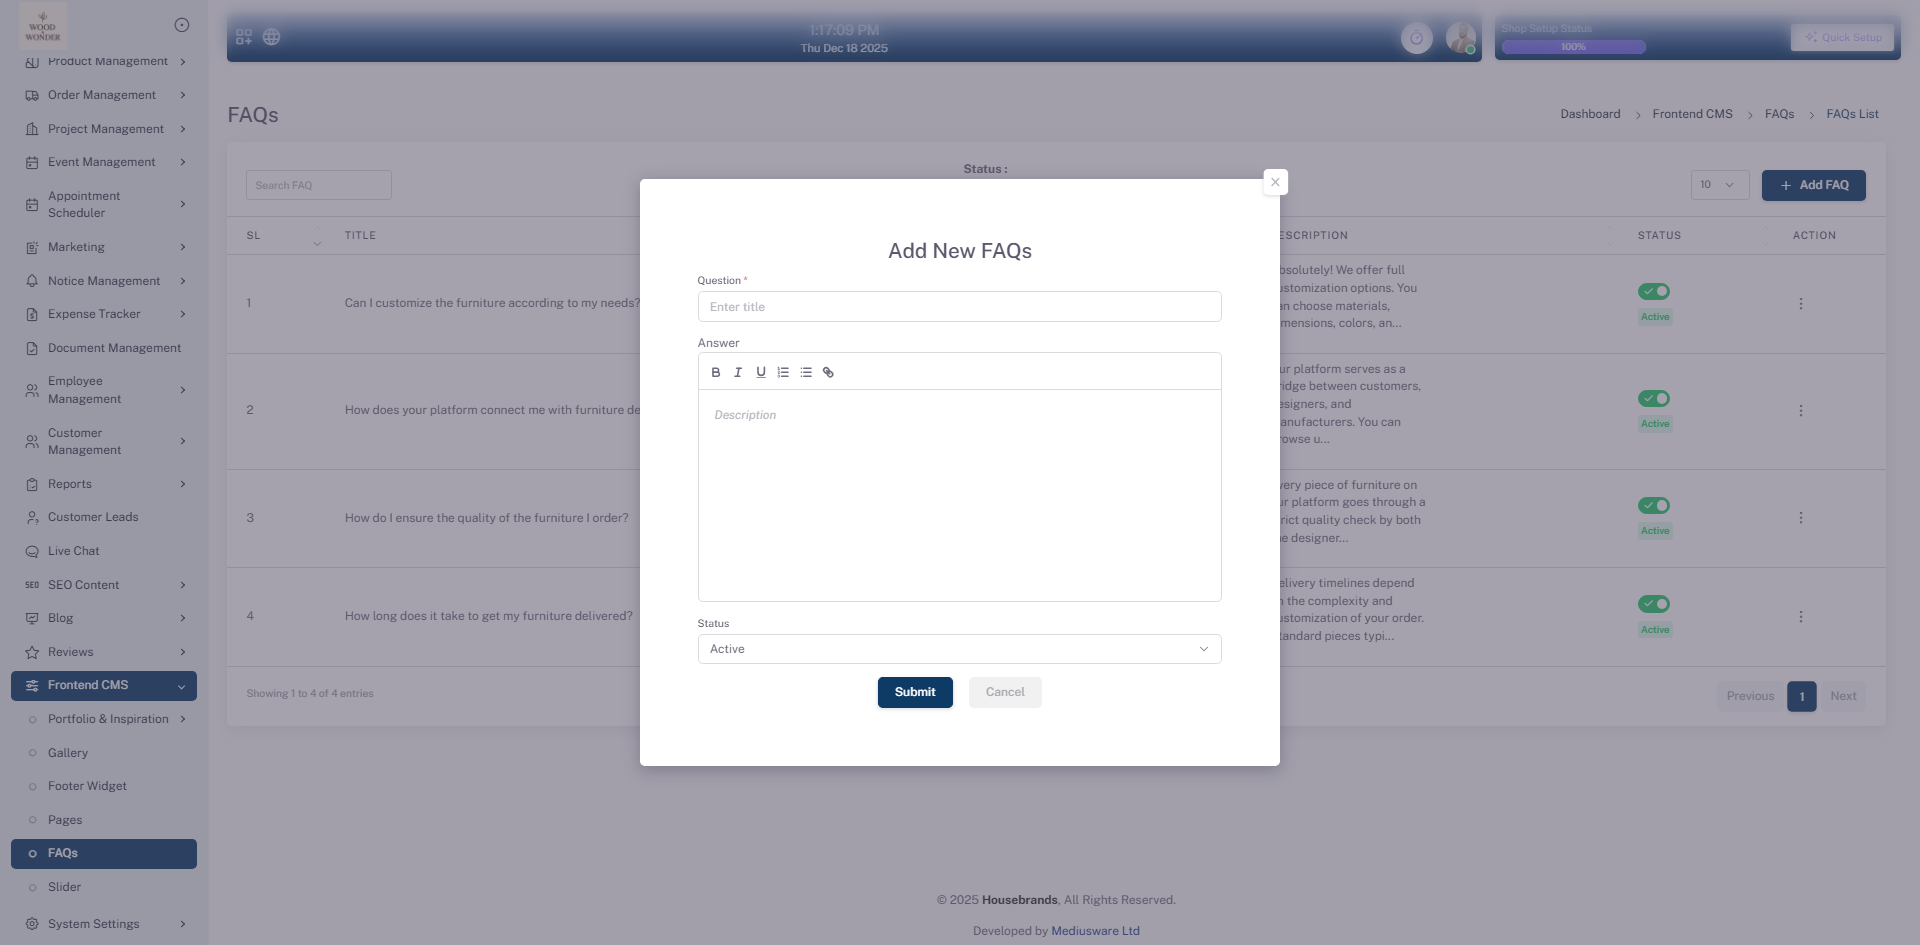
FAQS
This page is part of the Frontend CMS system, specifically designed for managing Frequently Asked Questions (FAQs). It provides an interface for adding new FAQ entries, with fields to input a title and a detailed description using a rich text editor. Users can also set the status of the FAQ as "Active" or modify it as needed. The modal form includes options to submit or cancel the entry. In the background, a list of existing FAQs is visible, showing their status and actions for managing them.
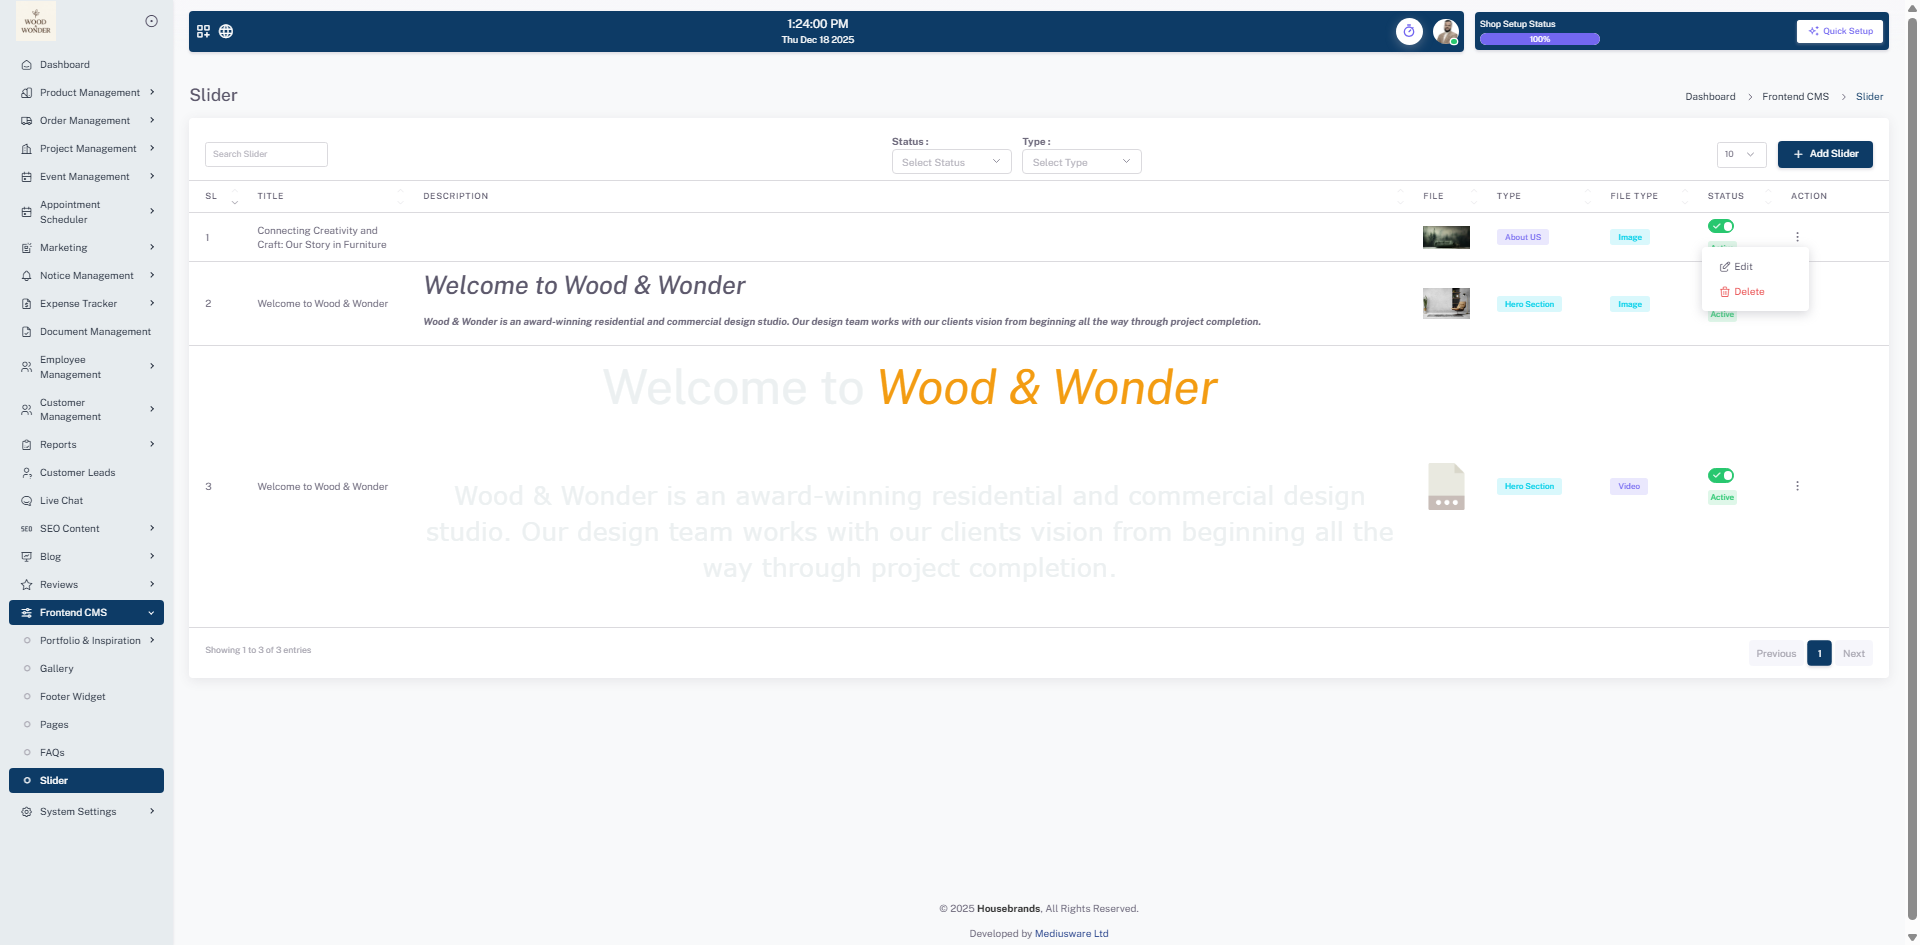
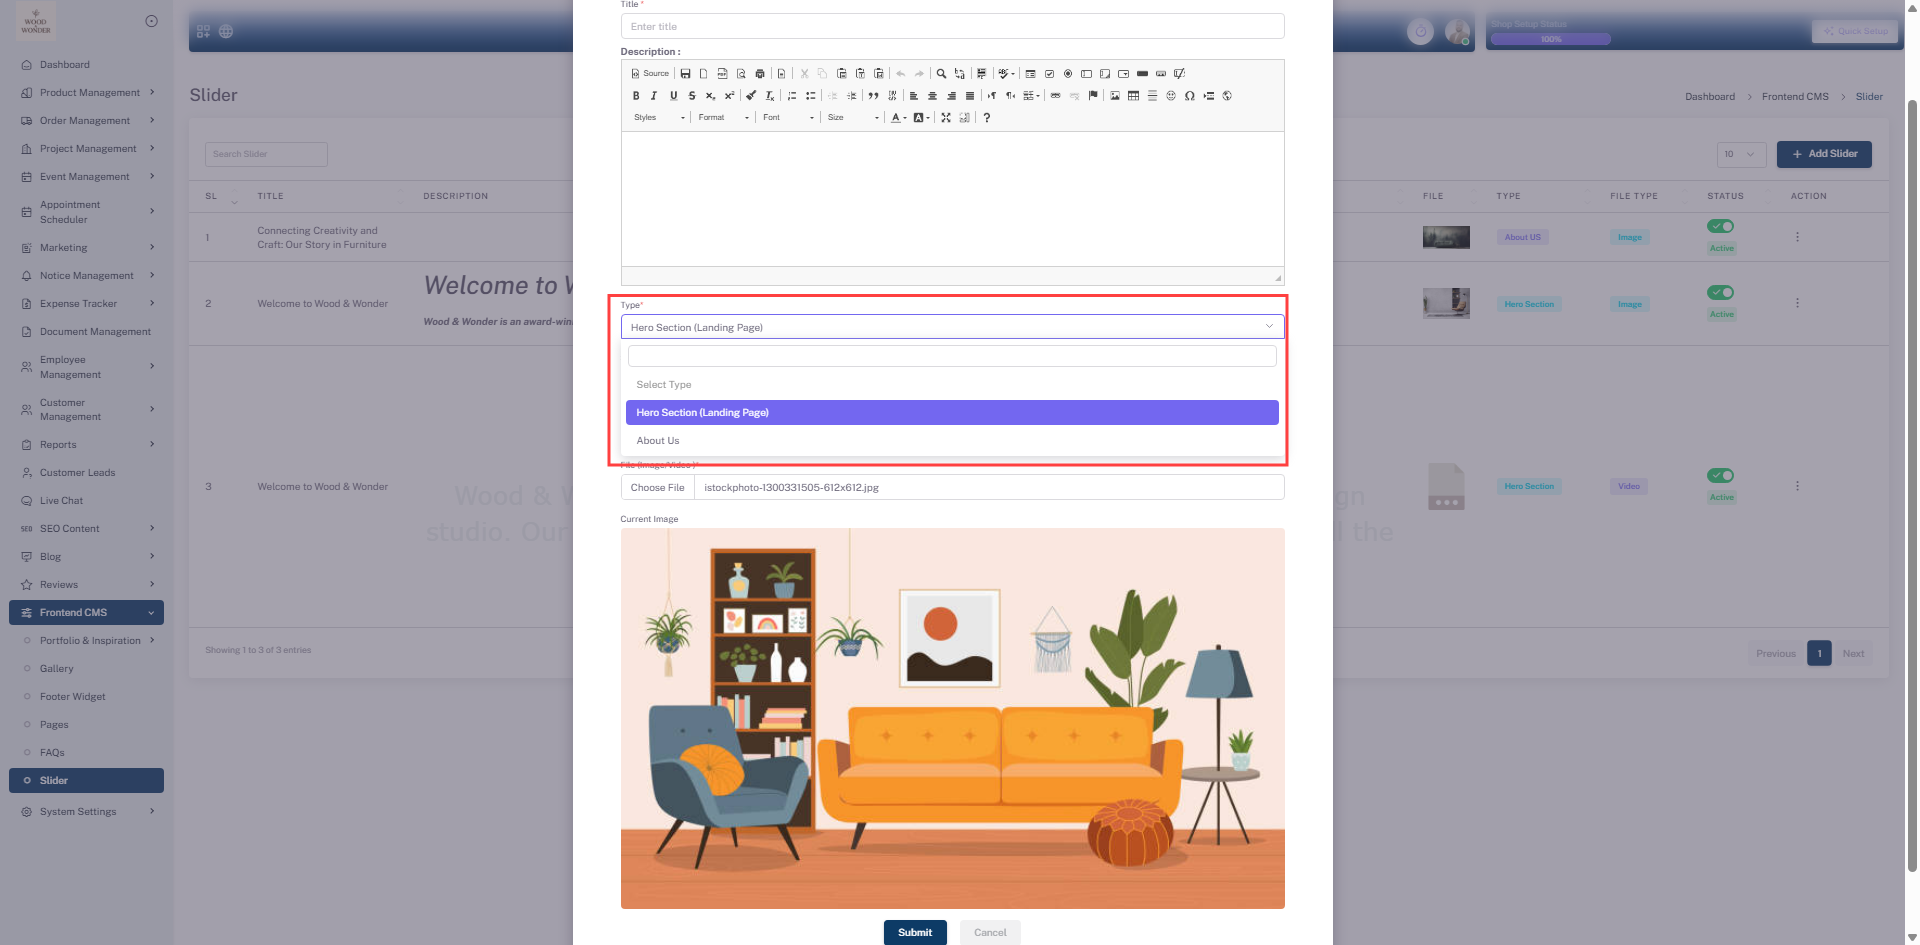
Sliders
This page is part of the Frontend CMS module and is dedicated to managing sliders across the website. It provides a structured interface for creating and maintaining sliders, with input fields for title, description, slider type, status, and file type. Depending on the selected slider type, users can upload either images or videos and control whether the slider is active or inactive.
The system supports two distinct slider types: one designed for the Home Page hero section and another for the About Us page. The Home Page hero slider additionally allows video uploads, enabling richer visual presentation, while the About Us slider is focused on conveying brand and company information through imagery.
Below the form, a list of existing sliders is displayed, showing key details such as title, slider type, file type, current status, and available management actions. The left-side navigation menu provides quick access to other Frontend CMS features, including pages, FAQs, and system configuration options, ensuring seamless content management across the platform.
System settings
This page is part of the system settings module, providing users with options to configure various aspects of the platform. The interface includes sections for general settings, email settings, payment settings, and other system configurations. Users can update information such as the platform name, logo, contact details, and social media links. The email settings section allows users to configure SMTP details for sending system emails. Payment settings enable users to set up payment gateways and manage transaction-related information. The design follows a structured layout with clear navigation and management options, ensuring users can easily customize the platform to meet their requirements.
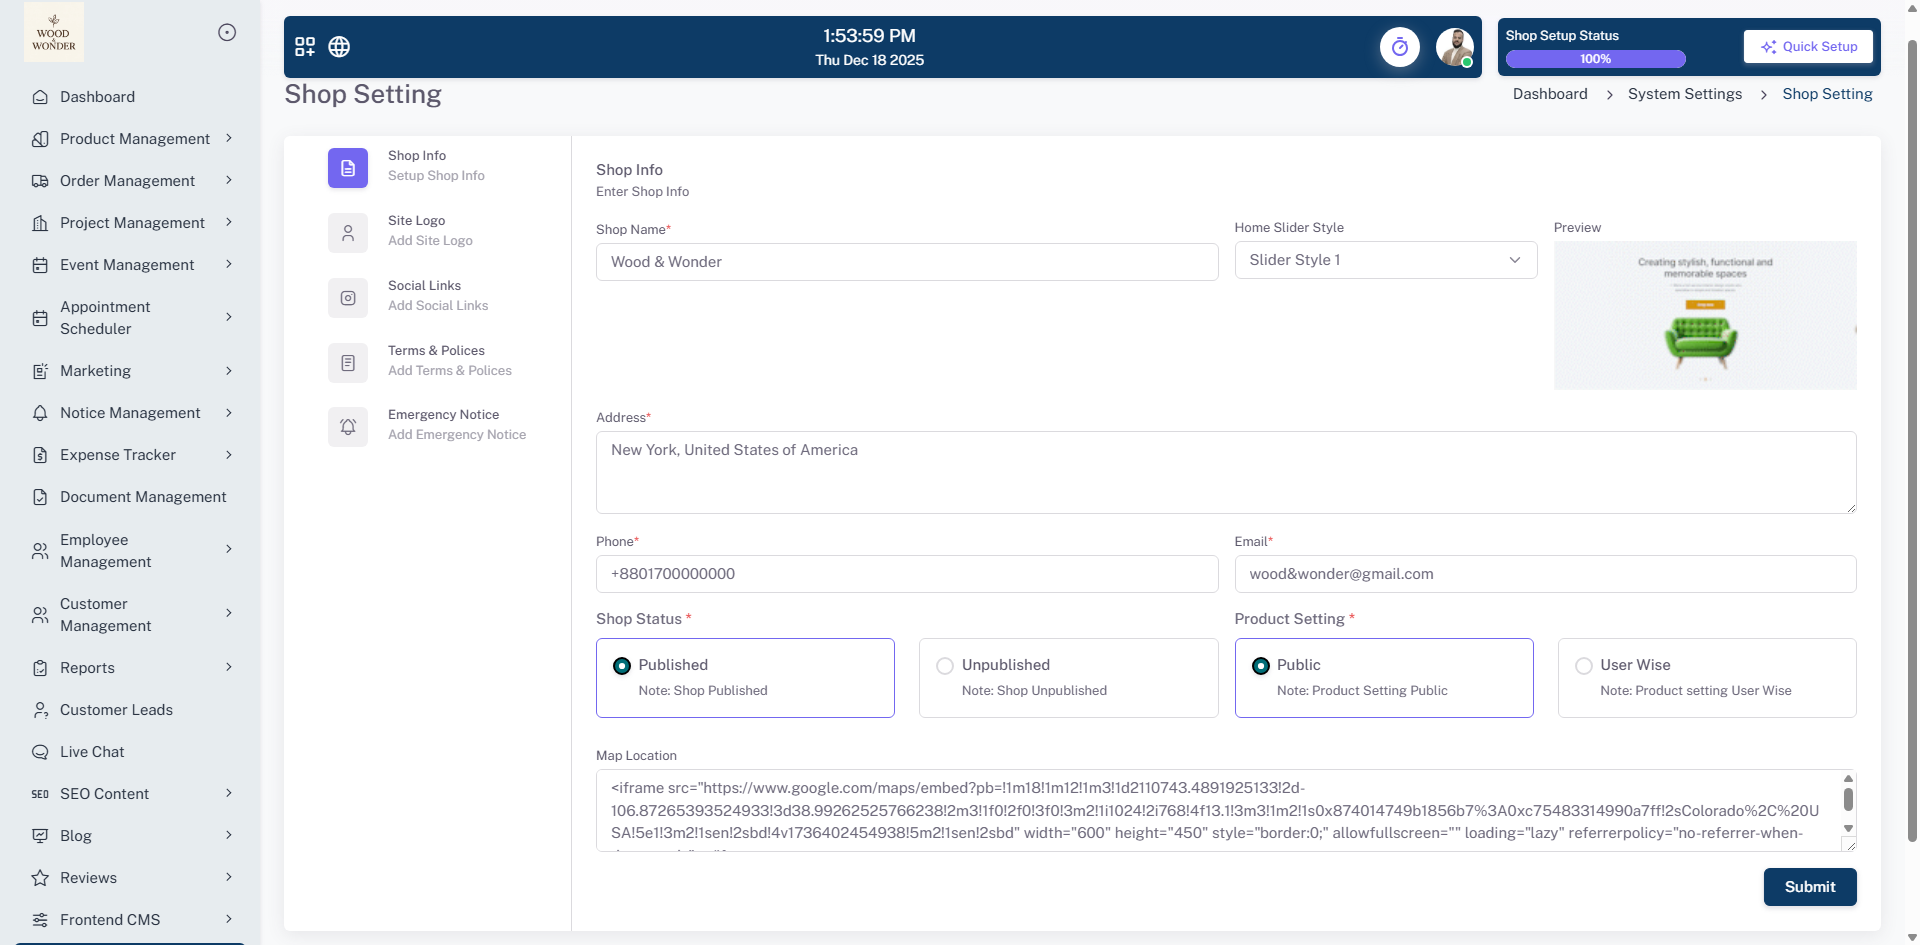
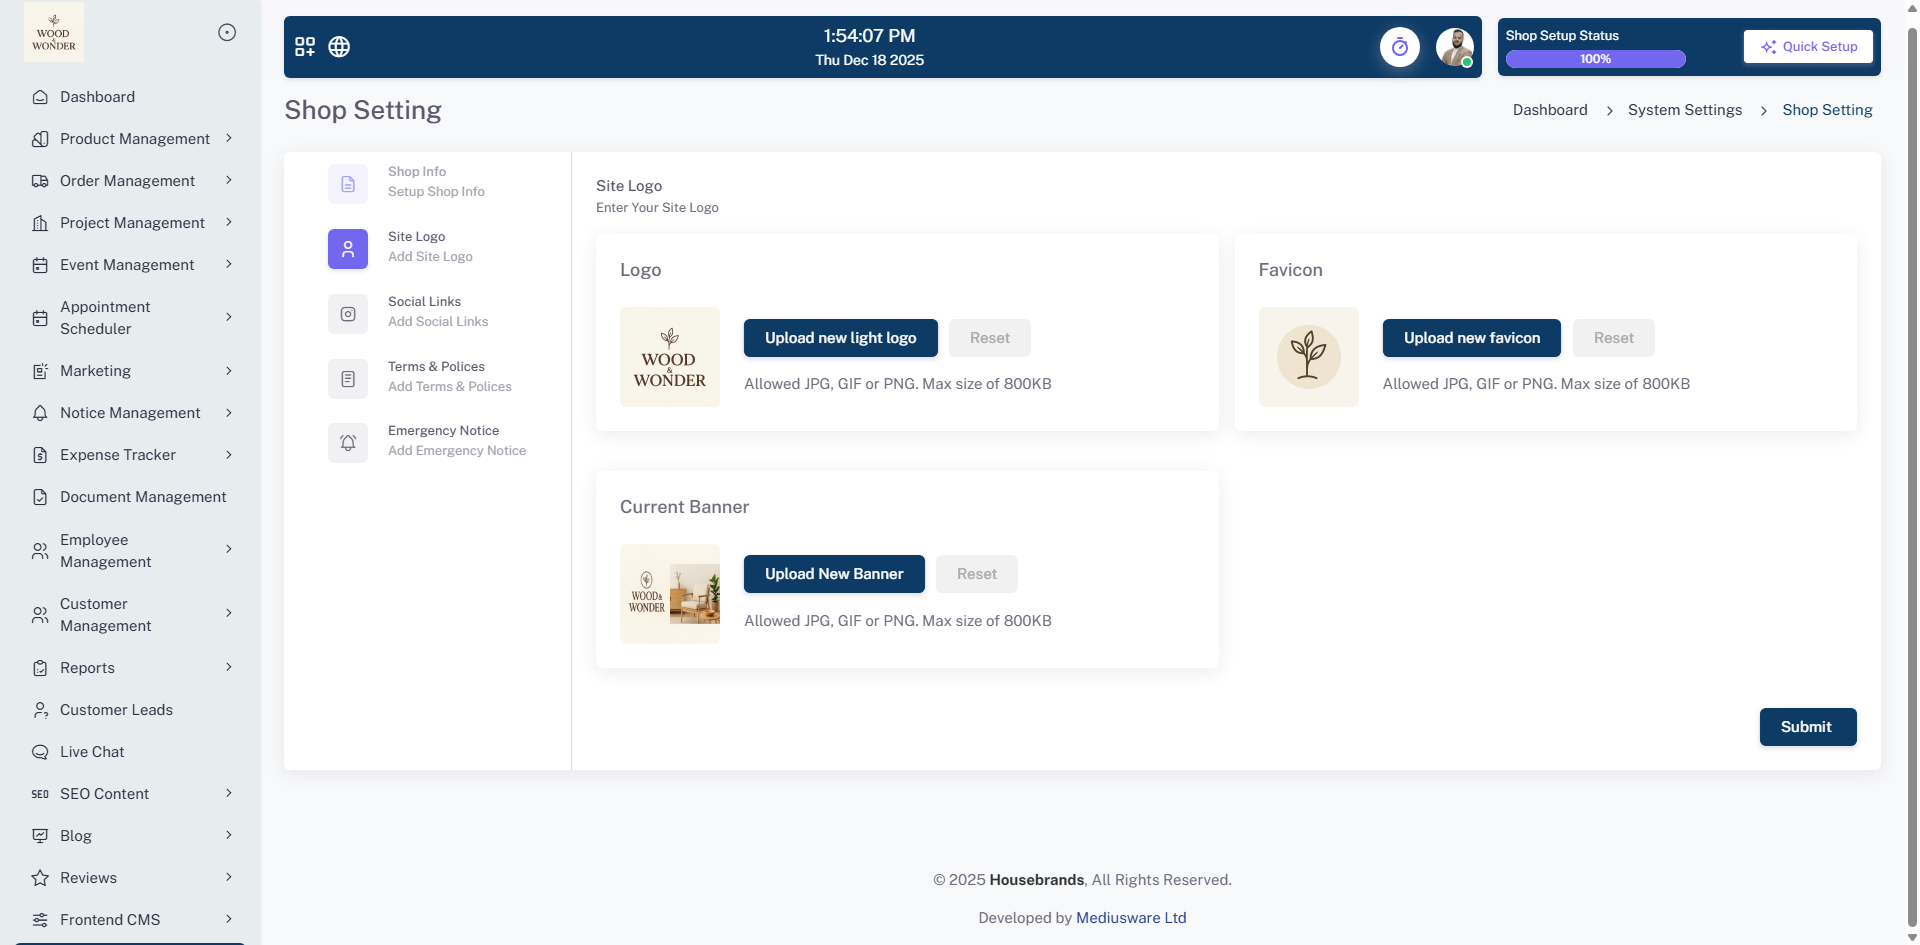
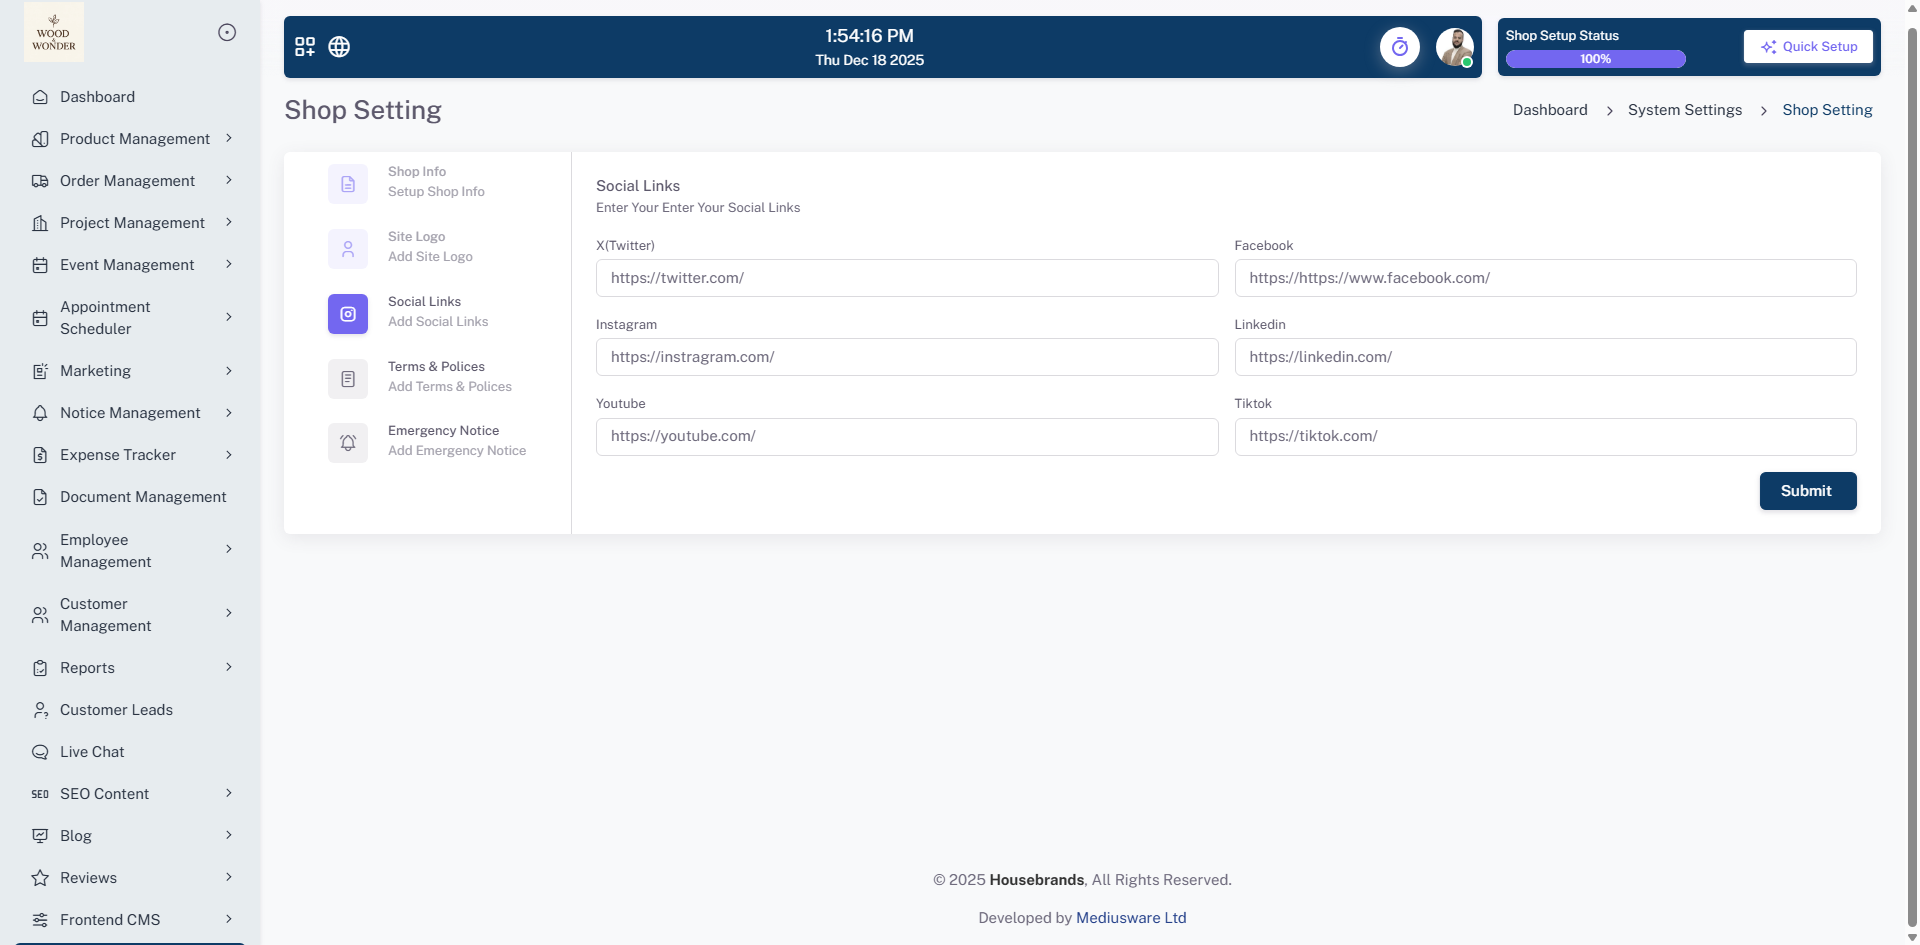
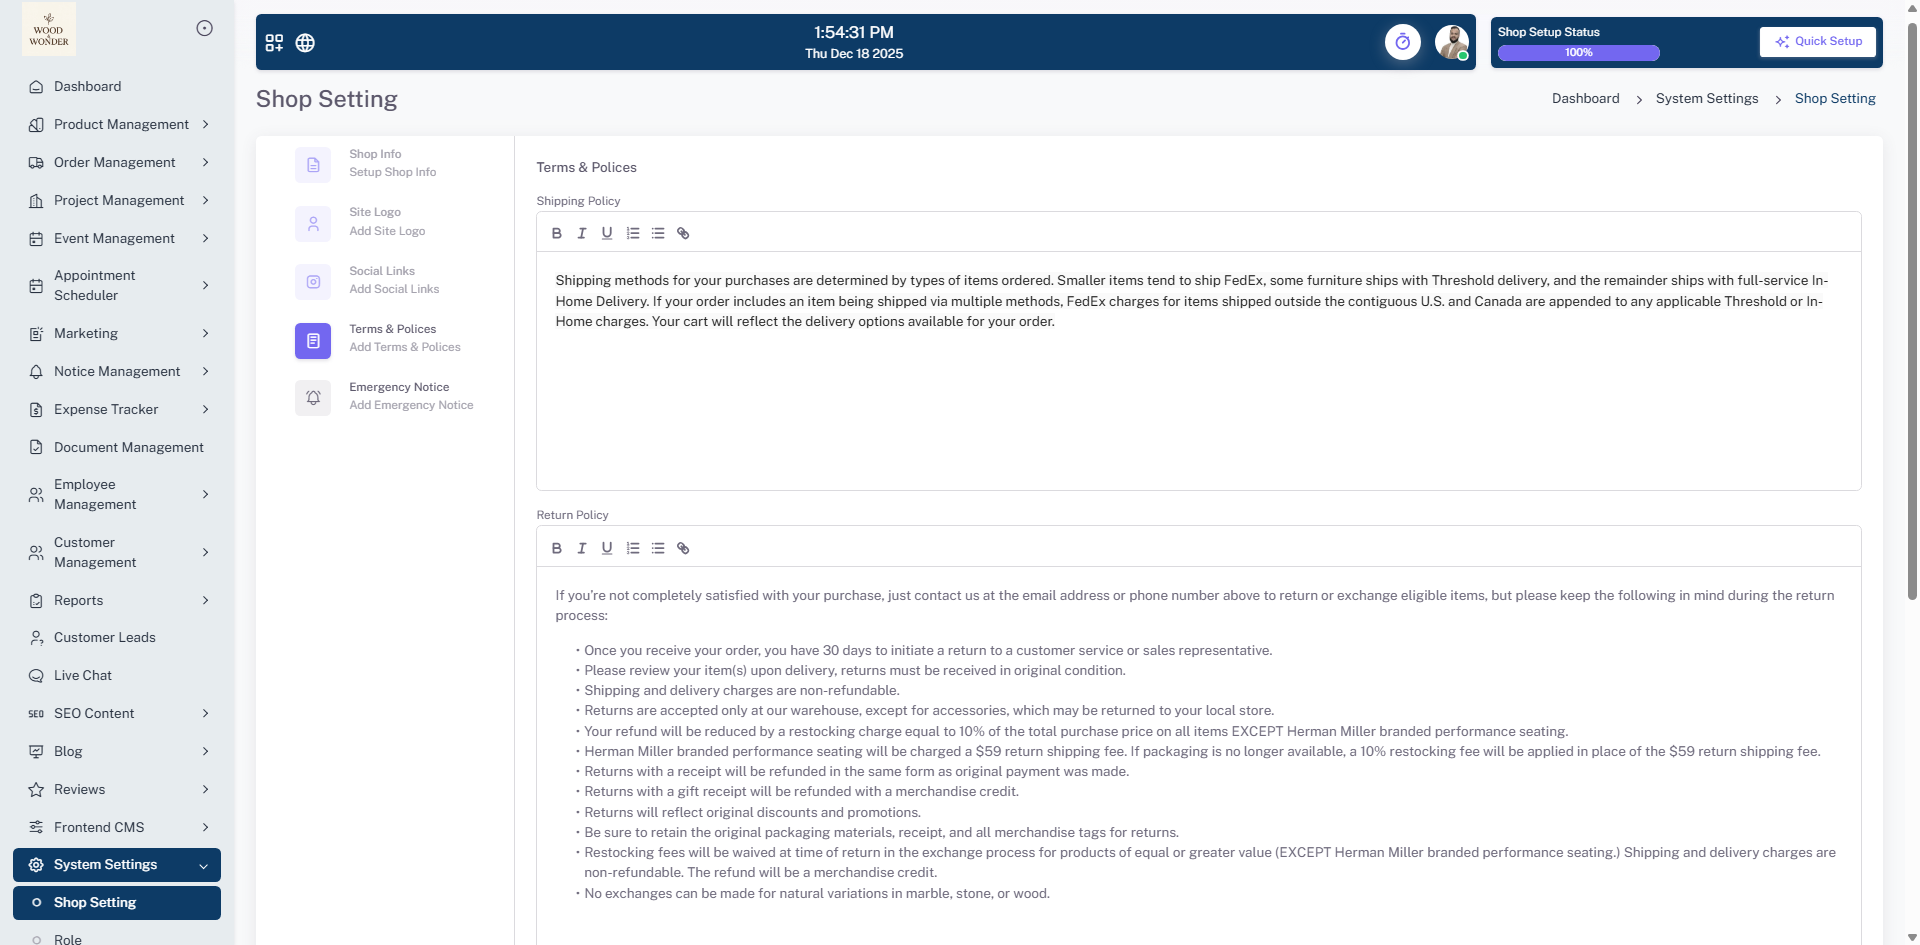
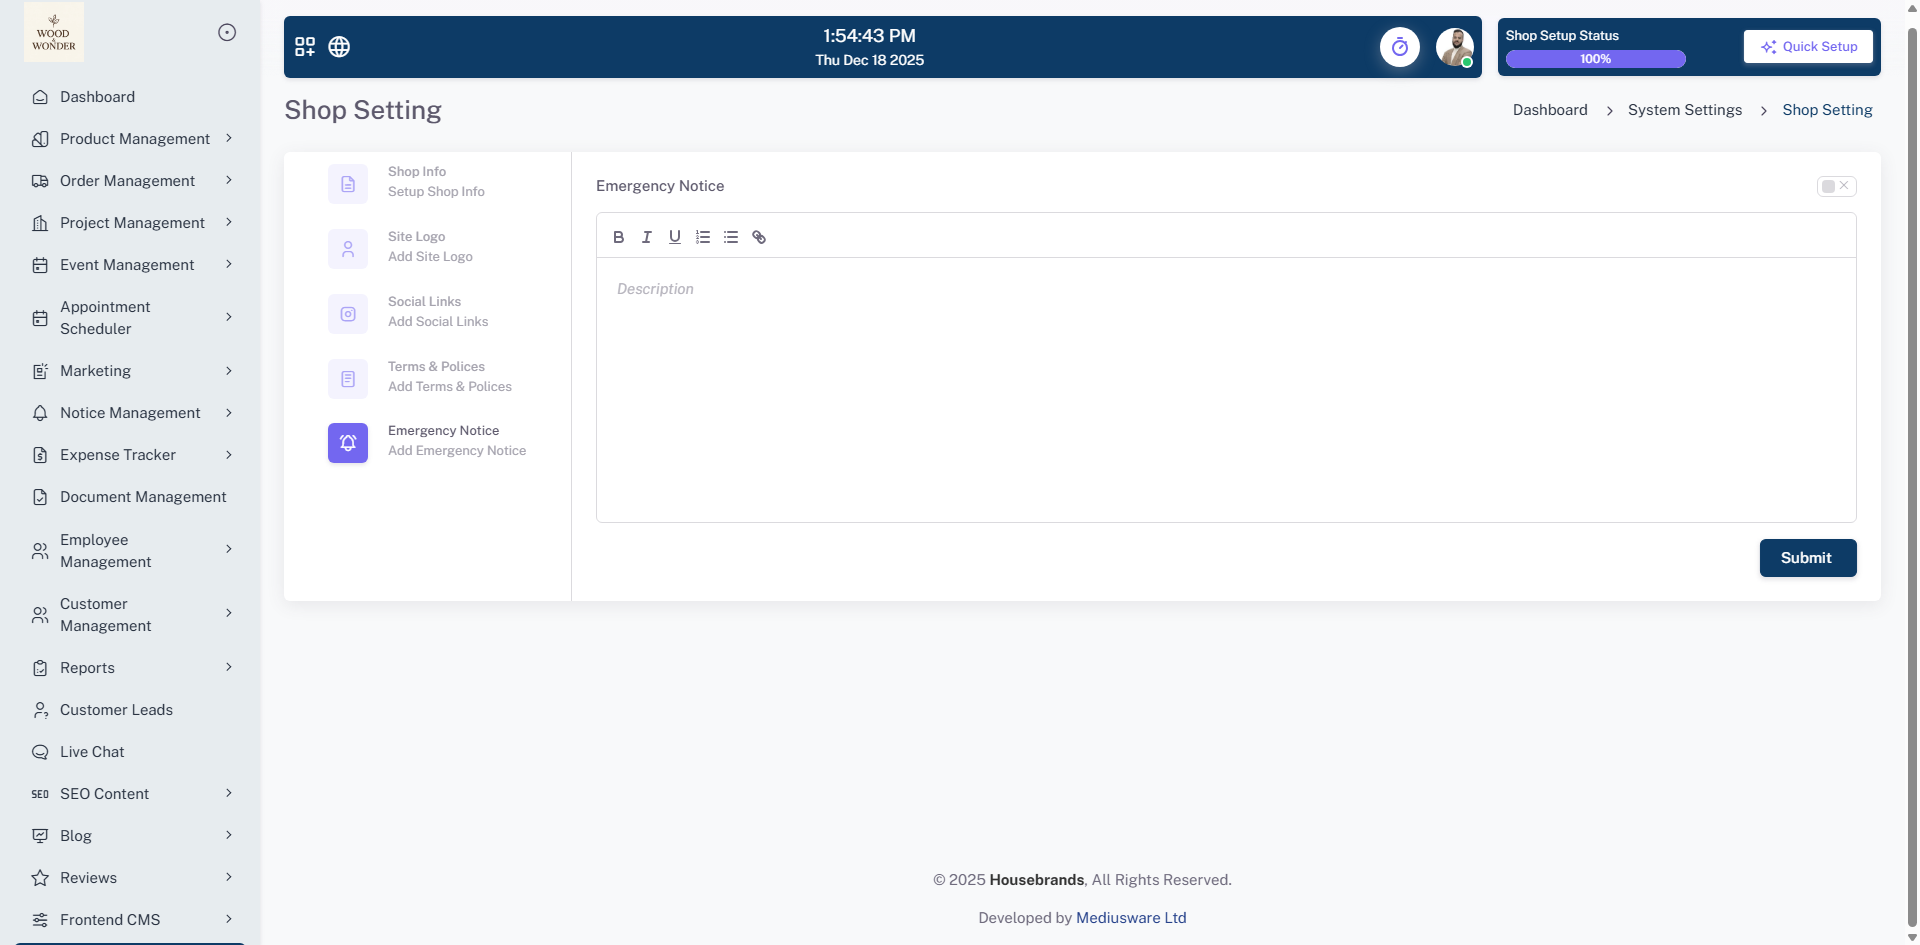
Shop Setting
The Shop Settings module serves as the primary administrative hub for defining your store’s brand identity and operational parameters, allowing for the management of core business credentials such as the official shop name, primary contact email, verified phone numbers, and physical geographic location. This section facilitates brand asset management for high-resolution corporate logo uploads while providing granular control over the global store status—enabling online or offline toggles—and governing product behavior settings. Additionally, the interface supports social media integration, legal compliance via Terms and Conditions, and a dynamic notification bar for broadcasting emergency notices or critical announcements directly to the storefront’s top bar.
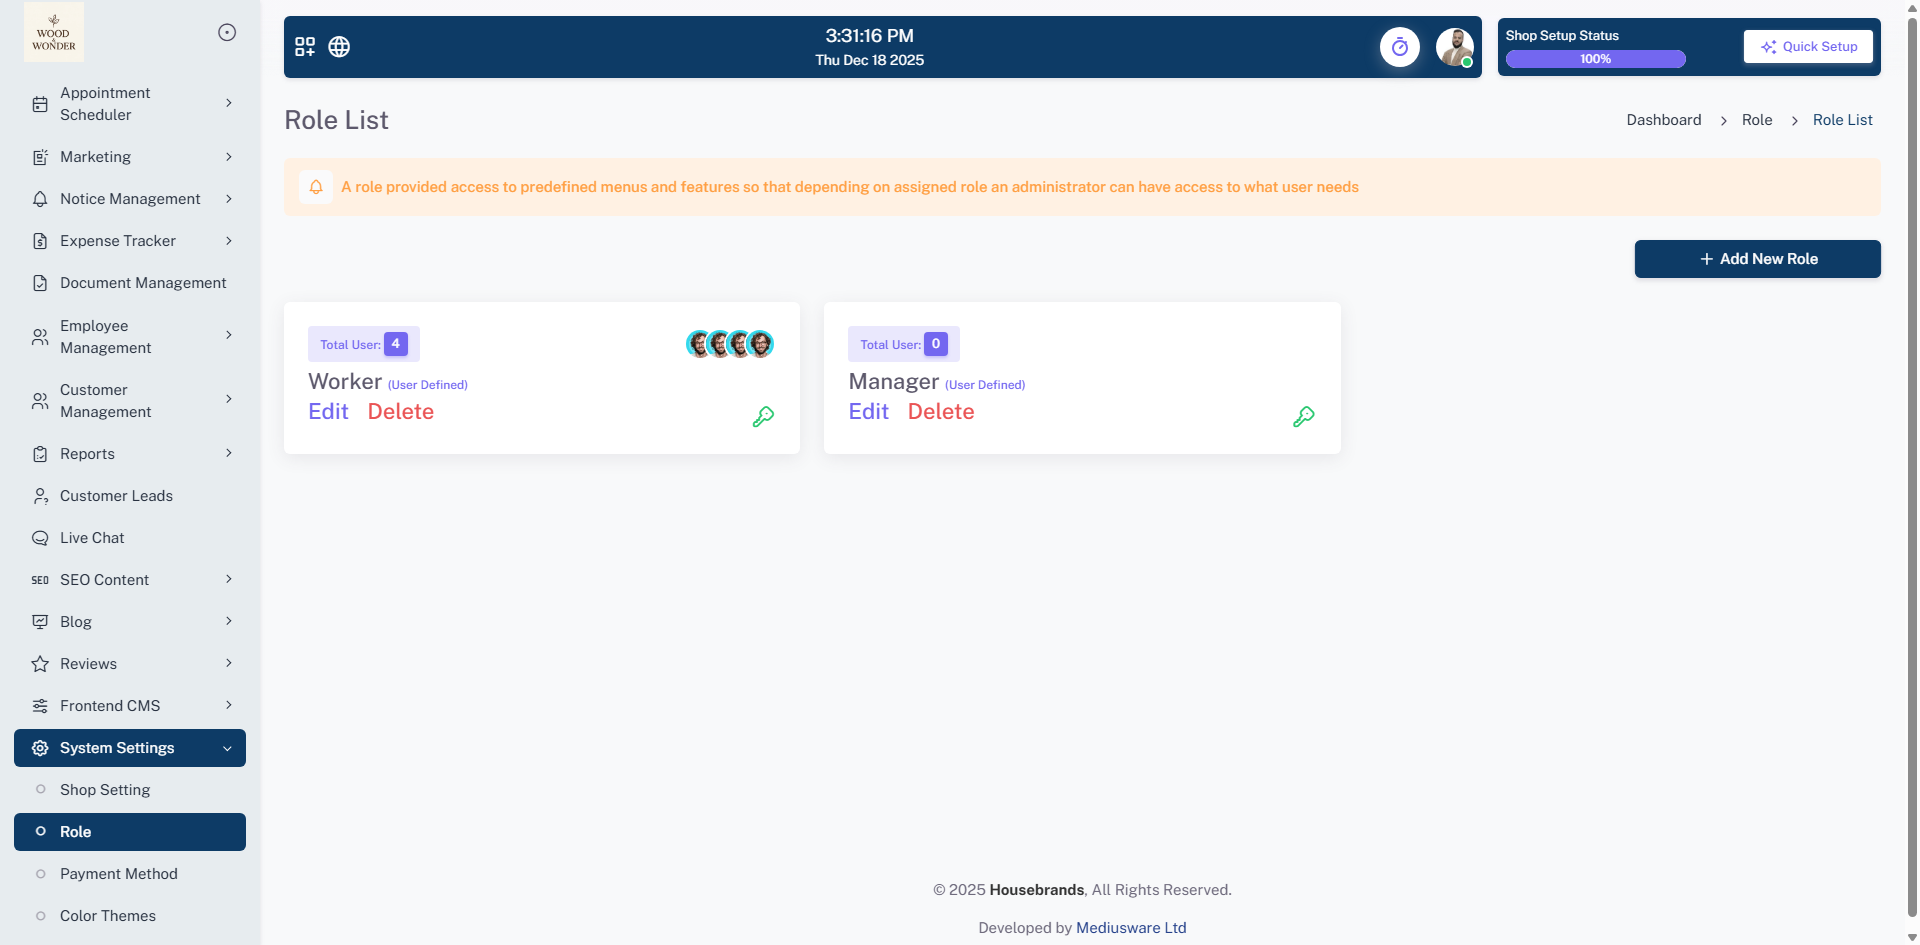
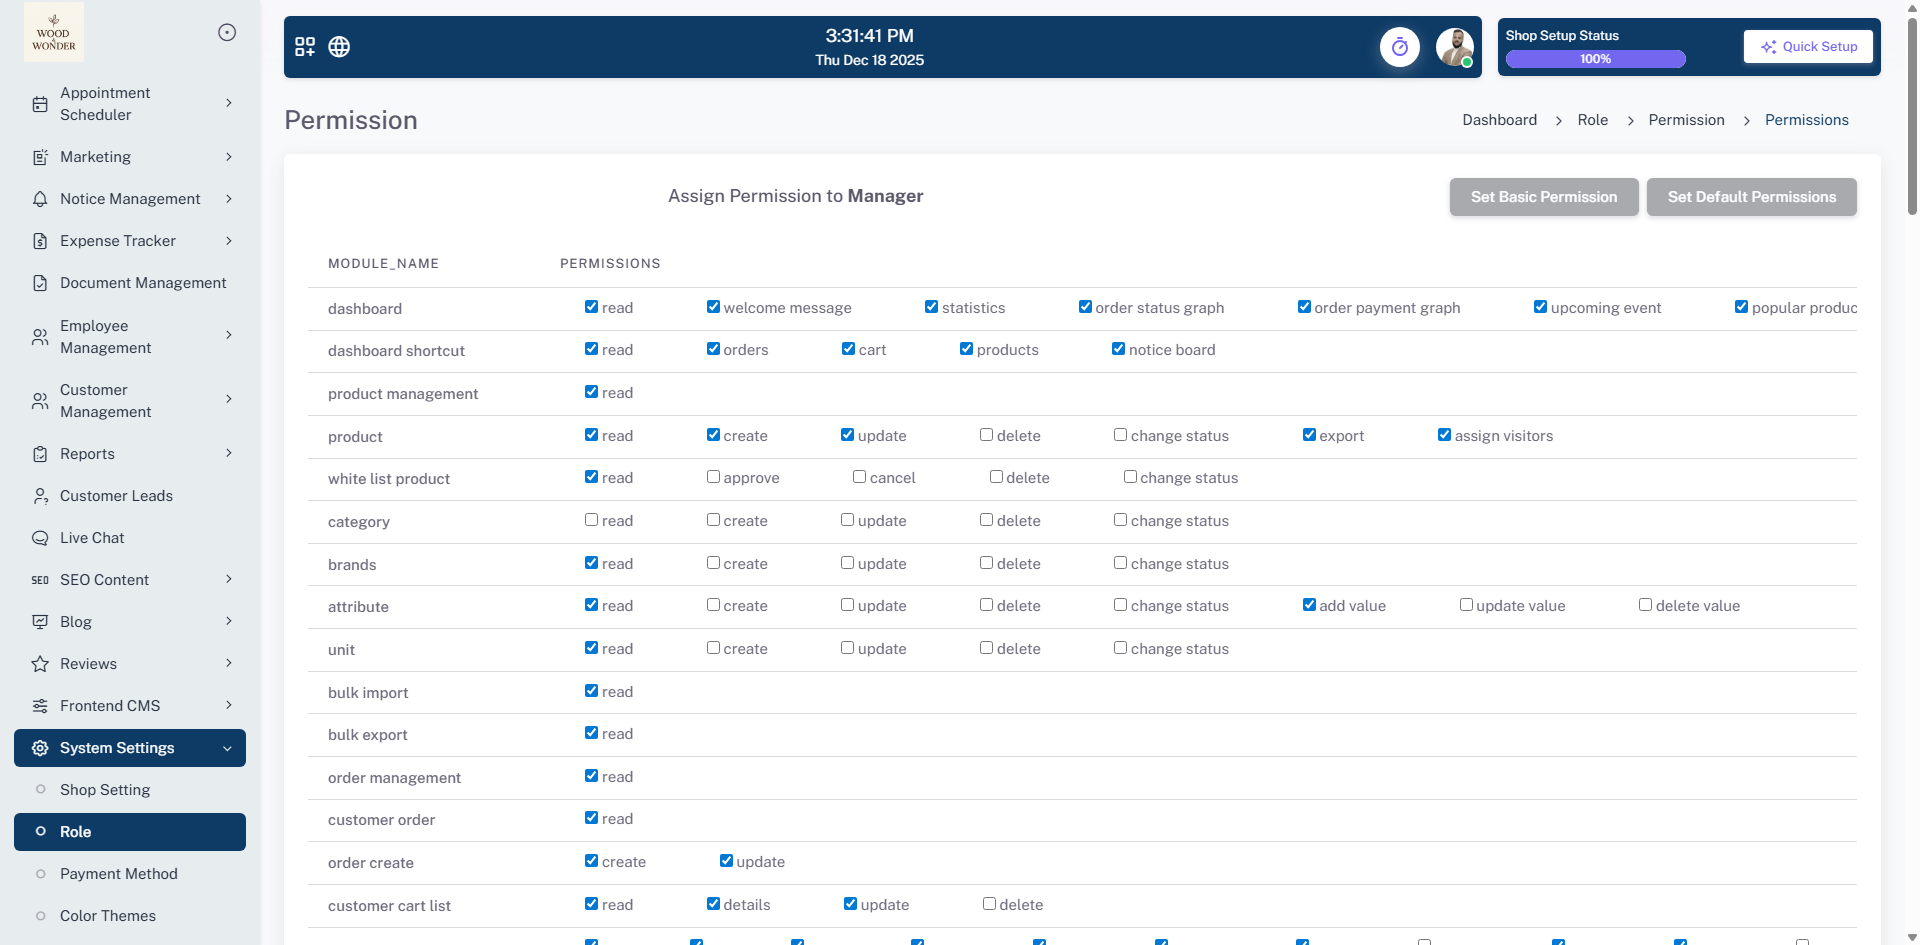
Role Permission
This page is part of the Role Permission module, allowing users to manage roles and access levels within the system through a structured interface that displays the role name, description, and current status. Users can efficiently edit or delete existing entries or use the "+ Add Role" button to open a pop-up form for creating new roles. Within the permission settings section, the interface features two specialized buttons—Basic Permission and Default Permission—which offer preset permission bundles for rapid configuration. These shortcuts allow for a quick setup by instantly applying standard access rights, ensuring consistency and saving time during the role assignment process.
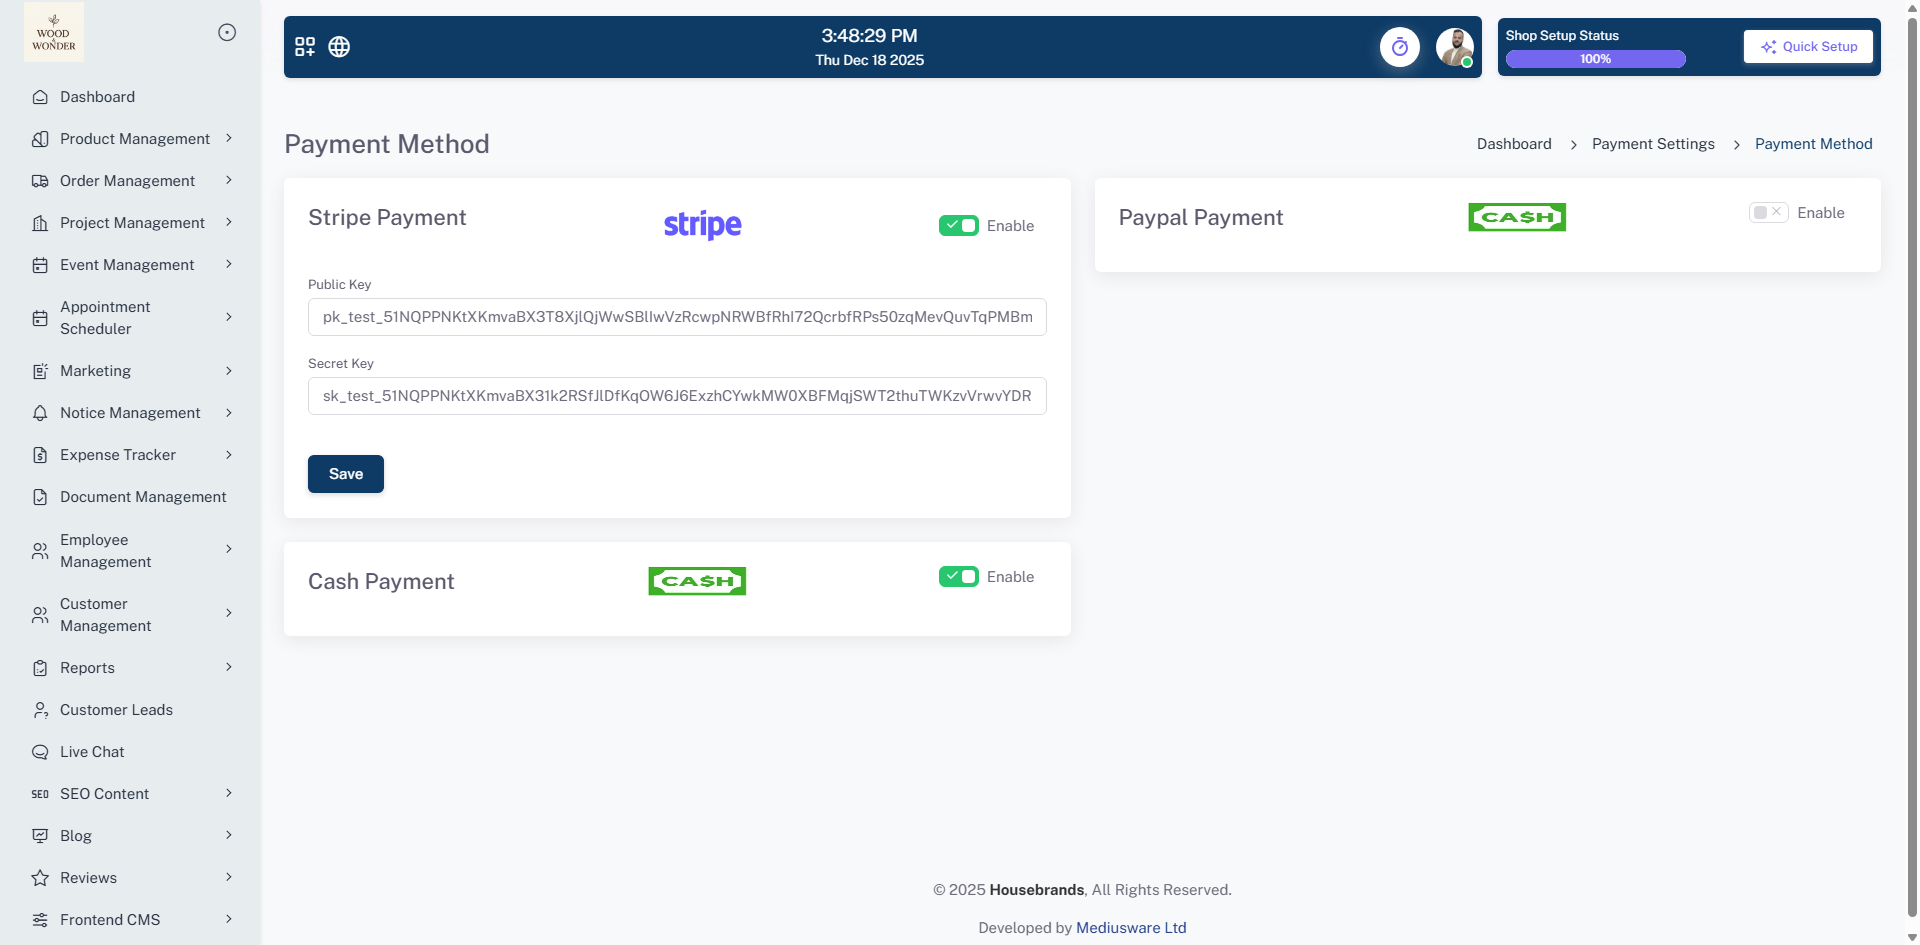
Payment Method
This page is part of the system settings section and is focused on configuring payment methods for the platform. It provides options for enabling and setting up Stripe, PayPal, and cash payments. The Stripe payment section requires a public key and a secret key, while the PayPal section requires a client ID and a client secret, along with an option to enable live mode. The cash payment option is also available with a simple enable/disable toggle. Each payment method has a save button to confirm any changes.
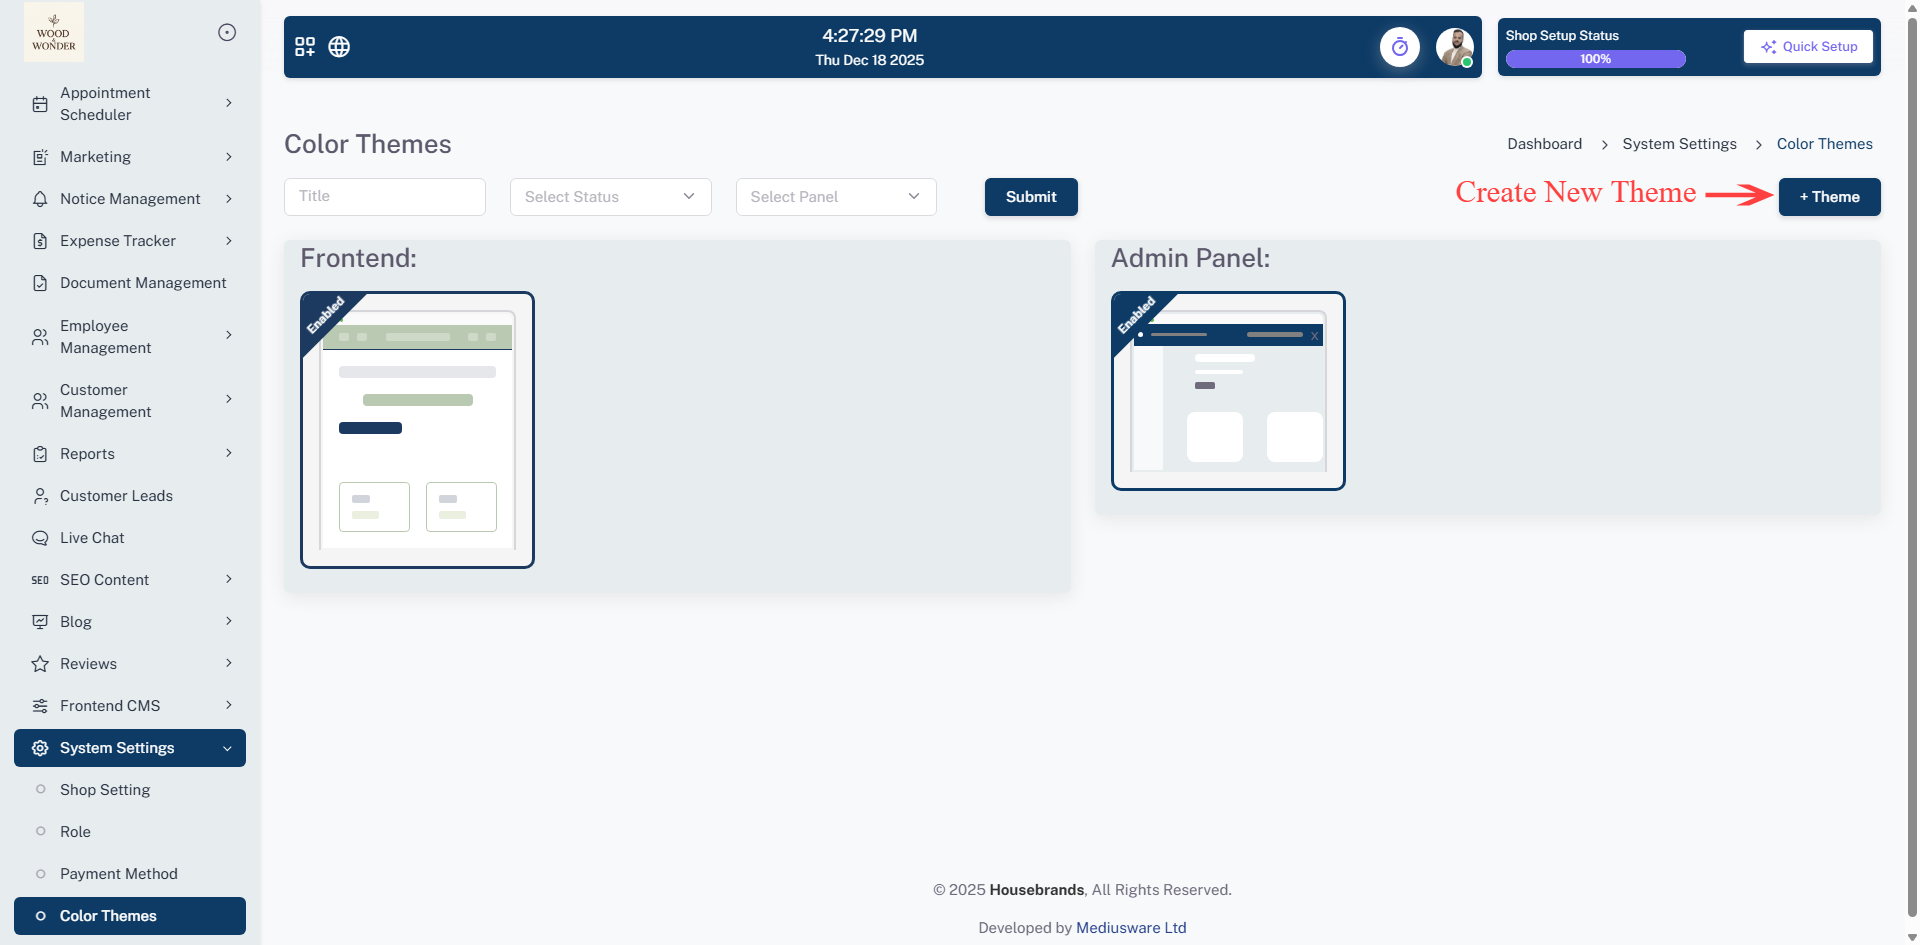
Colour theme
This page is part of the system settings section and is dedicated to managing color themes across the platform. Showcasing key attributes such as name, type, and status. Themes are categorized by their application area—either for the admin panel or the frontend—and can be toggled using the enable or disable settings. To navigate the list efficiently, users can search for themes or filter by status and type to find specific configurations quickly. Each entry includes action buttons for managing individual settings, ensuring full control over the platform's visual identity.
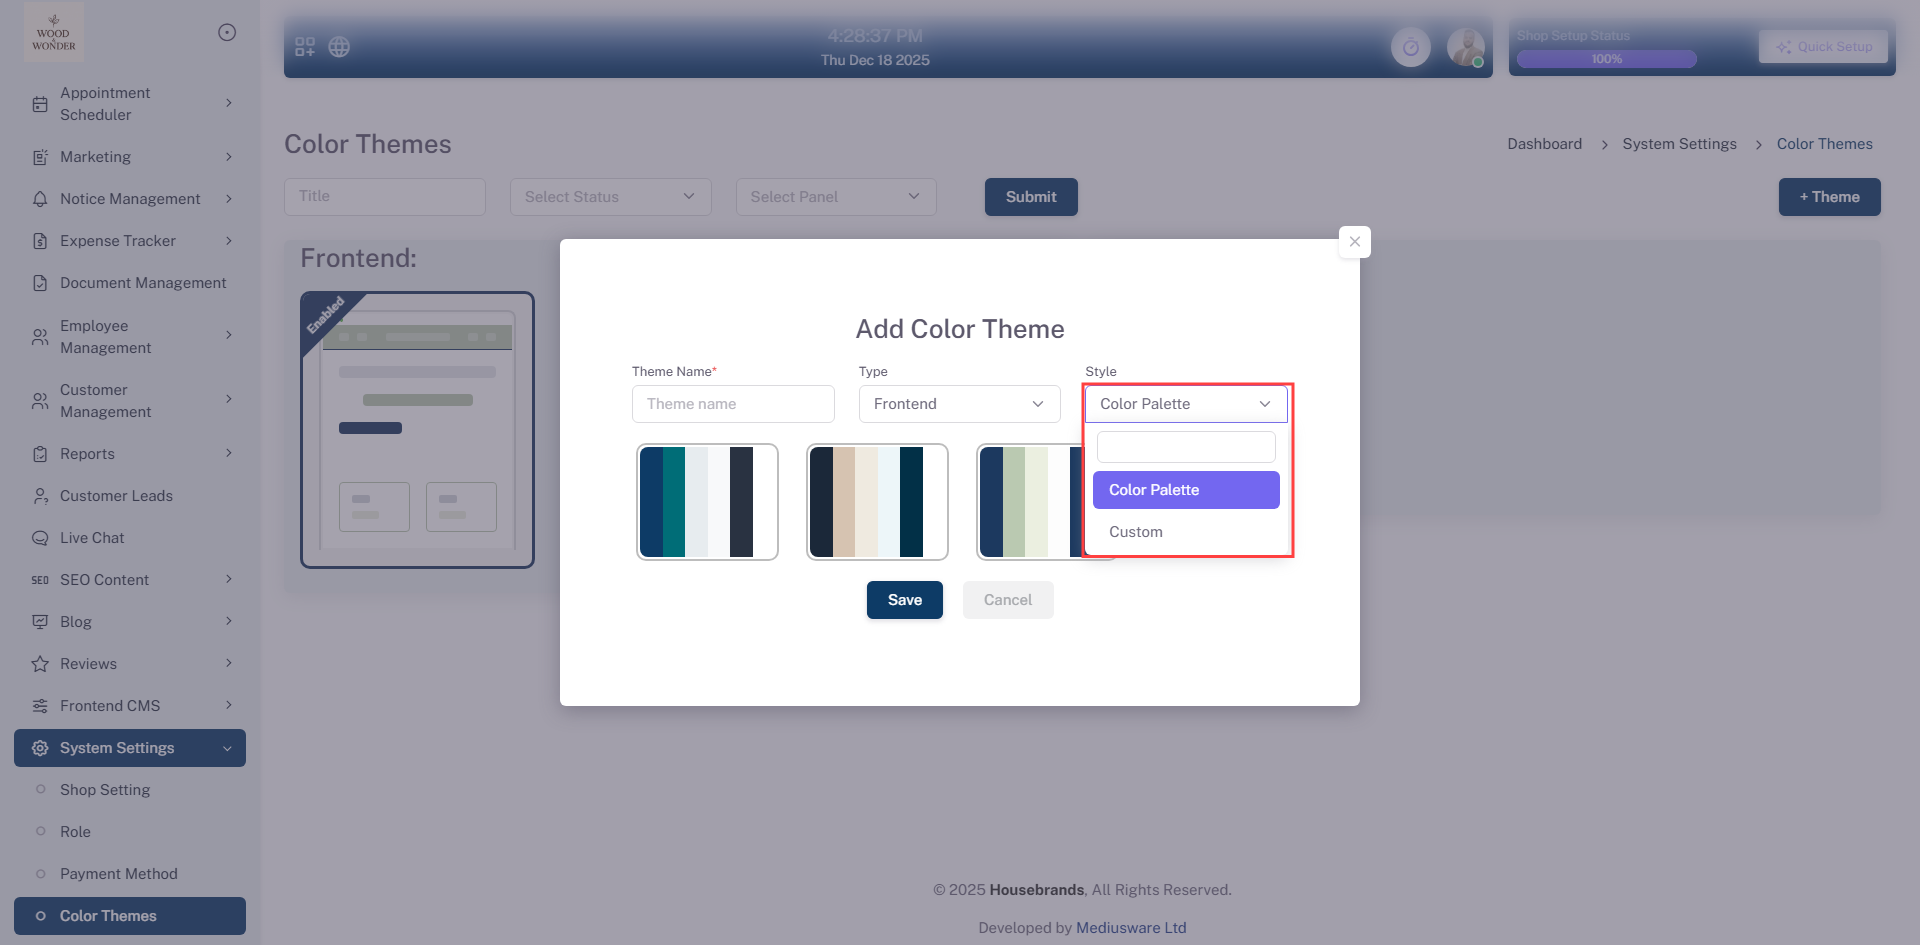
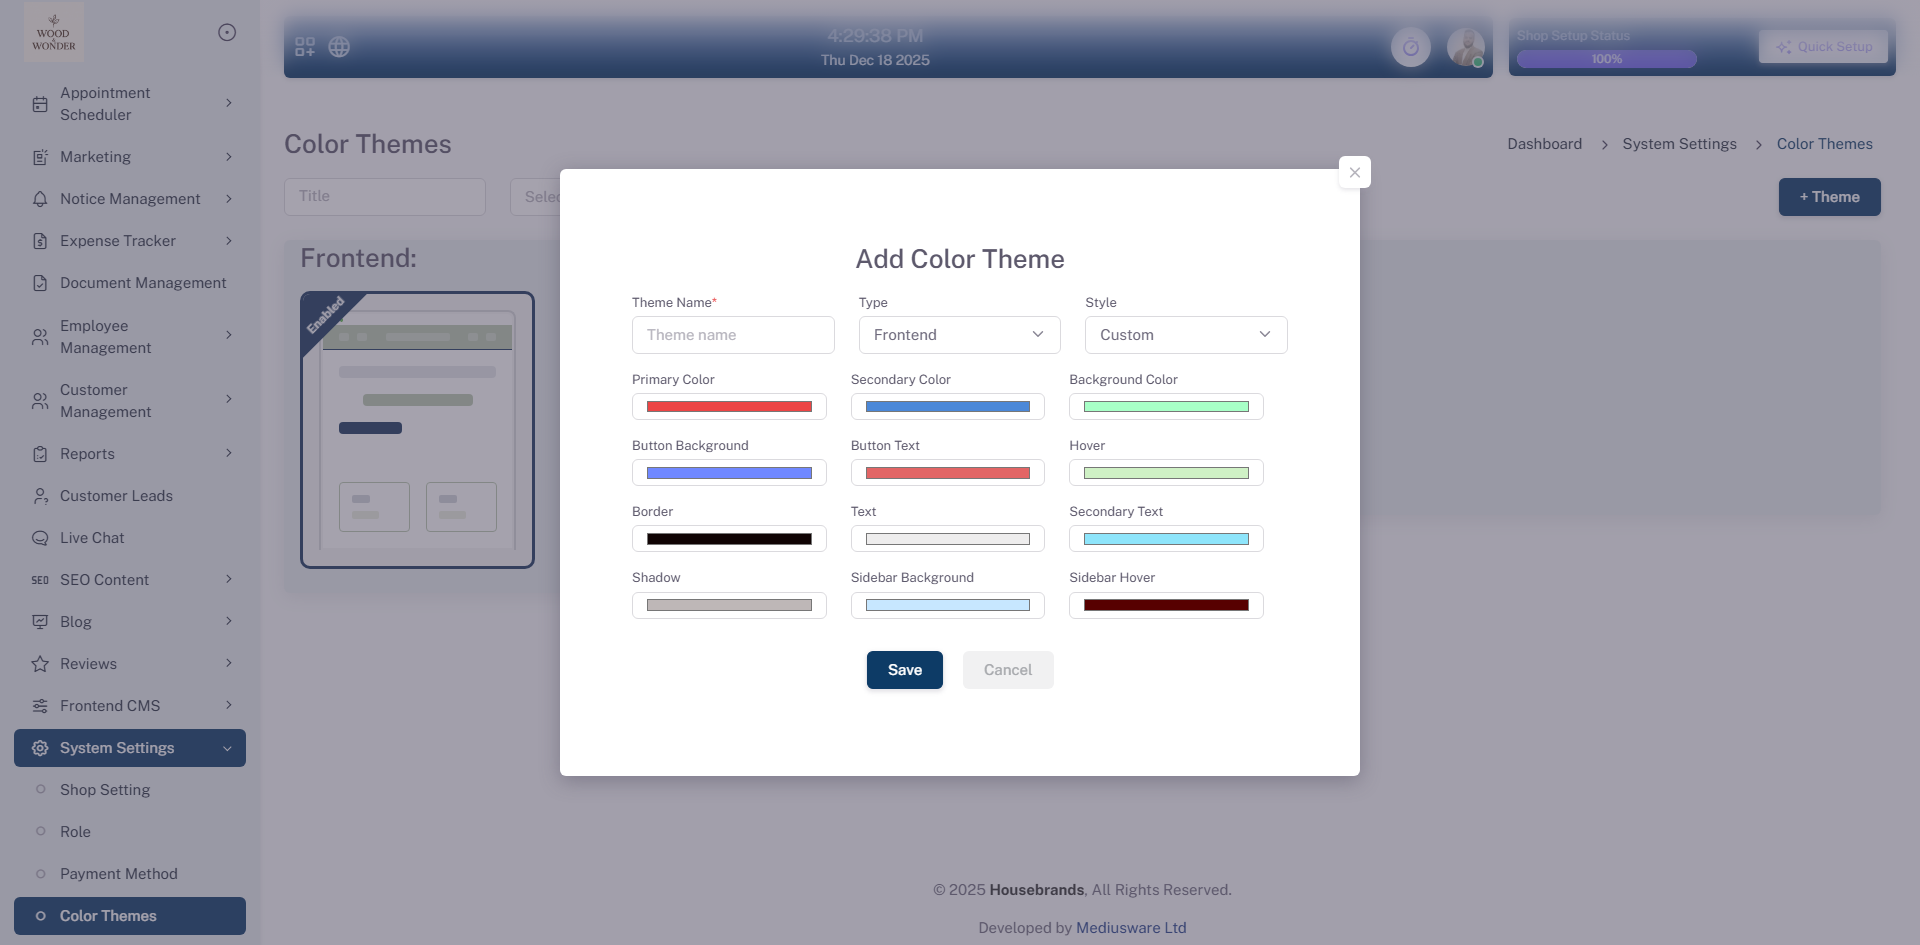
Administrators can introduce new visual styles using the "Add Theme" button. The system supports two distinct theme types: color palette and custom. The color palette option allows users to select from preset palettes for instant styling, while the custom option provides the flexibility to create your own color palette from scratch. This dual-type system ensures that users can either choose a professionally preset design for speed or exercise full creative control through a personalized setup.